I can’t believe how fast time has gone by! Little Baby K is about 2 months old now… with no handmade gifts from her Tante! Yes, I’ve been busy… but that’s no excuse not to whip up something fun for her… or several fun things!
When I was a baby, I loved the tags on stuffed animals. So much so that I would wear them out and my mom would need to stitch on replacement tags. True story. Since that time thirty-teen years ago, someone came up with the awesome idea of adding tags around a blanket. And, these little tag blankets are super easy (and super quick) to make. By using different kinds of tags and ribbon, it becomes a fun tactile blanket for the little one – and something that can easily be tossed into the wash when it gets dirty!
First things first – gathering supplies. I picked out some fun pink fabric, and all the coordinating ribbon I had – satin, grosgrain, even some actual tags.
I cut a double layer of the fabric into a 10″ square, then removed one layer. The layer that was left I placed right-side-up, and pinned folded bits of ribbon around the edges. I pinned the ribbon so that the folded edge was on the inside, and the two raw edges lined up with the edge of the fabric. The ribbon was cut all different lengths, I didn’t worry about keeping it consistent. I did make sure that they were small enough not to choke/strangle/harm Baby K in any way.
Once I had enough of the first ribbon, I added more “tags” with a second ribbon, and a third… and kept filling in until I was happy with the way it looked.
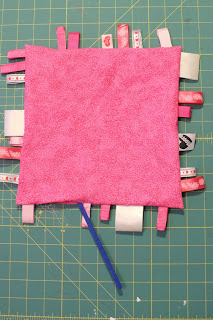
Important: I made sure to stay more than 1/4″ away from the corners, so that the tags wouldn’t get stuck in the seam allowance. Also, I left a “no tag zone” of about 3″ on one side… you can see it on the left, near the bottom.
I then put the other 10″ square back on top, right side down, and pinned a little.
I stitched all the way around, except for in my “no tag zone.” This will be the hole that I turn the project through. Before turning I clipped the corners close to the stitching. Most people just cut across, but I like to do a little “seagull” shape to reduce the bulk in the corners even more. When clipping the corners, you want to clip close… but not damage the stitching.
Using the hole left in the no tag zone, I turned the whole thing right side out. I used a turning tool to poke the corners out. A chopstick works well here, too.
I pressed all the edges down, tucking in the edge along the turning hole. I then top-stitched all the way around, about 1/8″ away from the edge, which closed the turning hole and gave the whole tagged blanket a nice, finished look.
Now I’m going to throw it in the washing machine with some free & clear detergent, so it is snuggly soft and ready for Baby K!
Until next time…


Thank you so much for this tutorial! I just started sewing and have always wanted to get one of these for my baby girl. Now she has one and it is even more special because I actually made it!!
What a sweet idea! I love this and I have tons of baby showers coming up so this will be perfect. Thanks!