


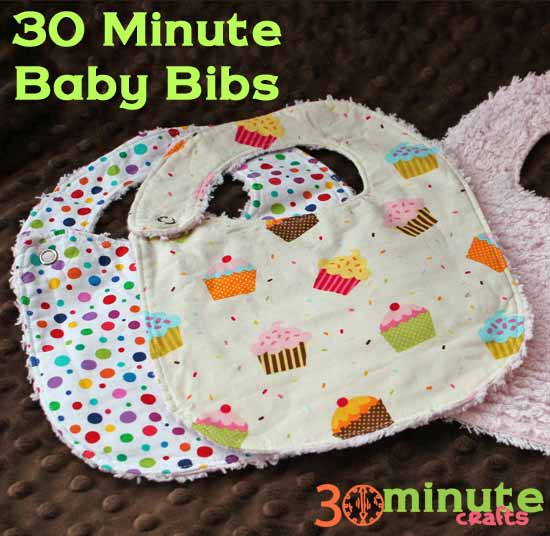
Bibs are an all-time handy must-have for every baby. And handmade bibs are a perfect baby shower gift. This is an easy baby bib that is simple to make, with no fancy applique or stitching. But it is still cute because of the printed fabric! And, they are reversible with the chenille side being extra-absorbent! If you want, you can use terrycloth instead of chenille for the backside of your easy baby bib. Your local fabric shop should have terrycloth you can use… but if they don’t, you can buy a towel. You’ll get several easy baby bibs out of a single towel.
Supplies for 30 Minute Easy Baby Bib:
2 fabrics (I used a cotton print and a chenille)
freezer paper
marker or pen
a couple pins
your iron and sewing machine
Snaps and snap tool (if you want to use velcro, check out the 30 Minute velcro bib)
To download the bib template, sign up for our free newsletter here:


Who knew that making a bib could be this easy? You can whip up an easy baby bib or two on the morning of a baby shower, and still have time to do hair and makeup before you go!


I love it when you post baby's stuff! I get tons of ideas of things to do for my little baby!!!
Cute. I never thought of making my own bibs when my girl was a baby. So easy and quick. Why didn't I think of that?! 🙂 These would make great baby shower gifts!
Super cute….loving the cupcake print. I need to get an apron in cupcake print.
These are very sweet… nice!
adorable Baby Bibs, looks cute, thanks for sharing your nice blog, its very helpful, im planning to make 3 or 4, gift for baby shower of my sister.. really nice idea, thanks for the tutorial….
I Love it, thanks for sharing
I have a question. Can you explain to me the purpose of using the freezer paper rather than just tracing the template onto the back of the fabric and just cutting it with scissors directly?
I don’t have freezer paper and don’t know if this is a necessary step.
These bibs look so cute.
Also, I have considered getting a snap tool myself. Do you recommend yours? Do you mind sharing where you got it?
Brooke M – great questions!
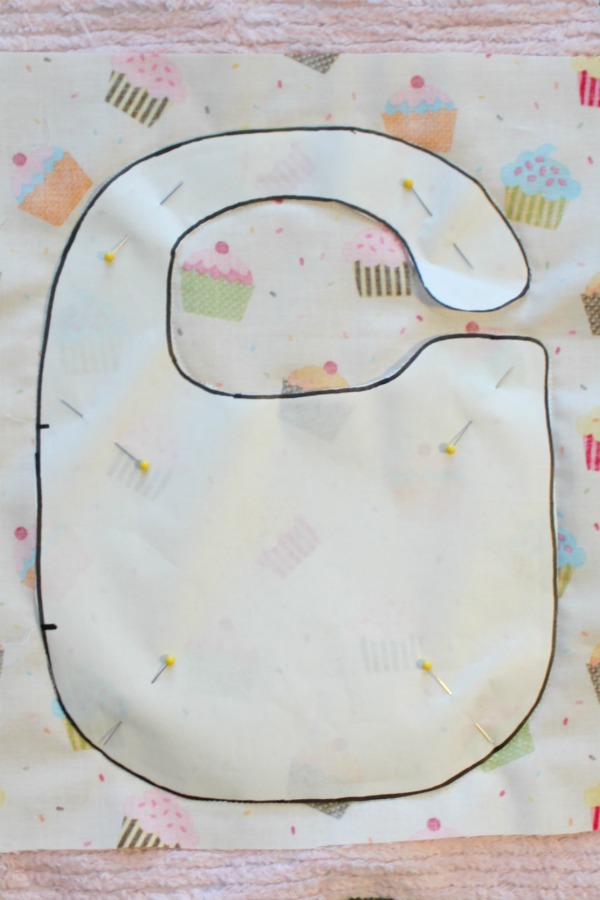
I like freezer paper because it irons on to the fabric to stay put a little better. You can make a template out of regular paper, and just pin it really well. With this project, I cut after sewing for a couple reasons.
First, there are a lot of curves in this bib. When sewing around those curves, the fabric can shift. It can shift so much that you’re not sewing through both layers of fabric if you already cut it out!
Second, when you have curves like this, you need to clip your seam allowance in the curved areas so that you don’t get bulky areas or puckers. Cutting with pinking shears is double-duty. It both cuts out your bib and clips the corners at the same time – making it a great time-saver!
Yes, I love this little snap tool. It is inexpensive and easy to use. Great for beginning sewers, but handy for experienced sewers who don’t want to invest in a heavy-duty snap maker.
is freezer paper different than parchment paper?
Yes. Parchment paper is like an un-waxy wax paper. Freezer paper has a plastic coating on one side. When you iron the plasticy side down, it temporarily adheres to the fabric.
I stumbled across this today whilst looking for home made gifts for a friend who is 6 months pregnant. I have to say, it was super simple to make and my finished one (so far) looks so cute! I found some cute fabric but I ended up buying a cheap white towel and using that for the back. I can’t wait to try some more of your 30 minute ideas!
NB – I’m not sure what the Australian equivalent to US freezer paper is but I cut the pattern out of baking paper, pinned it through both layers of fabric and then sewed just outside the edge of it. Worked a treat!
Thanks for this template – I’ve tried making a bib based on one we had, but didn’t make the band long enough so it’s too tight! I’ll try another with this template (and edit the first one to make it fit).
Can you tell me the name of that little snap tool please?
I’ve had several people ask me about this tool, so here is an amazon affiliate link that will take you to it:
Dritz Snap Fastener Attacher Kit – “Easy Attacher”
I’m also going to edit the post above to help any future searchers. 😀
Thank you! Just ordered one! 🙂
My mother printed out this pattern today and made my daughter’s baby girl about a dozen bibs to leave at my house. She was so excited about how easy it made the process. She already had the snap tool so she flew right through making some adorable bibs! Thanks for the info!
YAY! That makes me so happy! Thanks for sharing!
Now that is genius to cut further out at the opening! Why didn’t I think of that sooner! I always have such a hard time tucking in my edges when I am doing a seam like that – thanks for the idea!
I’ve been sewing since I was 6, and I think I figured this out at about age 30? But, better late than never, right? 😉
Glad I could help!
This is really amazing! I am so impressed on how you have done this. It looks so simple to make. This type of bibs are so cute and perfect for a baby shower gift. Great Job!
I think leaving a raggy raw edge might be cute too and even faster.
Great tips – thank you! I especially love the freezer paper idea and sewing before cutting out. Can’t wait to try!
I think this pattern is great wish I had these when I had my babies I used blankets all the time I was also wondering if the bibs can be made with cotton for t shirts it is very thin fabric and the inside could be just a piece of scrap cotton right