Quick Decorated Gift Box

Gift Boxes are a great way to wrap up a little gift. I keep boxes I get, and I like to dress them up before re-using them. Using Mod Podge to cover them with paper or fabric is quick and easy. So is this technique that adds a pop of color and texture with tissue paper!

This box is even more quick to put together because I found pre-cut tissue paper squares at the craft store! Sure, I could cut out individual squares from tissue paper myself, but that takes time. Making a craft quick and easy is often as simple as having just the right supplies close at hand. And, since this little box didn’t use up that many squares, I’ll have plenty more on hand for future projects!

To make the decorated gift box, I used Mod Podge, tissue paper squares, an old cardboard gift box (though you can find inexpensive ones at the craft store) and a paintbrush.
I put a generous coat of Mod Podge on the top and sides of the lid.
Then added a layer of my base color. In this case, white. I overlapped the squares a bit.
I kept adding more Mod Podge and layering more squares. I didn’t worry about letting the tissue paper dry between layers, and I didn’t worry about getting everything smooth – the wrinkles are part of the fun of this project. So is not worrying!
I added more colors, and let them overlap to get a fun stained-glass effect.
Once I finished the top, I repeated the process with the bottom of the box.
After I let it dry overnight, I had the perfect box for a fun spring gift! 
Another fun twist on this project would be to use Mod Podge Sparkle. Or, if I wanted to spend more than 15 minutes… I could use torn pieces of tissue paper for a little more “distressed” look.

Until Next Time!

Want more 30 minute crafts? Like 30 Minute Crafts on Facebook, Follow 30 Minute Crafts on Twitter, and check out 30 Minute Crafts on Pinterest.

Crafty Quickies Round Up

There is so much I want to pack into each day! Between building towers for the kiddo, laundry, errands, and the billion other little things that take up my time, it can be tough to find a little “me” time. And for me, “me” time is crafting time! That’s why I love these quick projects! Click on each image to see their great project… and make sure to come back tomorrow for more Crafty Quickies!

Mad in Crafts did a whole round-up of her own 15 minute projects. She has lots of great spring, Easter, and home decor ideas that you really must check out!

 Angie from the Country Chic Cottage is my partner all this week. We’re doing Crafty Quickies together. She made these great magnets for hanging artwork on the fridge.

There is another great magnet and artwork project at Belle Rose Designs. Hang artwork on any wall by turning a basic canvas into a stylish magnet board!

These flower clips from the Sewing Loft are great! I can envision so many different uses for them! from clipping together papers to upscale chip-clips… really, the uses are infinite!

And, if you missed my quick stenciled napkins post this morning, be sure to check that out as well!

And, if you have a Crafty Quickie of your own to share, make sure to link it up at the Crafty Quickie Linky!

Until Next Time!

Fast Stenciled Napkins

Normally, this blog is all about crafts that can be done in 30 minutes or less. But this week, I’m working with Angie from The Country Chic Cottage, and we’re upping the ante. This week, we’re doing Crafty Quickies, and every project here is going to be fifteen minutes or less. So that means, no matter how busy your day is, or how beautiful the weather is – you still have time to fit some crafty into your day!

Angie is sharing a fun fifteen minute creation on her blog each day… and we have several bloggers who will be posting their own Crafty Quickies. I’ll be sharing a round-up post each night so that you don’t miss a single minute of crafty goodness! And, if you have a Crafty Quickie of your own to share, make sure to link it up at the Crafty Quickie Linky!

Today I’m going to share these fast stenciled napkins with you. And yes, they can really be made in 15 minutes or less!

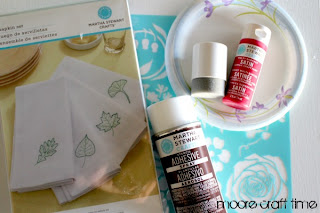
Start by gathering your supplies. I picked up these great napkins on clearance, you can find inexpensive napkins in the linen section of many discount clothing stores as well. Along with my napkins, I needed the stencil, stencil adhesive, fabric paint, pouncer, and a paper plate.
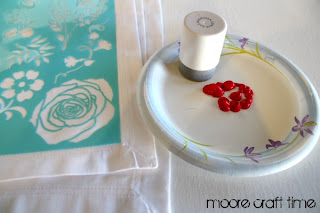
Spray the stencil adhesive on the back of the stencil. This stuff is awesome and will prevent the stencil from slipping or moving. And, it is re-positionable, so spraying once will last through all 4 napkins. While you’re waiting for the adhesive to dry, lay out your napkins to prepare them for stenciling, and squeeze some paint onto the paper plate.
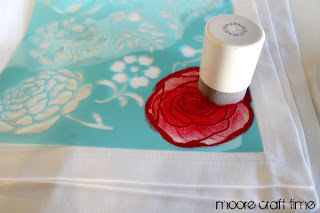
Lightly dip the pouncer into the paint, and then pounce over the stencil. Going in a couple light layers is better than being all goopy. You might think it takes more time, but if you make a mess, clean-up takes even more time!
A great trick here for when you move the stencil onto the next napkin – use the pouncer, without adding additional paint, to push the stencil down and adhere it to the fabric. Once it has been secured, add paint to the pouncer and start filling in the stencil with paint.
Keep moving the stencil to the next napkin, painting, moving and painting. It goes pretty quick!
… and in 15 minutes, you’ll have stylish napkins you made yourself!

Until Next Time!

Linked up at:
Today’s Creative Blog

Want more 30 minute crafts? Like 30 Minute Crafts on Facebook, Follow 30 Minute Crafts on Twitter, and check out 30 Minute Crafts on Pinterest.

Crafty Quickies Link Up!

Tomorrow we’ll be starting a whole week of “Crafty Quickies” – projects that can be completed in just 15 minutes! Angie from the Country Chic Cottage and I have created some Crafty Quickies of our own… and we’ve lined up some amazing bloggers who will be sharing fun 15 minute crafts… but we want you to join in on the fun as well!

Please link up your 15 minute project in the link-up below. This can be a link to a new or old tutorial, a link to an album in Flickr… any 15 minute project you’ve made!

Please grab the “Crafty Quickies” button and add it to your post so that others can join in on the fun!

St. Patty’s Day Printable

Did the St. Patty’s Day holiday sneak up on you? There is still time to add a little luck and some green to your decor! Head over to Lil’ Luna’s blog, print out this fun St. Patrick’s Day printable, and you’ll instantly add a little luck to your home!

Don’t you just love printables!? I feel so “lucky” to have found this one!

Until Next Time,

Crafty Quickies – 15 Minute Projects Made by YOU!

March 26-30, 2012

I’m so excited to share with you a fun feature that I’m doing with Angie from The Country Chic Cottage! Angie is also the mastermind behind One Month to Win It. Both are amazing blogs, and you should check them out when you have time!

Speaking of time… that’s what this feature is all about! Angie and I are putting together a week of posts on 15 minute crafts called “Crafty Quickies”! Here at Moore Craft Time, I’m all about getting your craft on and movin’ on in 30 minutes or less… Angie and I thought we’d kick that up a notch by offering a week of crafts that can be done in just 15 minutes! We’re looking for crafty bloggers who would like to be featured during the week of March 26-30th… and we’ll be offering a link-up so that we can include as many awesome crafty quickies in this week of fun, fast, furious crafting!

Send me a note at carolina@carolinamoore.com with your blog name, what kind of craft you have in mind, and what date during the week of March 26th you’d prefer to post, and I’ll get back to you within 24 hours… I can’t wait to see what everyone comes up with!

Oh, and feel free to grab a button to share these Crafty Quickies, just snag the code in the box and paste it on your blog:

Pin It

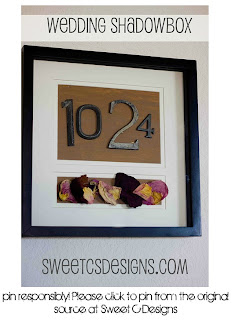
Simple Wedding Date Shadowbox from Sweet C Designs

My wedding is a day that has so many awesome memories tied to it. Family and friends all joining us to celebrate the love that hubby and I share. Pretty awesome stuff. I love this simple way that Sweet C Designs chose to commemorate her day… and incorporate some of the petals from her wedding flowers as well. You’ll never guess what she used to create this wedding date shadow box! Head on over to Sweet C designs to get all the details…

Quick Easter Wreath with Eggs and Raffia from Madigan Made

You could make this wreath in 30 minutes of less if you left out the spray-painting portion of the awesome easter wreath tutorial at Madigan Made. Just gather up similar-colored eggs, or use a fun rainbow of color with the plastic kind you can pick up at the store! You’ll be ready for the Easter Bunny to come hoppin’ along in no time!

Want more 30 minute crafts? Like 30 Minute Crafts on Facebook, Follow 30 Minute Crafts on Twitter, and check out 30 Minute Crafts on Pinterest.

Vegas Valentine’s Day Card

When the hubs and I got married, we decided to have a little fun with our wedding… our wedding favors were custom decks of cards, instead of numbering all the tables – we named each after a card game, and we sprinkled each table with chocolate poker chips. Is it any wonder that within 6 months we were living in Vegas?

One of the best quotes I came across during that time was, “Love is a game that two can play – and both win!” I created this Valentine’s Day card with that fun-loving spirit in mind.

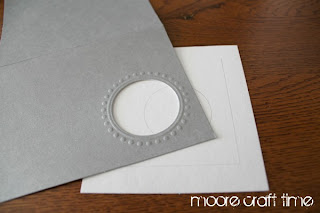
You can make this same card with just a few supplies from the craft supply store. I used some 3-D scrapbooking stickers, a card with a hole pre-punched out of the front, some glittery scrapbook paper, and markers and pens for writing on the card.
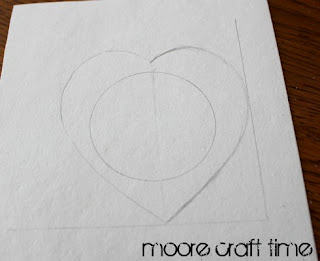
I traced the size of the circle and the edges of the card on the back of the glittery scrapbook paper. I made sure to trace the edges of the card because I didn’t want the heart to extend past the edge of the card.
I then drew a heart bigger than the circle, but inside the margins of the card.
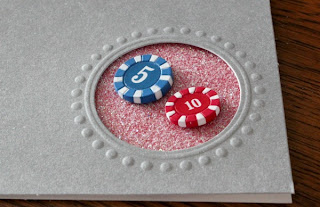
I used double-stick tape to stick it to the inside of the card, making sure that it completely covered the area under the hole.
I then picked out a couple of the poker chip stickers, and put them on top of the heart, making sure that they poked through the hole on the front of the card.
Then, time for my “clever” saying. On the front, I chose the simple “Valentine…”
And on the inside – “my heart is ALL IN!”

Quick, simple, and fun for Valentine’s Day!

If you want to see another fun Vegas-inspired Valentine’s Day project, check out my Valentine Roulette Wheel Centerpiece over at Vegas Bloggers!

Until Next Time…


I Only Have Ice for You – Ice Cube Tray

I’m loving the dollar section at Target for quick and easy holiday craft supplies! I saw this heart-shaped ice cube tray, and knew that with a little corny humor, it would make a great Valentine’s gift! Even better – these trays come two-to-a-pack, so you can whip up a stack of these as Teacher’s gifts, or for you gal pals! Because with a little corny twist “I only have eyes for you” becomes “I only have ice for you!”

The process takes about 10 minutes, depending on your lettering skills.

I started by collecting my supplies – paper cutter, scallop-edged scissors, markers, and Valentine-y papers.
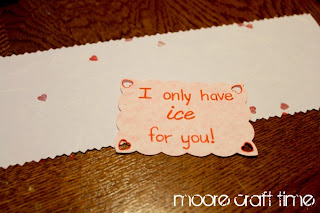
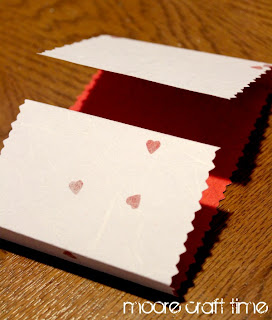
I cut a strip the length of the paper, and a smaller rectangle. I trimmed both with decorative scissors, and wrote “I only have ice for you” on the smaller piece.
I scored and folded the larger piece. The tray is about 5″ wide and 1/2″ tall, so the perfect size for the sheet of paper.
I wrapped it around the tray, taped the back, and attached the wording… DONE!

Until Next Time…