Quick and Easy Solar Light Jar

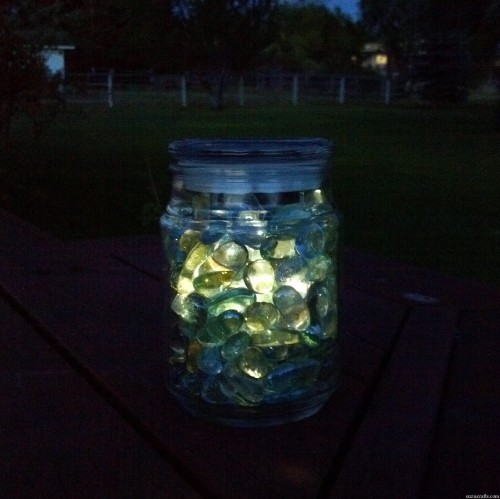
I love taking a few simple supplies, and re-imagining them into something completely different. That is exactly what was done here with the solar light jar. A solar light has been completely converted into a jar that would look great as part of a picnic or BBQ tablescape. Simple, but elegant lighting with the benefit of being solar powered!

solar light jar - suzis crafts

You’ll want to pin this project so that you make several for your summer picnics and outdoor eating events… just make sure you pin from the original source!

Quick Spraypainted Votive Vase

Spraypaint is such a quick way to transform an item. It adds color to any decor item, which can completely transform the look of the piece. You can make something matte that was normally gloss, and vice versa. And there are all kinds of fun techniques you can use with spray paint to get different effects. Like with this votive vase.  A dollar store vase becomes a great candle holder in just a few minutes!

DIY Dollar Store Vase - Eclectically Vintage

This project just begs to be pinned. Make sure you click through to the original source and pin from there.

Floral Napkin Ties

Want a quick way to dress up a table for brunch? Expecting guests for a weekend brunch? Or maybe you’re having family over for a meal and you’d like a quick way to dress up the table… these floral napkin ties can be done quickly, and are easy to personalize. You can put your own monogram in them, or the initial of each of your guests. If you’re looking for a fun conversation starter, you can give each person an animal or symbol in the center of their flower, and each person can share why the picture does or does not apply to them.

Napkin Ties simply belle blog

There are so many ways to personalize this craft, you’ll want to pin it so that you can try some of these ideas… but make sure you click through to the original source and pin from there.

Felt Zipper Bag

I love quick and easy zipper bags. This zipper bag is a fun take on a little zippered tote because it uses FELT! I love this quick little tote… and have plans for some felt bags of my own, and little zippered bags would be perfect to toss in a felt bag – or any bag. I firmly believe that there is no such thing as too many zippered pouches… and am constantly testing that theory by making more!

Felt zipper pouch - the sewing loft

You’ll want to pin this for the next time you’re close to the sewing machine. Just be sure to pin from the original source.

Quick and Pretty Flower Head Pins

Do you know someone who collects pincushions, and needs pretty pins to put in them? Or maybe you have a pincushion of your own that could use a little touch of springtime? These flower-head pins are simple to make and oh-so-pretty! You can make them in whatever colors you like, and you can make different flower shapes as well. Learn how to make your own flower head pins.

Flower head pin - Craft Test Dummies

This project is uber pinable. But before you pin it, please make sure to click through to the original source.

Sixty Second Giant Pom Pom

This is crazy awesome. Seriously, how have I lived this long without learning this technique. I need to stop writing immediately and go buy yarn so that I can make myself a pile of giant sixty second pom poms. In minutes. No crazy templates. No wrapping and wrapping yarn around cardboard. Just extreme pom pom satisfaction. This is the bon bon of crafts. Tiny commitment, awesome pleasure. Really, I don’t know why you’re still reading about my love for these, and not learning how to make them yourself!

sixty second giant pom pom from handmade charlotte

Pin this. Your friends will thank you. Especially if you pin from the original source.

Sea Glass Wine Charm

Here in Vegas, it has been 60 degrees and sunny, and I’ve been dreaming of beach weather. Sticking my feet into the blistering sand and then rinsing them off in the cold waves. But I can’t pick up and leave to see the ocean. I have to be a little more responsible – and unfortunately that doesn’t include packing up the kiddos for an impromptu road tirp!

You an make a “matching” set of these wire-wrapped sea glass coasters to bring the outdoors in for your next party. Or you could similarly hued pieces of glass, and make a set that reminds you of our days on the beach. And wire wrapping isn’t a crazy-complex technique…
Wire Wrapped Sea Glass Charms - Creativity in Pieces

I’m sure you’e getting ready to pin this post. Please remember to click through to the original source before pinning.

There is a Yottle in my Bottle – Dr Seuss Craft

DrSeuss Yottle in my Bottle

For so many of us, Dr. Seuss books were a big part of our childhood. Bedtime stories. Some of the first books we read on our own. The bright colors, whimsical illustrations, and fun words attract kids. Dr. Seuss’s birthday is this weekend, so I decided to celebrate with a fun (and quick) craft from his book “There’s a Wocket in my Pocket.” And I whipped up a printable for you to use to make your own!

Supplies:Yottle in Bottle Supplies

  • Orange Felt (I used Heather Bailey’s “Marigold”)
  • White Felt
  • Ribbon of your choice
  • Stripey paper straw
  • Starbucks Frappachino bottle (large size)
  • Goo Gone or other adhesive remover.
  • Printable iron-on transfer sheet with Yottle in bottle printed on it.
  • HeatNBond Ultra
  • Iron
  • Sharp Scissors

Start by washing out the Starbucks frappachino bottle. Peel off the label and rub with the adhesive remover to get all the adhesive off. Set aside to dry.

Fold the Yottle image (which has been printed onto printable iron-on transfer paper) in half and cut around.

Iron the HeatNBond on one side of the orange felt (do NOT remove the paper yet). Unfold the Yottle image and iron on to the other side (do NOT remove the paper yet).

iron yottle onto felt

Rough cut around the Yottle. Cut close to the mouth on both sides. Remove the paper on the Heat N Bond side ONLY.
Trim one side of the paper straw so that about 1.5-2″ is a single layer about 1/4″ wide. Fold the Yottle back in half, with the HeatNBond on the inside. Insert the trimmed end of the straw so that the trimmed end is inside the Yottle and the straw is pointing out of the mouth.

Insert straw in yottle

Cut around the Yottle, as close as you’d like, paying attention to the alignment of the images on both sides. Peel off the paper.

peel paper off yottle

Insert the Yottle into the Bottle.

insert yottle in bottle

Cut out the label from the iron-on printable. Fuse onto the white felt, trim, add a hole, and tie to the top of the bottle.

DIY Seuss Yottle in Bottle

You are now the proud owner of a Bottled Yottle!

A bunch of friends and I are doing projects to celebrate Dr. Seuss’s Birthday… check out these other fun Seuss-inspired crafts!

Amazon Gift Card Giveaway!

Who doesn’t love a giveaway? And who doesn’t love to buy stuff on Amazon? Well, if you know such a person, do not tell them about this giveaway, ‘cuz they are going to hate it! But YOU are going to love it… because one lucky winner is getting $225 to spend at Amazon!
This giveaway is being brought to you by some of my favorite blogging buddies. Be sure to pop by their sites to say hi and check out what these gals have going on. Because they’ve got lots of good stuff going on!
 
Entering is super easy. Just leave a comment on this blog and earn extra entries by following these awesomesauce bloggers on Facebook, Twitter or Pinterest. Good Luck!

a Rafflecopter giveaway


Easy Ribbon Shamrock Pins

These ribbon shamrocks are super easy to make! Whip up a couple now, and stash some in your glovebox, your purse, and your kid’s backpack. This way you won’t be caught unawares on St. Patty’s day, and have to resort to the color of your underwear to avoid the dreaded pinch (what bully decided on that cruel way to celebrate the holiday, anyway?)! You can attach these to safety pins, bobby pins, or glue them just about anywhere! You’ll end up needing several rolls of green ribbon for this project – you won’t be able to stop making these cute shamrocks!child made tutorials - ribbon shamrock

You’ll want to pin this project to share the idea with all your Pinterest friends, and so that you can remember this project year after year – just remember to click through to the original source and pin from there.