Make a pillow toy from any image!

any picture becomes a pillow toy

My preschooler has a couple favorite shows. Which I don’t mind, because kids TV nowadays is educational while entertaining. He has mighty math powers from Team UmiZoomi, Special Agent Oso has taught him to break big jobs down into multiple steps, and Jake and the Neverland Pirates teaches him the value of working as a team.

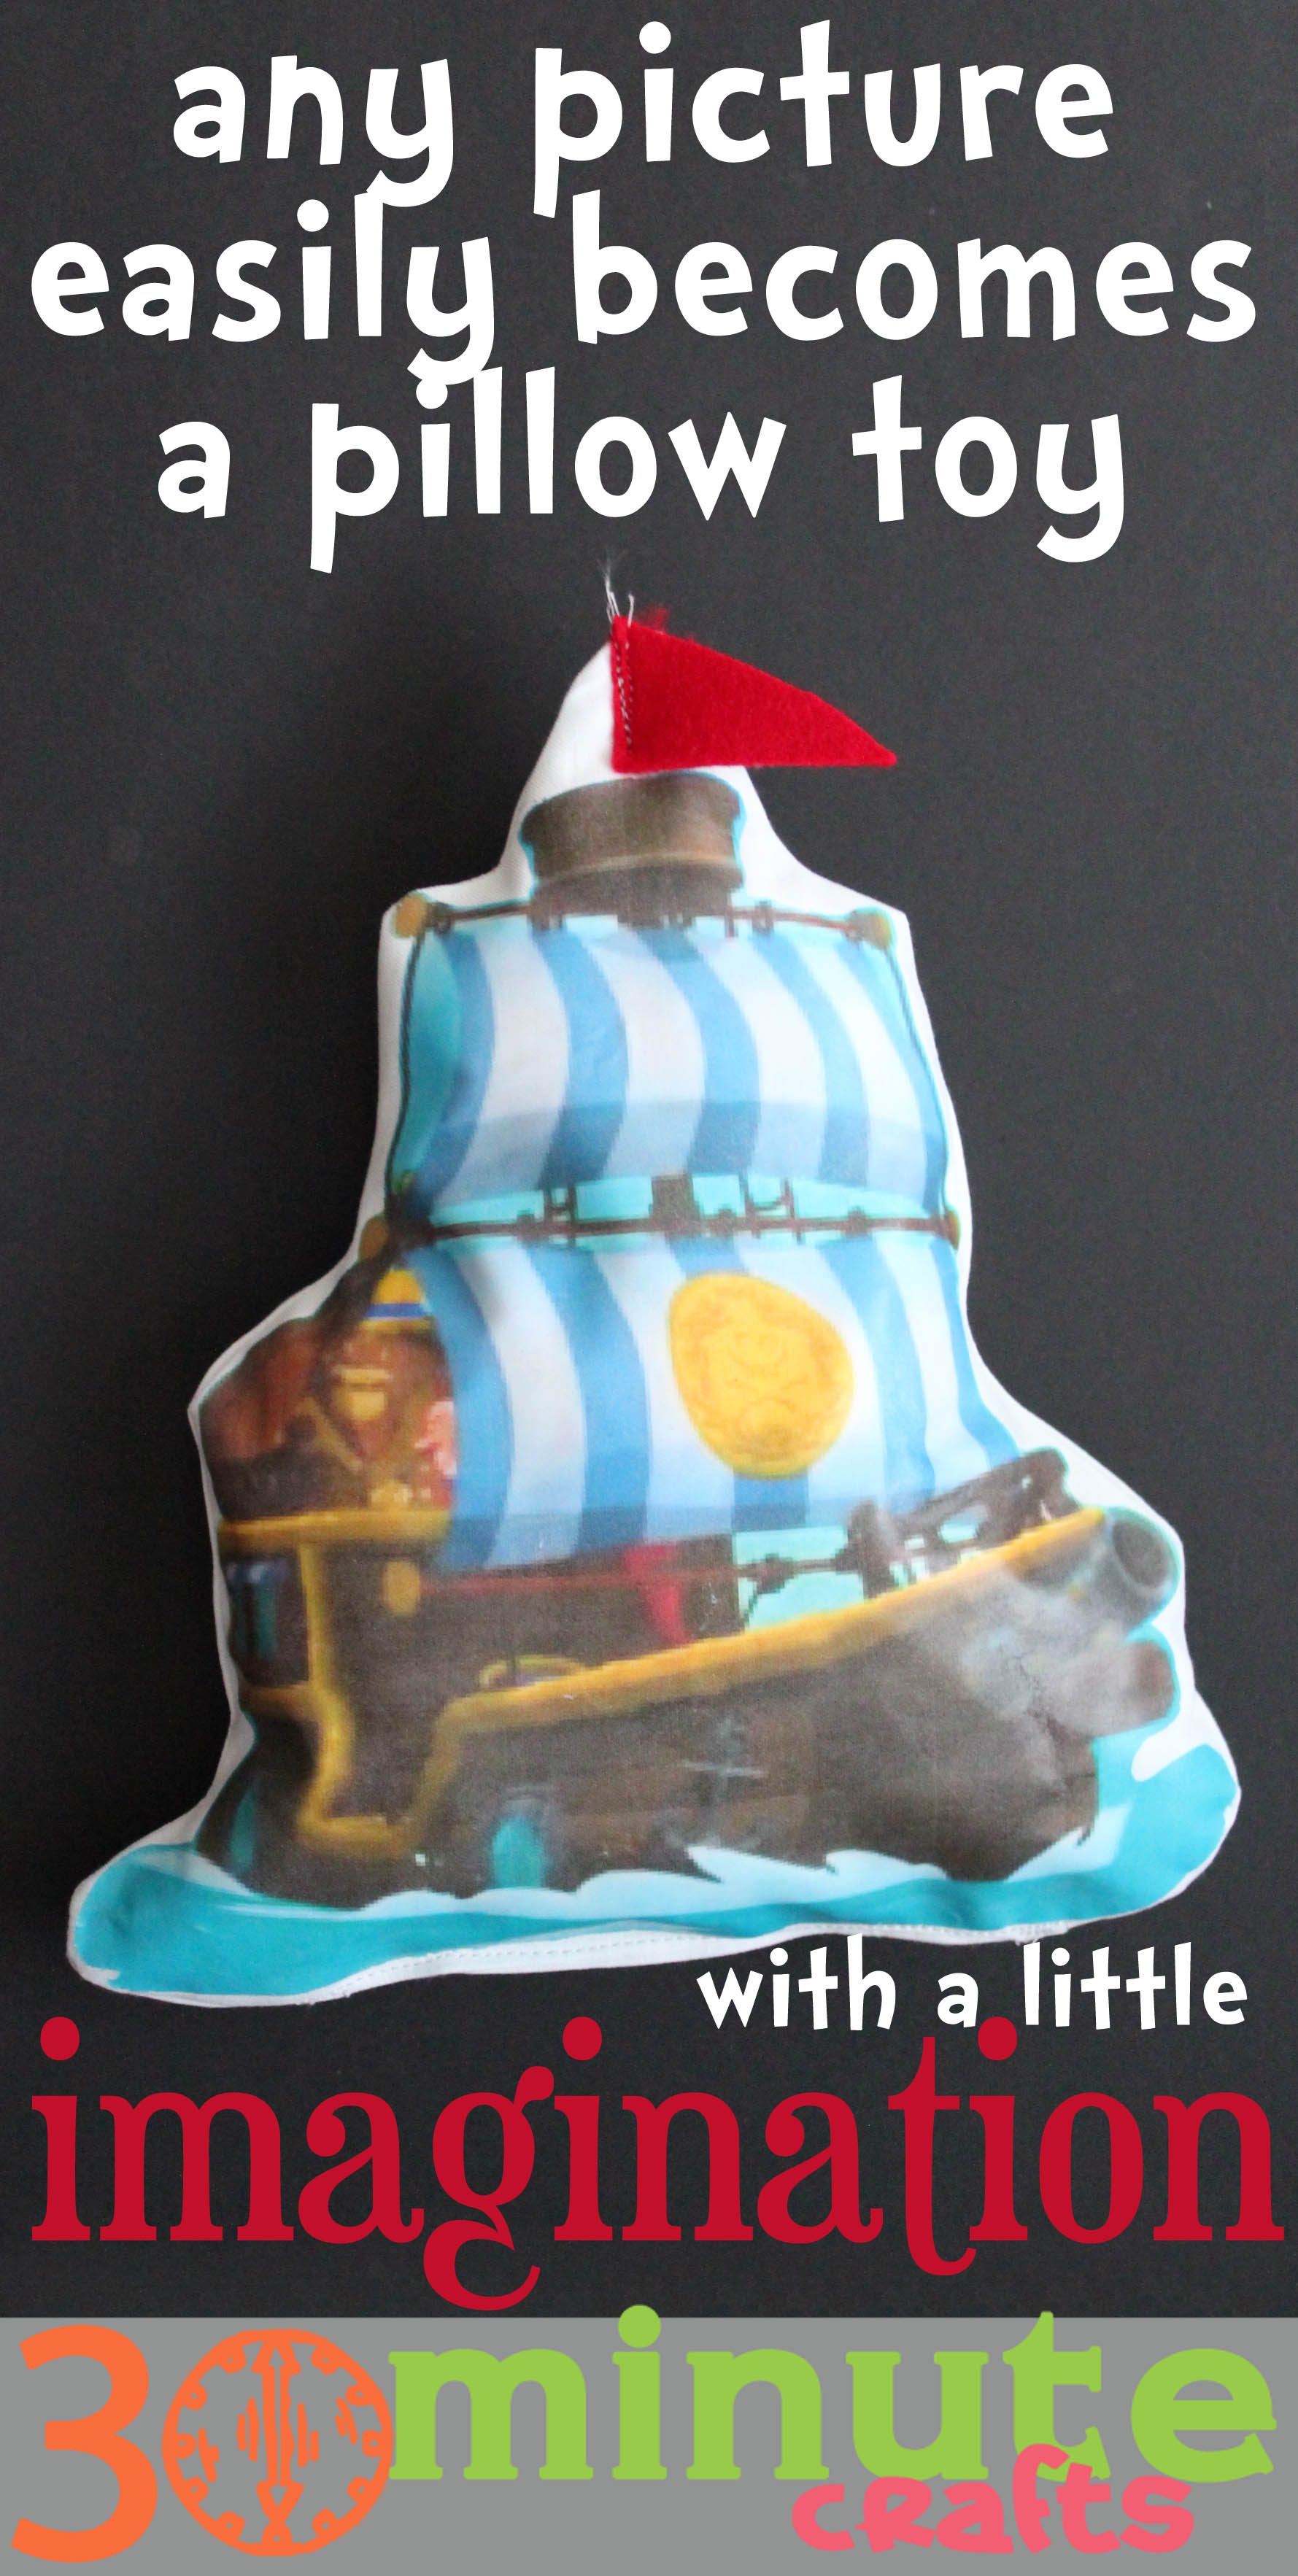
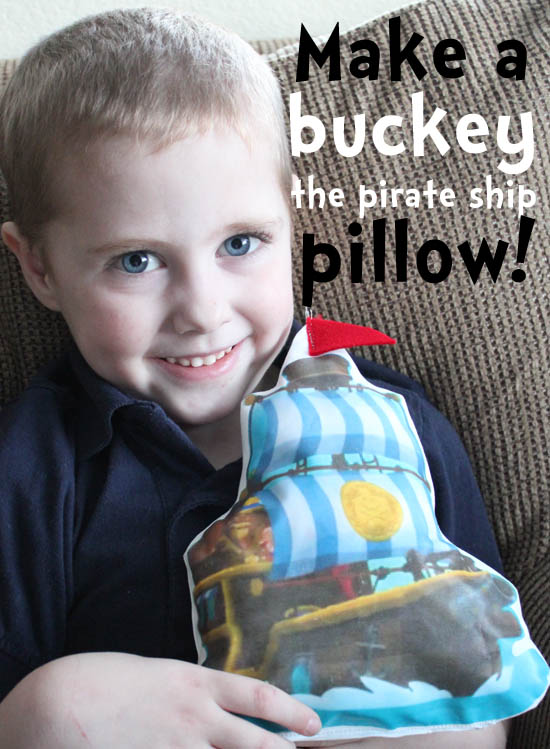
A few weeks ago, he told me that he wanted a Buckey pillow. Being a crafter and knowing how to sew, I figured that I could whip up a quick pillow for him with just a few supplies…

Supplies:
Plain Fabric (I used a Kona Cotton, I think this is Ivory)
Printable iron-on t-shirt transfer
Stuffing (like Polyfill)
Scrap of felt
Iron
Scissors
Sewing Machine

Making the stuffed toy is super easy.

steps to make your own pillow shape

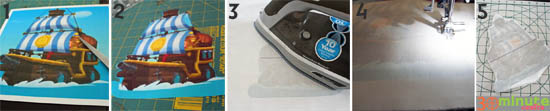
1. I searched around online to find an image I liked of Buckey the Pirate Ship, and printed it onto the printable transfer paper. Important to note – if there is any writing on the image you pick, you’ll want to reverse it before printing.

2. Cut out the transfer pretty close to the shape of the ship.

3. Iron the transfer onto the white cotton fabric as directed on the transfer packaging.

4. Leave the paper covering the transfer, and cover with a second piece of fabric about the same size. Stitch all the way around the transfer, following the shape of the ship, leaving a hole of about 3″ at the bottom for turning.

5. Trim all the way around the shape, clipping any curves as needed. Turn right side out. The transfer may crinkle a little in turning, that’s fine. Once the pillow is right-side out, press again to fix any wrinkles in the transfer.

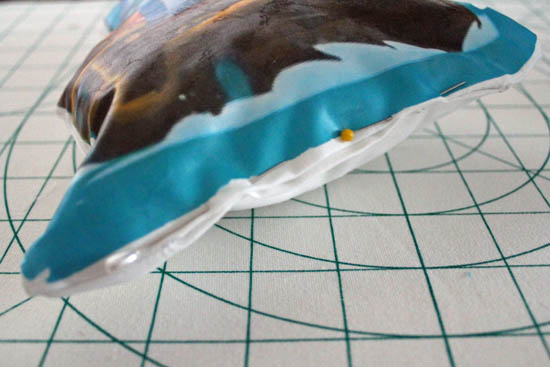
Now you can peel off the paper and stuff the pirate pillow! After stuffing, I pinned the hole at the bottom, and just stitched it up with my sewing machine. If you have more time, you can use a needle and thread and a blind stitch… but I had an impatient 4-year-old…

pin pillow on bottom

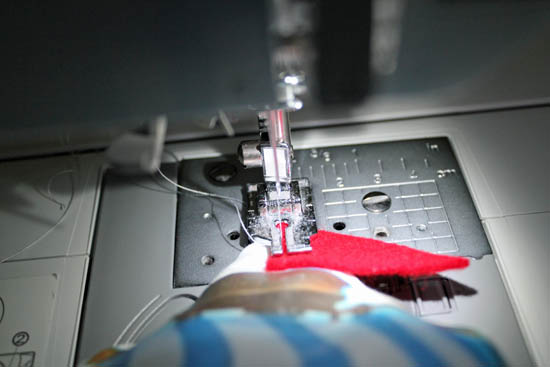
I did want to give it an extra touch, so I cut a triangle out of some scrap felt and stitched through all the layers with the sewing machine to add it to the top.

stitch on felt flag

My son has slept with this pillow just about every night since we made him. Buckey even gets tucked in and gets a kiss goodnight!

make a buckey the pirate ship pillow

Which makes me the best mom ever… with just 30 minutes of work!

thanks for the buckey pillow mom!

Make Washi Tape Flags

how to make washi tape flags

Make any food more special by putting a little washi tape flag in it! These washi tape flags are super easy to make, and you can whip up several in just a couple minutes. You can switch up your flags for different holidays or special occasions by using different washi tape… there are so many different colors and designs to choose from!

Supplies:
Washi Tape
Toothpicks
Scissors

make washi tape flags

Start by wrapping washi tape around one end of each toothpick. Make sure the sticky sides line up, and stick them together.

trim flags

Trim the end into a little “V” shape, and insert into the food of your choice… from breakfast to dessert, the possibilities are endless.

ps: this is a photo from my Valentine’s Breakfast

25 Quick Valentine’s Day Crafts

25 Quick Valentine's Day Craft Ideas

With Valentine’s Day nearly here, if you haven’t finished your hearts-and-flowers crafting (or even started!), you still have time! Here are 25 Valentine Crafting ideas that each take 30 minutes or less to make! Pick some to work on today, one to try tomorrow morning… and enjoy your Valentine’s Day!


Valentine’s Day Suckers

Valentine, I'm a sucker for you

My son and I are working on Valentines for his preschool class. For Valentine’s Day I love both candy and corny sayings. And these Valentine’s Day Suckers are great for gifting around Valentine’s Day! This little “Valentine, I’m a sucker for you” printable has that covered. You can print and cut them and either punch a hole in one end to tie the label to the lollypop stick, or you can use washi tape like I did to stick it to the sucker.

cut printables and washi tape

You can get this Valentine’s Day Suckers printable tag … I have it all set up for you as a PDF if you’d like to download it and whip up your own Valentines! Just sign up for our email list, and we’ll send you a link to the file download:


FREE Valentine’s Printables
Sign up for our email list to get access to the free Valentine’s Printable files!
You’ve successfully signed up! Check your email for details.

Once you print out the tags – and this page has a lot of tags per sheet, so you’ll only need to print a page or two – you can cut them out with scissors or a paper cutter. Then attach them to the sucker. I used cute Valentine themed washi tape for these, but you can use a dab of hot glue to attach the tag to your sucker, or you can punch a hole in the tag to put the sucker stick through. You could also tie them in place with a cute ribbon. If these will be transported to school by your child, pick the most sturdy option!

Have a fabulous Valentine’s day – enjoy these days of making Classroom valentines for your kiddos – the days are long, but the years are short! Before too long, you won’t have an excuse to whip up cute valentines for Valentine’s Day!

Check out all these other fabulous printable valentines:

Slime Printable Valentines
Marvel Avengers Valentines
Valentine’s Heart Bookmark

Mod Podge Gift Wrap

mod podge valentine's gift wrap

I love Valentine’s Day. Maybe it is the hearts and flowers. Maybe it is all the red (which is my favorite color). Maybe it is just because Valentine’s Day is an excuse to tell people that you love them.

This Valentine’s Day, I wrapped up some books for my nieces… I wanted to make it more fun than regular gift wrap.

supplies for valentine's gift wrap

Supplies:

Gold-toned Kraft paper
Red Doilies
Valentine’s Ribbon
Mod Podge
Bubbles
Brush
Tape
Scissors

I found some cute Valentine’s books for the girls, and wrapped them in the kraft paper.

wrap gift for Valentine's Day

I mod podged a heart doily in one corner.

mod podge doily

While the doily was still wet (you can wait for it to dry, but no real need to), I tied on the Valentine’s ribbon

add ribbon to valentine's gift wrap

All that was left was to tuck the bubbles under the ribbon and gift it!

No Sew Valentine’s Day Tea Towel

No Sew Valentines Tea Towel

I love quick and easy no-sew projects. This simple little Tea Towel is perfect for adding a little holiday decor to your kitchen, but doesn’t take much time, and doesn’t require busting out the sewing machine!

no sew Valentine's Tea Towel SuppliesYou just need a few supplies:
Plain tea towel
Thermoweb Heat’n Bond Ultra
Scrap Fabric (I grabbed a fat quarter I had on hand)
Scissors
Iron


Start by cutting off a piece of the Heat n Bond. Iron it to the back of the fabric. Once it cools, draw a heart on the paper backing. You can trace one if you like, or draw it freehand.

draw heart shape

Make two more hearts that are smaller, and then cut out the hearts. Remove the paper backing and them in place on the tea towel.

iron on hearts

Make sure you iron really well, and then you’re done! You can stitch around the hearts if you like, but the HeatnBond Ultra will last though many washings!


Child’s Valentine’s Card

My 4-year-old loves making cards for his dad. And what dad doesn’t love getting a card from their kiddo? This card child’s hand card would be a great Valentine’s card for any parent, grandparent, aunt, sibling… really anyone would love getting this message in their mailbox! Simple to make, the felt hand is a perfect reminder of the little hand that has captured your heart.

Kids Valentine - Our Knight Life

If you’re pinning this project to keep it handy for a future craft time with the kiddos, make sure to pin from the original source.

Conversation Heart Ring

I love conversation heart jewelry! I made some sweetheart candy earrings last year… this year I need to make myself a ring and pendant to go along with my earrings. Admittedly, the earrings last year took some time. That’s why I love this method over on Craft Test Dummies. The conversation heart ring looks awesome, and doesn’t take a whole lot of time to put together. She even gives you links to all the supplies you need to make it happen!

Conversation Heart Jewelry - Craft Test Dummies

If you don’t make this ring this year, you’ll want to make it next year. Pin it to keep the idea handy… but make sure you pin from the original source.


Craft Lightning – Duck Tape Crafts!

Duck Tape Earrings in 10 Minutes

We’re hanging out live again and sharing more fun Valentine’s crafts… this time with Duck Tape! I’m making earrings out of Duct Tape, and Angie is putting ruffles on candles! We have fun taking something that doesn’t scream “hearts and flowers” and making fun Valentine’s projects… in under 10 minutes! You really will want to watch this one…


Valentine Doily Wreath

Every time Valentine’s displays go up in the store, I buy heart doilies. And they sit in a box with the doilies from previous years. The doily is the classic Valentine’s craft supply… but for some reason I haven’t managed to incorporate them into my Valentine’s crafts… yet. This Heart Doily Wreath might change all of that. Quick and easy to make, even the kids can help out!

Heart Doily Wreath

You’ll want to pin this so you know what to do with all of your heart shaped doilies. Just make sure to click through to the original source and pin from there.