Search Results for: svg

Olive Valentine

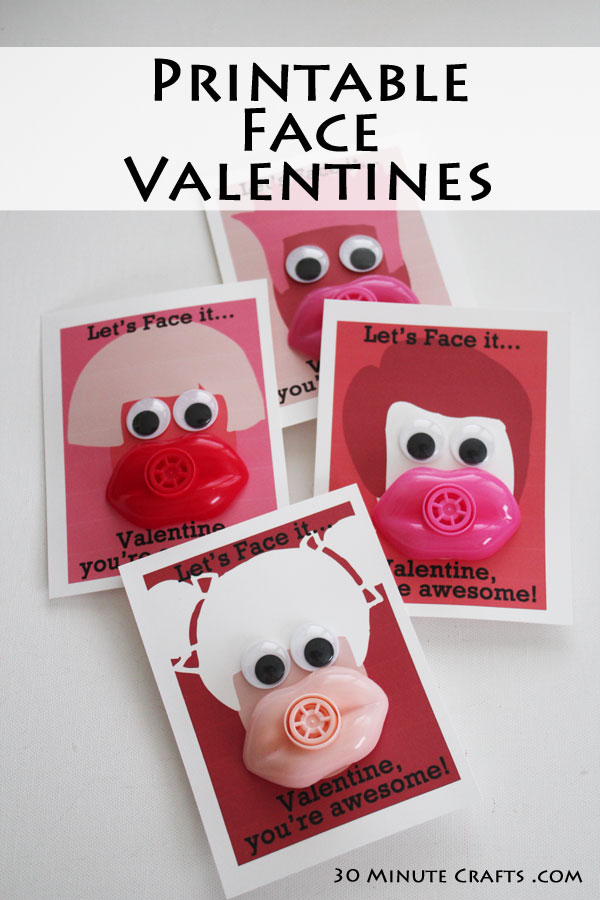
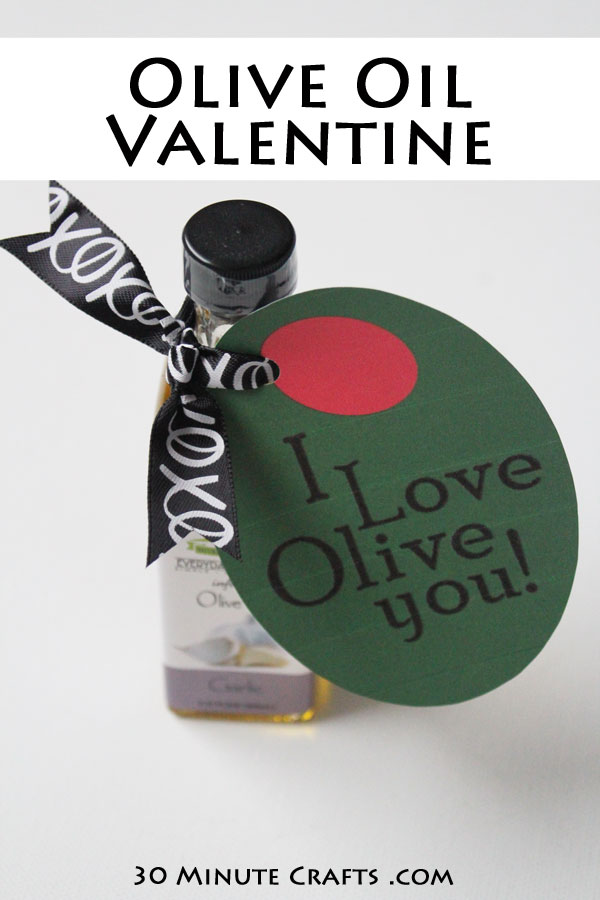
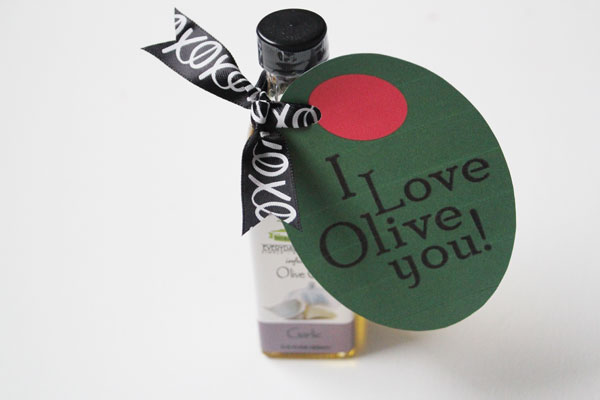
Calling all lovers of Olive lovers! This is the perfect Valentine for you to give to your sweetheart. I’ve tied this Olive Tag to an olive oil bottle, which makes it perfect for someone who likes to cook… but attach it to a jar of olives for an equally heartfelt sentiment. Want to go all out? Put olives and your sweetheart’s favorite vodka (or gin) in a bag or basket, and attach this olive valentine tag.

Valintine perfect for a cook or olive lover!

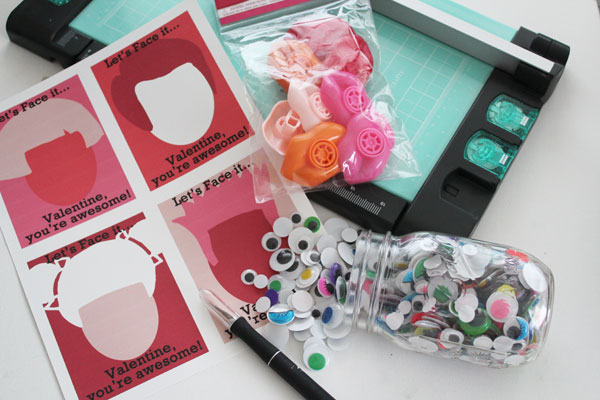
The supplies are simple:
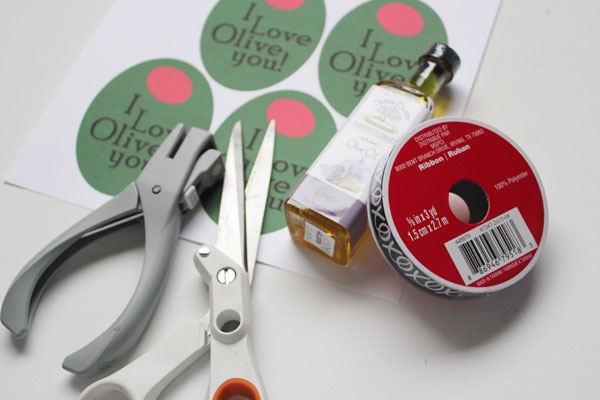
Olive supply of your choice (olive oil, jar of olives, etc)
I love Olive You printable printed on cardstock
Ribbon
Scissors
Hole Punch

supplies for olive oil printable

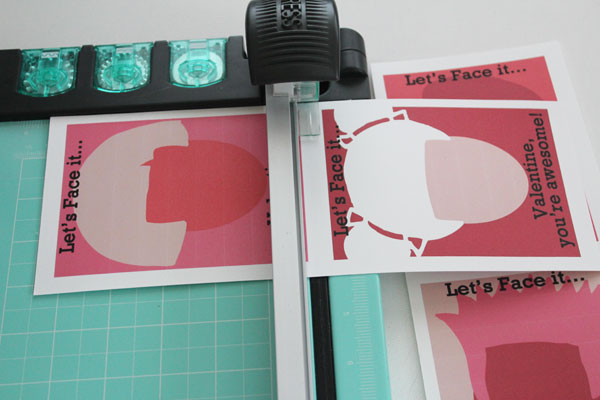
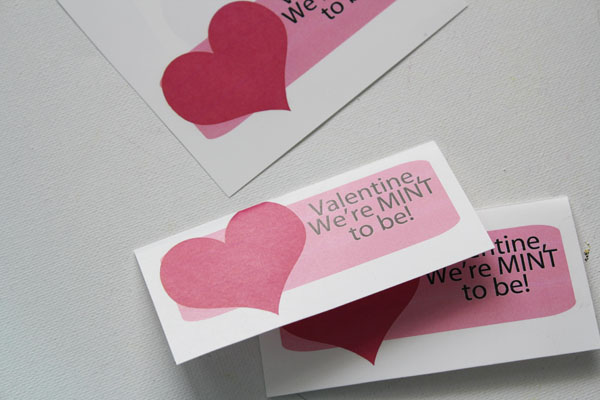
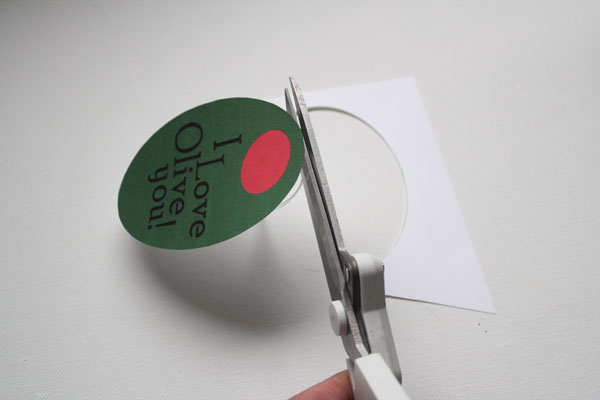
Cut out the olive printable

cut out tag

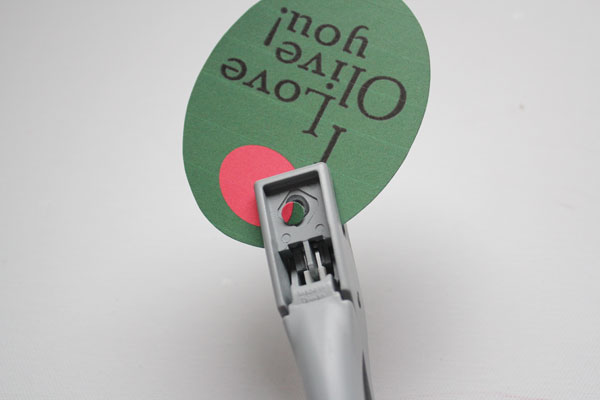
Use hole punch to punch a hole at the top.

punch hole in tag

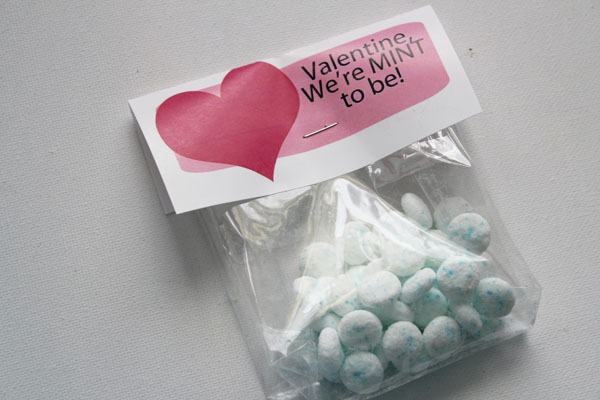
Tie in place with ribbon, you’re done!

olive oil printable valentine tag

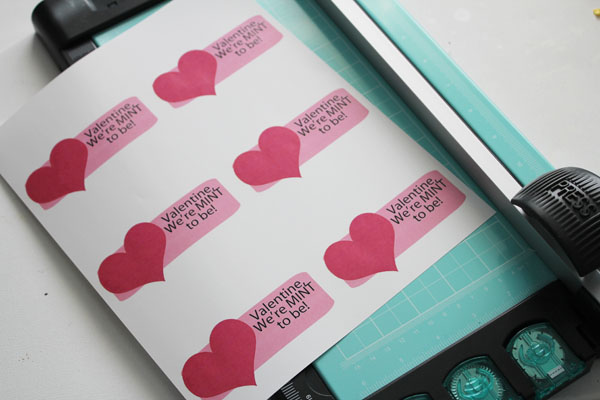
The printable makes 6 tags at once – perfect for gifting to family and friends!


Get the olive printable valentine, and all our printable valentine files, by joining the mailing list below:


FREE Valentine’s Printables
Sign up for our email list to get access to the free Valentine’s Printable files!
You’ve successfully signed up! Check your email for details.

Let’s Face it Valentine

When I was at the craft store, I saw these adorable lip whistles. I knew my kids would get a kick out of using them for Valentines… but how? Then I came up with these fun face valentines. I got to use the lip whistles, AND googly eyes!

make your own face valentines by printing and assembling these with lip whistles and googly eyes!

You’ll need:
Printable face valentines
Scissors or paper cutter
Lip Whistles (you can find them on Amazon with my affiliate link here)
Craft Knife
Large Googly Eyes
Glue

supplies for face valentines

Print and cut out the valentines.

cut apart

Use a craft knife to cut a slit for the mouth, about 3/4″ long, then a perpendicular slit on each side, about 1/2″ tall.

cut hole for mouth

Insert whistle, then glue on googly eyes.

glue on eyes

Allow glue to dry, then you’re all done!

finished face valentines

If you want, you could just print out the page, and color faces onto each, instead of adding the lip whistles and googly eyes. Or you could add googly eyes, and draw in a mouth. There are lots of ways you can get creative with this printable.


Let’s face it – these will be the most awesome valentines at the party!

Get the printable valentine, and all our printable valentine files, when you join our email list:


FREE Valentine’s Printables
Sign up for our email list to get access to the free Valentine’s Printable files!
You’ve successfully signed up! Check your email for details.

Nutella Valentine

Oh, Valentine, you totally get me! With this adorable Nutella Printable Valentine. Because we go together like Nutella and… everything. Because Nutella really does go with everything. Apples? Check! On toast? Check! Pancakes? Check! What about a spoon? Check, check check! This Nutella Valentine will have people giggling or chuckling… and even the most stern will crack a smile!

Simple Nutella Printable Valentine - we go together like Nutella and everything!

I found these single-serving Nutellas at World Market. You could use the single-serve nutellas that come with the little breadsticks, too. Or you could go all-out and attach your printable to a whole jar of the stuff. Up to you. If you want ones that look like these you’ll need:
Nutella Valentine Printable
Single-serving Nutella (you can find them on Amazon with my affiliate link here)
Hot Glue (or double-stick-tape)

Print out and cut the valentines. Add a dab of hot glue to the back of your single-serving Nutella.

glue to paper

Stick to the card, and done.

Nutella printable valentines

Done and yum!

Please excuse me while I go grab a spoon.

Get the free nutella valentine’s printable when you join our email list below:

 
FREE Valentine’s Printables
Sign up for our email list to get access to the free Valentine’s Printable files!
You’ve successfully signed up! Check your email for details.

DIY Lego Stickers

My sons love their Legos, and I love how many hours of playtime they get with their Legos! They use their imaginations to build cars, spaceships, helicopters, homes… and sometimes flying helicopter homes that can go to outer space! They enjoy customizing their Lego creations, and we discovered that vinyl makes the perfect Lego Stickers to customize their Lego bricks even more!

DIY Lego Stickers cut from Vinyl

Making these stickers is super easy. Start with basic Lego Bricks that have smooth sides… any shape or size is fine.

legos can get stickers

You’ll want my Lego bricks vinyl weeding sheet. The squares and rectangles on this page are already set to be the right size for Lego Bricks. Place your designs inside the boxes, and they’ll be easy to cut out.

I created these on my Sizzix eclips2, but the Lego Bricks vinyl weeding sheet is an .svg file, so you can use it with any cutting machine that accepts .svg files – most do.

boxes for DIY Lego Stickers

Once you’ve created all the designs you want, delete any unused boxes so that you can save your vinyl for future use. You don’t want it cutting out all those extras until you’ve filled them with shapes.

Then cut your vinyl! Peel away all the background. This is where you’ll see the magic of having the weeding sheet.

pull away vinylOnce you’ve peeled away the background, it is easy to “weed” away any of the pieces you don’t want. Leaving you with perfect stickers.weed the vinyl

Cut a small piece of vinyl transfer tape – just slightly larger than the sticker you want to place on the brick. Press firmly on the sticker, and lift.

apply transfer tape

Place the sticker on the brick. Rub down.

transfer tape

Carefully remove the transfer tape. I get the best results when pulling completely in the opposite direction (backwards and not upwards).

peel off transfer tape

Ta da! A custom lego brick!

sticker on lego

Make lots (and lots, and lots)!

put lego stickers on legos

If you have an eclips2, here is the cut file I used… feel free to add more designs, or remove the extra weeding boxes.


DIY Pencil Toppers

Making your own Pencil Toppers is a simple back-to-school craft. These pencil toppers are completely customizable, like lunchbox notes that last the whole day… or week! As long as the pencil is being used, your child will have a fun reminder. These pencil toppers make easy and inexpensive gifts for an entire class, or can be doled out one at a time to your children as they need a reminder or a pick-me-up.

These DIY pencil toppers are the last project in this week’s Back to School Craft Lightning. All week long, my Co-Host Angie from the Country Chic Cottage and I, along with our Guest Host Laura Kelly, have been sharing 15 minute or less back to school crafts, and we’ve had lots of our crafty friends join in… be sure to scroll down to the bottom of this post to check out their projects.

DIY Pencil Toppers

Supplies:
Pencils
Paper
Marker
Digital Cutting Machine
Cut file for Sizzix eclips2 or SVG cut file for all other machines

Start by cutting out the pencil toppers.

supplies for pencil toppers

Write your messages on the pencil toppers. You can draw doodles instead, if you like.

write on pencil toppers

Slip the pencil toppers on your pencils.

finished pencil toppers

It is that easy!

Check out these other fast and fun back to school crafts:


With her new line of papers, Jen Gallacher created these fun school lunch treat bags.

School-Lunch-Treat-Bags-by-Jen-Gallacher


Make staying healthy fun with these Printable Germ Juice Labels from Cute as a Fox.

Germ-Juice-Hand-Sanitizer-Title-427x640

Make Life Lovely shows you how you can make cute apple bean bags in 15 minutes.

DIY-Bean-Bag-Apple-7-743x1024

Over at Fireflies and Jellybeans you can find out all about making these personalized water bottles.Easy DIY Personalized Water Bottles 2

One Krieger Chick made these adorable special message dishes – what a great way to start the day!Make-your-own-Personalized-Special-Message-Dishes-in-less-than-15-minutes-perfect-for-kids-to-start-the-day-off-on-a-positive-note-OneKriegerChick.com_

Learn all about these fun wood burned pencils over at Bumble Bree.Wood-Burned-Pencils-19-1024x683

Happiness is Homemade whipped up these simple Washi Tape Pencils and Desk Cup.Washi-Tape-Pencils-and-Desk-Cup-Organizer

Katie at a Sweet Berry crafted this clever “My First Day” frame.final

Though you’re probably more excited about the kids heading back to school than they are, enjoy these last days of summer with this Summer Countdown Calendar from Angie at The Country Chic Cottage.

ccc-back-to-school-countdown-calendar


Keep school supplies organized with these fun DIY School Supply Containers from Laura Kelly.Pinterest5


Learn how Laura Kelly made these cute Apple Beanbags, and then eleven ways to use Beanbags in the classroom.Beanbags_Apples1


If you’re looking for a cute school snack, Angie from The Country Chic Cottage made these fun pencil pops.pencil-marshmallow-pop

Inside Out Movie Craft: DIY Memory Spheres

Disney Pixar’s Animated movie comes out today: Inside Out. I had a chance to catch an early screening of it, and loved it. The movie takes place largely in the head of a young girl. She is growing up, and her family moves across the country. The emotions in her head: Happiness, Sadness, Anger, Fear, and Disgust help her cope with everything that comes her way… in every way they can. Inside Out does a great job of tackling emotions and memories. One of the concepts is that memories are captured onto large marble-like spheres. At the end of each day, most of these spheres are sent off to long-term storage. The spheres are different colors, depending on the emotion surrounding them. Happy memories are yellow, sad ones are blue, angry ones are red, fearful ones are purple, and ones associated with disgust are green.

I created these fun memory spheres as a craft project to do with my kiddos. I can cut out a “sphere” (they’re not really spheres – trying to cut a true sphere out of paper would be much more difficult!), and have my children draw on the different pentagon-shaped-sides. Then I can put the ball together, and they can have a “memory” of a day to put on a shelf. I can cut a white memory sphere so they can color each side based on the image they draw, or cut a whole ball one solid color, so they can express a single emotion in one place.

Inside Out Movie Inspired Memory Spheres

I used my Sizzix eclips2 to cut out the shapes. The eclips2 has a scoring feature – it does a true score on all the folds instead of a dashed line! If you have access to an eclips2, use it! If not, I’ve added the SVG file with dashed lines so you can use whatever cutting machine you have available. If you don’t have a cutting machine, there is also a PDF so you can cut out your sphere by hand (or allow your kiddos to cut their own).

You’ll need scrapbook paper or cardstock, a hot glue gun (I find that a low-temp gun works best for paper projects), and a long stick to help push everything together. I used the end of a skinny paintbrush.

supplies for memory spheres

Here are the cut files:
Sizzix eclips2 cut file
SVG cut file
PDF printable to cut by hand

memory spheres image


Once you have cut out your shapes, fold on all the score lines.

fold in flaps

Add a line of glue to one flap, then adhere to the opposite side.

glue on flap

Secure the sides together, making two halves.

two halves complete

Then secure the two halves together.

finish gluing panels

All done!

The best day ever memory sphere

Make more to represent all the emotions!

completed memory spheres


Enjoy making these memory spheres all summer long to capture memories with your kids – trips, vacations, or just days hanging around the house. I hope that most of them are happy yellow… but a few other emotions mixed in isn’t a bad thing, either!

Flower Girl Headband

Many bridal parties include a flower girl or flower girls. A fun way for a younger family member to be a part of the wedding. This flower girl headband is the perfect hair accessory for any young gal preceding the bride down the aisle, and you can customize it with your own wedding colors! The flower headband is would also work for any other dressy occasion … or just to wear to school on a Wednesday!

This project is part of Craft Lightning Week – this week my co-host Angie from The Country Chic Cottage, and our Guest Host, Katie from Sweet Rose Studio and I are 5 days of fast and easy wedding craft ideas, along with other crafters from around the internet. Be sure to scroll to the end of this post to check out all their fast and easy wedding craft ideas!


Flower Girl Headband
To make the Flower Girl Headband, you’ll need:
Plain Headband
Wide Lace/Ribbon trim
Small Faux flowers (in wedding colors)
Faux Pearls or Rhinestones
Hot Glue Gun
Scissors

supplies for flower girl headband


Start by gluing the ribbon trim to the headband, one section at a time so that the glue doesn’t cool before the ribbon is in place.

add line of glue

Gently pull the flowers off of the stems. We just need the petals for this part, so discard the rest.

pull flowers off stems

Put a dab of hot glue on the back of one petal set. Put onto the headband. I find that the headband looks best when the flowers are placed asymmetrically (just on one side of the head), but use your own judgement.

glue on flower

Glue a pearl or rhinestone into the center of the flower.

add pearl

Repeat, adding multiple flowers with pearl or rhinestone centers.

glued on flowers

Your flower girl headband is complete!

DIY Flower Girl Headband

Check out these other fun and fast wedding craft ideas:

Over at My Daylights, you can learn how to foil your own napkins – great for any fancy party!

DIY-Printed-Gold-Foil-Napkins1

Do you love wrapping beautiful gifts? Over at 100 Directions, Jen shows you how easy it is to wrap a beautiful wedding gift.

diy-love-gift-tags-jen-goode

If you’re planning a summer wedding, you’ll want to check out these Fan Wedding Favors from My Very Educated Mother.

FanWeddingFavors

These wedding crackers from Frog Prince Paperie are super fun, and add a great pop of color to the wedding decor.

DIY-wedding-favor-party-cracker-8

Get your bridal party together for an evening, and you’ll have all your wedding placecards done in no time, using this tutorial from Tikkido.

tikkido-craft-lightning-wedding-seating-card-6

These bride and groom flower pots from Albion Gould could be wedding decor, or you could use them to decorate for a bridal shower… or save money and use them twice!

Bride-and-Groom-Flowerpots-829x1024

Homemadeville shows you how easy it is to make a classy bowtie napkin.

Bowtie Napkin

Carla Schaurer Designs made these fantastic watercolor Thank you notes – because a bride can never have too many!


watercolor-ty-wash

Katie from Sweet Rose Studio, our guest co-host, made this awesome Monogram Cake Topper (and I love the donut “cake” she put it on!

Simple-Monogram-Cake-Topper-at-Sweet-Rose-Studio

My Craft Lightning Co-Host, Angie from The Country Chic Cottage made these photo transfer candles – great for decor at the ceremony or the reception.

photo-transfer-candles-006

Great Job Rubber Stamp

My son has been doing awesome in school. Since the move, his reading has really improved. It has been a lot of hard work, mostly on his part, and we wanted to celebrate that. Each time he is able to get through a little photocopied book from school without getting any words wrong, we want to check it off as complete. We could just put a checkmark in the corner, but we thought making a stamp would be more fun. I let him decide what we would put on the stamp. He wanted “good job”. I made a little sketch of the letters with a star, scanned it in to the computer, and cleaned it up in eCAL 2, the software for my Sizzix eclips2. I love their machine and software because it lets me share the cut file with you as a .svg file… meaning it can be used with most cutters on the market… awesome, right? I have links to the cut files for you at the end of the post.

DIY Good Job Rubber Stamp

I bought the (affiliate link:) Silhouette Stamping Starter kit almost a year ago, and had never used it. Since I hadn’t used it on the Silhouette, I didn’t want to use it on the Sizzix without first trying it on the Silhouette. So I took the .svg over to the Silhouette software, and cut it out from there.

Stamping Kit

The stamp was easy to cut using the materials in the kit, and the instructions provided, I do have a couple tips:

Don’t cut a reverse image – cut the image as you want it to appear. Scale it to the size of the stamp you want, then create a box around it.

After the image is cut, place the acrylic block on top of the cut area. Flip, so that the block is on the bottom, and the mat is on top. Carefully peel away the mat, leaving the entire cut area – both the box you cut, and everything inside it.

Carefully weed away all the stamping material that isn’t part of the completed stamp. This ensures that your finished stamp is properly spaced, according to your original cut. The image will be in reverse on the stamp – but when you stamp it, it will look perfect.

The stamping material isn’t perfect – it doesn’t accept the ink fully the way I’m used to with traditional rubber stamps, but my son loves the custom stamp we made together!

good job stamp

If you’d like to use this image to make a stamp or other gift for your kiddo, teacher, or other special person in your life, you can grab the eCAL file for the eclips2 here, the .svg cut file here, or the Silhouette cut file here.

DIY Tomorrowland Pin

Tomorrowland comes out in theaters today. I had the chance to catch an early screening of it earlier this week. It is a fun movie that reminds us of the value of dreamers. As a creative person, I love the message! However, for all you mamas of youngin’s… they’ll love the movie, but you might want to cover their eyes during the two times that heavy machinery smashes a human or anamatronic body. Just a little too much violence, in an otherwise charming movie, for this mom trying to teach her young boys to play nicely.

I love making craft projects to go along with the movies we see, so I came up with this DIY Tomorrowland Pin. I’ve done all the heavy-lifting, creating a cut file you can use to cut out your design. And I’m super excited, because this time I can offer you the cut file as an .SVG file! That’s right, a universal file for whatever cut machine you have!

DIY Tomorrowland Pin

To make a Tomorrowland Pin, you’ll need:
Orange Cardstock
Blue Cardstock
Gold Cardstock (or gold foil and a manilla folder)
Magnets
Hot Glue
School Glue Stick
Mod Podge
Mod Podge Dimensional Magic
Paintbrush
Cutting Machine – I used my eclips2
Cut file: For eclips2 or the .SVG cut file

supplies to make your own tomorrowland pin

Start by cutting out the pieces.

cut with eclips2 machine

The background is gold, the T is blue, and the funny-shaped bit is orange.

cut out the pieces for the Tomorrowland pin

Test-fit the pieces for placement, then glue in place. I like to put my pieces on a scrap piece of paper, then use my gluestick.

use gluestick

This pin is about 1.5″, so it is a little larger than the pin looks in the movie… but with so many small pieces, a little bit larger is easier to put together, and fun for kids!

pieces glued in place

Brush a coat of Mod Podge over the top to keep everything in place.

Mod Podge in place

Once the Mod Podge has dried, use hot glue to secure the magnets to the back. The two magnets will secure the pin to clothing – just remove the top magnet, place the pin on the clothes, and put the magnet in place with the fabric of the clothing between the two. Alternately, you could use a pin-back… but I thought a magnet back felt a little more “techy”.

hot glue magnets

You could stop here, but to give the pin more depth, add a layer of Mod Podge Dimensional Magic. It works like resin, but doesn’t get quite as hard… and the benefit is that you don’t have to mix resin and wait for it to get thick enough to dome on the top.

dome the Mod Podge DM

Leave overnight to dry.

Finished Tomorrowland pins

Invite your friends to become the newest members of Plus-Alpha… and change the world.

Tomorrowland Pin

Save

Mint to Be Valentine Printable

Looking for a simple printable valentine for one person, or an entire class? This “Mint to Be” Valentine is easy to print up, and you can use any mints you like! I used breath mints, but any leftover holiday mints would work great as well (this would look super cute with pinwheel mints)!

Free Printable Mint to Be Valentines

You’ll need:
Mint to be Printable (see below to download)
Mints
Paper Cutter or Scissors
Bag
Stapler

Start by printing the Mint to Be Printable.


Cut them out.

print valentines

Fold in half.

fold mint to be valentine

Staple to tops of bags.

mint to be valentines

Get the “Mint to Be” printable as part of our Valentine’s Files… available when you join our email list:

 
FREE Valentine’s Printables
Sign up for our email list to get access to the free Valentine’s Printable files!
You’ve successfully signed up! Check your email for details.