Search Results for: dollar store

Etched Glass Quick Craft

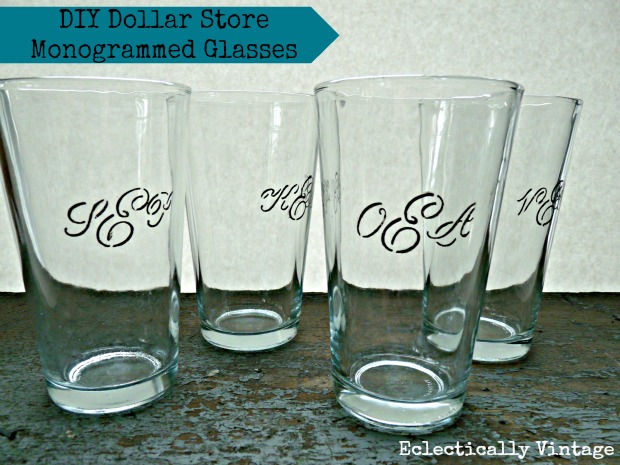
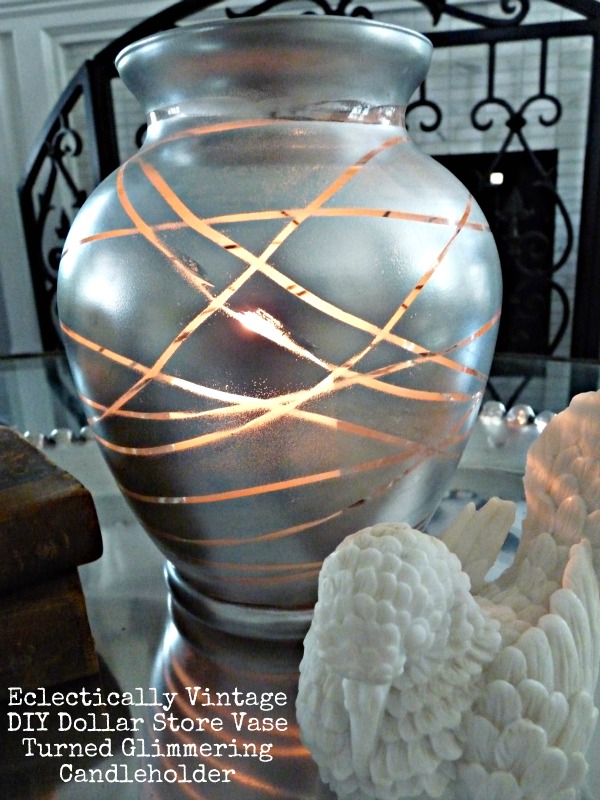
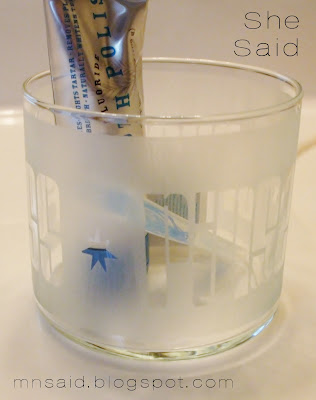
Did you know that etching glass is a super quick and easy craft? You apply vinyl to clean glass, cover in etching cream, and then rinse off after a few minutes – so simple! With all the fun pre-cut vinyl shapes available, and the cutting machines that cut vinyl – the possibilities are endless! You can etch Dollar Store glassware to make custom glasses for guests at a dinner party – that double as placecards and triple as a personalized favor to take home! There are so many fun things you can do with glass etching cream!

etched glass - mn said blogspot

Pin this to your “crafts to make” Pinterest board, but be sure to pin from the original source!

Individually Monogrammed Glasses

We have a household of 4, yet we use an unnatural number of cups and glasses. Considering that the baby doesn’t drink out of regular cups yet (unless he happens to get his hands on one), it is even more frustrating how fast the dishwasher fills up! That’s why I love this solution! These individually monogrammed glasses all “match” each other in style, but they are each personalized for a different member of the family. Now everyone knows which glass is theirs (and there is no more arguing about who had the red cup or who had the blue one).

They would also be great for a dinner party – very practical in an informal setting when people are walking around with their drinks. And because the glasses can be purchased at the dollar store, it is an easy, inexpensive, and fun favor that your guests can take home with them.

Dollar Store Monogrammed Drinking Glasses - Eclectically Vintage

You’ll want to pin this project for the next time you’re sick of washing dishes. Please make sure to pin it from the original source.

$2 Hobo Bag

Recently, Dollar Store Crafts offered a contest for readers to submit a 30 Minute Craft made with Dollar Store supplies. I was floored by all the awesome crafts that were submitted. This $2 Hobo Bag was one of my favorites! I love how simple it is to make, even for a beginning sewist. Just a few quick stitches and you’ve finished a simple bag! Using a bandana is fun because they come in so many different colors and patterns, are inexpensive, and are already cut to the right size!

Bandana Hobo Bag - Crafty Leslie

You’ll want to pin this project for the next time you get behind the sewing machine. Make sure you click through to the original source first.

10 Minute Styrofoam Easter Basket!

styrofoam ball easter basket

Angie and I are working on some fun live crafting with Styrofoam! I’m making this fun Easter basket with half a styrofoam ball and some Dollar Store supplies, and Angie is using a Styrofoam egg and two of our favorite craft supplies – Mod Podge and Washi Tape! Watch us in this 10 minute video as we live craft and share some of our fun quick crafting tips!


Easter Egg Topiary

easter egg topiary via @30minutecrafts

Quick and simple to make, these Easter Egg topiaries can be fun Easter Decor on your mantle or on your Easter table. You can leave them empty, or fill them with a few hidden jelly beans as a snack for later… Depending on your decor, you can change the colors of the eggs to whatever you like, change out the containers, paint the stems… the options for customizing are limitless!

easter egg topiary supplies

Start with a few basic supplies:
Plastic Easter Eggs (in at least 2 sizes)
Pots or other containers (I used a clay pot and some Dollar Store Weddng Favor Pails)
Dowel
Hot Glue
Assorted Ribbon
Scissors
Filler (I used Poly beads, you can use beans rice, or whatever you have handy)


Saw your dowel into parts… My tall topiary is 14″ high, and my small topiaries are 11″ high. Then put holes in your eggs. You want to put a hole in the top and bottom of your large egg, and only the bottom of the small eggs.

You do NOT want to use a drill to make your holes. I broke several plastic eggs trying different ways to make a drill bit work.

do not drill easter egg

Instead, use a craft knife. Put the tip where you want your hole, and turn back and forth like you are locking and unlocking a door. Apply steady, gentle pressure, and start with an egg you don’t care overly much about in case you push too hard. It doesn’t take long to get the hang of it, though! Just remember that different eggs are made with different plastics, and some will crack easier than others.

use stanley knife

Once you have holes in your eggs, thread them onto the dowels. If your holes are a little big, add a dab of hot glue to hold the eggs in place. If you are making multiple topiaries, make sure that you compare the height of the eggs on their sticks before gluing anything into place.

thread eggs onto dowels

Put a glob (that is a very technical term) of hot glue into the bottom of a pot, and insert the bottom of a dowel. Hold until the glue hardens. Add more hot glue if needed, then add your filler to keep the stick in place.

fill with poly beads

Tie a ribbon at the base of each egg, and you’re all set!

easter egg topiary at 30 Minute Crafts

If you like, you can paint your pots or your sticks to match your decor, and have lots of fun picking out just the right ribbons…

And be sure to check out all these fun Easter Egg crafts that my friends came up with!


Quick Spraypainted Votive Vase

Spraypaint is such a quick way to transform an item. It adds color to any decor item, which can completely transform the look of the piece. You can make something matte that was normally gloss, and vice versa. And there are all kinds of fun techniques you can use with spray paint to get different effects. Like with this votive vase.  A dollar store vase becomes a great candle holder in just a few minutes!

DIY Dollar Store Vase - Eclectically Vintage

This project just begs to be pinned. Make sure you click through to the original source and pin from there.

Valentine’s Kids Craft Button Votive

I’m super-excited about today’s guest post… my friend Amy from Mod Podge Rocks is here sharing a fun (and quick, of course) kids Valentine’s craft! Amy wrote the book on Mod Podge
… literally! She sent me a copy (which I love so much I lent it to my mother)… and a second copy to give to one of you! Make sure you scroll to the end of the post for a chance to win!

Valentine kids craft button votive

Well hello there! I’m Amy from Mod Podge Rocks. I’ve never been a big Valentine’s Day person until I did a Aqua Valentine series last year . . . in which I threw hearts on their head by turning them blue. It made for a more interesting Valentine’s Day in terms of crafting, and I’ve loved making projects for February 14th ever since. This year I’ve pulled together a quick craft for the kids, and not only is it fast, but it’s budget friendly. I got this votive from the dollar store and I had the tissue paper and buttons in my stash.

$1 for a kids craft? Yes please!

Not only that, but the Kids Wash Out Mod Podge
is a new formula and it’s very special. It comes out of kids’ clothes, which is awesome. No more crafting in fear of a destroyed wardrobe! Here’s how it’s done.

Gather These Supplies

Dollar store votive – got mine from Dollar Tree
Kids Wash Out Mod Podge
Tissue paper in the patterns of your choice (pink and red, of course!)
Craft glue
Button
Paintbrush
Scissors
LED tealight

IMG_6980

This is my before. These votives from Dollar Tree are really nice and come in a variety of shapes and sizes.

IMG_6996

Bigger kids can cut out the tissue paper into squares – I recommend cutting a bunch of squares for little ones.

IMG_6997

Give your child a paintbrush or foam brush and have them paint a layer of Mod Podge down, adhere the tissue paper and then paint more Mod Podge over the top.

IMG_6998

Keep adding layers and layers on top. It’s fun because it doesn’t matter how many layers and it can be random – kids will love that.

IMG_7007

Once it’s dry, add a button or other embellishment to the front with craft glue.

Kids Craft Button Votive

This votive was done in about 15 minutes. It will take some kids longer, but you can definitely be done in a short amount of time. This fun votive can be used for home decor or you can even add candy for a teacher gift! What do you think?

Come visit me at Mod Podge Rocks for daily decoupage ideas – also visit me at Facebook, Pinterest, Google Plus or follow my RSS feed for more!
a Rafflecopter giveaway

30 Minute Valentine’s Blinking Wreath

30 Minute Valentines Blinking Wreath

This Valentine’s wreath is so simple and easy to make! Just a few simple supplies, and one brand-new-on-the market supply… the LED textile light ribbon! I saw this ribbon at the Crafts and Hobby Association Winter trade show, and was smitten. They are just coming out with it in retail settings, so for now if you want it there is only one place you can purchase it, and there is an order minimum… but I loved it so much that I bought quite a bit, so you’ll be seeing it pop up in future craft projects!

blinking wreath supplies

Supplies:
Heart-shaped tinsel wreath (dollar store find)
Pink Felt
Felt Valentine’s Words (craft store)
LED Textile Ribbon
Hot Glue
old keys (optional)


Cut a piece of felt about 2.5″ wide, and at least 20″ long, and a second piece about 1.25″ wide and at least 7″ long. Cut V shapes out of the ends of the long piece.

cut felt bow

Fold the large piece into uneven thirds, with the ends longer than the center. Then wrap the LED ribbon into several loops, with the ends in the middle.

wrap up LED light ribbon

Glue the ribbon in the middle of the folded piece, with the battery unit on top. Make sure the on/off switch is facing up.

glue down LED light ribbon

Wrap the smaller piece of felt around the battery unit, gluing in place on the back. Test the button to make sure you can press it through the felt.

center of felt bow

Glue the felt letters on top, and then glue the whole bow into place on your heart-shaped wreath. Adjust the tails of the bow to make it look like a nice bow with even tails. Depending on where you put the bow, you may want to add some counter-weight on the other side to keep the wreath from tilting. An old key or two glued on the back will work as a counter weight.

blinking-valentine-wreath

Fast and Classy Valentine’s Day Favors

These favors start with a humble dollar store plastic heart, but with the addition of a little washi tape and stickers, they become upscale-looking favors. Quick and easy to make, the washi tape really makes the project pop!

valentine favors on dollar store crafts

If you’re going to need favors for a classroom and want to pin this project, make sure to click through to the original source and pin from there.

Glue Gun Snowflake


glue Gun snowflakesYou can make a beautiful, glittery snowflake fast and easy using hot glue! They make glitter hot glue, and if you’ve never tried it before, this is your excuse! This is a fun craft to make with kids that are old enough to wield a glue gun – the more wonky these snowflakes end up, the more fun you’ll have!

Supplies:
Snowflake Template
Glitter Hot Glue Sticks (like these: Glitter Glue Sticks for Hot Glue Gun – Pack of 12 Sticks)
Old glue gun (or pick one up at the Dollar Store)
Tissue Paper
Scrubby Dish Sponge
Ribbon

make glue gun snowflake

You can draw your own snowflake, or you can print a template. I printed my snowflake templates from here. (scroll halfway down to “snowflake activity sheet printables.”

Put your template under a sheet of tissue paper. Insert the glitter hot glue stick into your glue gun, and outline the shape, then fill it in. To avoid making a hole later, draw one in with the glue, and don’t fill that part in.

Allow your snowflake to cool, then rip off as much tissue paper as comes off easily.

tear away tissue paper

Rinse off the back of your snowflake with warm water, and use the scrubby side of a dish sponge to scrub off the tissue paper.

Allow to dry, insert a ribbon through the hole, and hang up your glitter snowflake.

single glue gun snowflake

Want to bring in more snow this winter? Try some of these fun snow crafts!


Let it snow - over a dozen ways to let the snow in