Search Results for: dollar store

Easy and Cheap No-Sew Table Runner

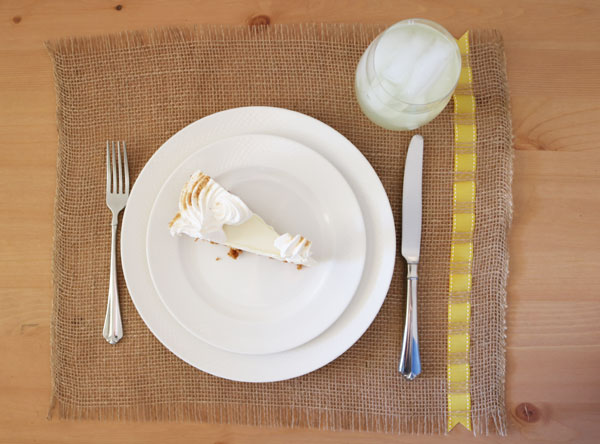
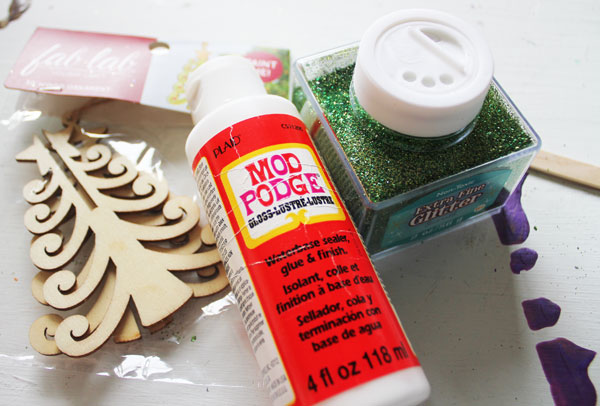
Are you hosting a New Year’s Eve party at your house? Want some super simple and quick decor to spice up your table or buffet line? Make this super easy no-sew table runner… it uses only a few supplies, one of which you can find at the Dollar Store!!

No sew cheap easy Table Runner CRAFT

You’ll want to pin this project to your party crafts and decor Pinterest board… but make sure you click over to CRAFT {Creating Really Awesome Free Things} and pin from there.

Craft Lightning Holiday Edition – Day 1 Roundup

craft lightning holiday
YAY! I love all the fun projects my fellow bloggers came up with for the first day of Craft Lightning! It is fun to see that, when given a time constraint, craft bloggers manage to get even more crafty!!
If you’re looking for an easy project for an upcoming party, or simple hostess gifts, check out these glitter edged holiday coasters from Mad In Crafts.
CL1 glitter-edged-coasters-for-psa-graph

And how cute are these peppermint paper plates by Very Educated Mother? A great kids craft!

CL1 PeppermintPaperPlates4


I love these simple Painted Christmas Linens from Just Paint It . Can you believe the supplies came from the Dollar Store?


I have a fascination with Washi Tape. I use it whenever I can. That’s why I love both this post from Angie at The Country Chic Cottage
washi tape ornaments-001
and these great Washi Tape Tag ornaments at Cherished Bliss!
Washi-Tape-Ornaments
Do you have a holiday themed project that takes less than 15 minutes to complete (excluding dry time)?  You can link up by clicking here.  Come back everyday this week to see if you are featured!
… and … if you missed them this morning, check out my Glitter Bell Candle Sconces!
glitter bell candle sconces
Make sure you come back tomorrow, and every day this week, for more fun and fast crafts!

DIY Cloche Jars

No, you don’t have to try to blow your own glass in 30 minutes or less. Carolyn at Homework shows you how to DIY your own trendy Cloche Jars. In 30 minutes, you can not only make your jar, but you can style it on your mantle, too! And I haven’t told you the best part, which is, you can make these with items found at the Dollar Store!

I love pinning, but make sure you click on the link to pin from the source.

Want more 30 minute crafts? Like 30 Minute Crafts on Facebook, Follow 30 Minute Crafts on Twitter, and check out 30 Minute Crafts on Pinterest.

Day Two Craft Lightning Round Up!

The thing I love most about Craft Lightning week is that we are dis-proving the notion “I’m too busy to craft”. All of the crafts Angie from The Country Chic Cottage and are showing and featuring this week were made in 15 minutes. Most even less!
Sure, you need to come up with an idea first… but we’ll be sharing over a dozen ideas this week. And for each craft I made this week, I guarantee you I didn’t sit in front of my craft table and think, “Huh, what can I create in less than 15 minutes?” I usually get my inspiration in mundane places like while driving the car or taking a shower. Sometimes I get them while shopping… much less mundane! and often I get ideas for new crafts while making other crafts. Because creativity begets more creativity.

Cynthia from Creative Cynchronicity made this awesome dragonfly. I love the colors and artwork in the wings… click over to see how she got that effect!

Ella Claire shows us how to make 50 treat bags with just $4 of supplies and 15 minutes of time! Super adorable, low budget, AND fast to make! You have to visit her blog for all the details…

At The Country Chic Cottage, Angie glams up her place settings with dollar store items! Go ahead and re-read that last sentence, and check out Angie’s blog to see how she makes it possible.

And earlier today, I made a trophy with burger beginnings

…and I’m sharing a project from the Craft Lightning Linky Party! Link up your 15 minute or less craft, and Angie or I might feature YOU sometime this week!

I love these Duct Tape Deco Spheres. Simple, and so versatile because of all the patterned Duct Tape that is out there! Make sure you read the tips and tricks at Crafts n Coffee.

Come back every day this week for more fast craft ideas!

Glitter Distressed Wooden Sign

Normally, I’m not a huge fan of glitter. But every now and then I get a crazy idea to start playing with some. I thought making this glitter sign would be a fun way to add a little sparkle. And, it uses stencils!

This project is part of Craft Lightning Decoupage Week. Angie, Stephanie and I are sharing fast and fun crafts made using Decoupage, along with some of our friends! Be sure to scroll down to check out their ideas!

To make this glitter distressed sign, you’ll need:
Wooden sign
Spray on Mod Podge
Stencils
Glitter
Stencil Tape or Painters Tape

Start by taping down your stencils. Then spray well with the Mod Podge. Make sure you shake your Mod Podge well first!

Sprinkle liberally with glitter.

Then spray well with Mod Podge.

Carefully lift off the stencils. It is okay if some falls off – that helps with the distressed look.

Dip your fingers into the wet glitter that is left over on the stencils. Spread this around the edges to add to the glitter distressing.

Once you’re happy with all your glitter, give it another liberal spray of Mod Podge. Allow to dry.

And check out all these other fun and fast decoupage crafts!

These fun Decoupage Eggs were made by Our Crafty Mom.

Ginger Snap Crafts made over this clipboard.

I love these Decoupage candles from Tried and True.

Stephanie made these cute Decoupage Earrings!

Angie made these fabric covered planter pots.

Handmade Peacock Earrings

I love walking through the bead and jewelry sections of the craft store. So many gorgeous supplies just waiting to become beautiful jewelry. And for my friends who are “afraid” of making jewelry, try these earrings. They are so crazy simple. If you aren’t into peacocks, you can find just about any set of charms in the jewelry and bead section to whip up some earrings so fabulous your friends will think you paid top dollar!

Handmade Peacock earrings that just take 3 supplies and a few seconds to make!


Supplies (and yes… there are only three):
Peacock Jewelry Charms (or any charms of your choice)
Earring wired
Jewelry Pliers

supplies for peacock earrings

Start by removing the jewelry charms from the cardboard. This probably goes without saying, but this project really is so simple that I feel like I need to stretch it out so that you feel like you got your money’s worth in reading this free tutorial. So there you go – take the charms off of the cardboard. You might have to twist the wire in either a clockwise or counterclockwise fashion.

untwist the wire

Using the jewelry pliers, open the loop at the bottom of the earring wire. You want to use the same twisting motion you use when opening a jump ring. This ensures that the loop will close easily two steps from now.

open earring wire

Slip the charm (in this case the peacock charm) onto the now open loop on the earring wire.

slip onto hook

Close the loop, basically reversing what you did two steps ago. You have one earring complete.

finished

Follow these same steps to make the second earring. And you’re done!

peacock earrings like from a department store

There you have it. Go to the store. Find all the pretty charms. Make stupid simple earrings. And then either tell all your friends how crafty you are that you made them all yourself, or let them think you have an insane jewelry budget so they can be jealous. Up to you.

diy peacock earrings

Simple Burlap Placemat

If you’re looking for a simple, rustic, yet fun way to set the table, try out these burlap placemats! They take only a few minutes to make, and you can weave in any color of ribbon into your burlap placemat to match your theme or decor. I’ll show you how easy it is to make a burlap placemat – then make as many as you like!

This project is part of Craft Lightning Week! All week long my friends Angie, Beth, and I are sharing fun and fast crafts that you can make using burlap. And we’ve invited some of our craftiest friends to join in! Be sure to scroll down to the bottom of the page to check out all the fun and fast crafts that you can make using burlap!

Simple Burlap Placemat

To make this burlap placemat, you’ll need:

Large roll of burlap
Rotary Cutter, Ruler, and mat
Ribbon
Scissors

supplies for placemat

Decide how big you want to make your placemat. Cut it about an inch larger on each side.

Fray down the edges by about an inch on the top and bottom, leave the sides with the finished edge that they had when it came off the roll.

trimmed edge

About an inch from one side, pull out enough threads to make a gap slightly wider than the width of your ribbon.

pulling out the thread

pull out threads

Weave the ribbon into the gap. You can weave up and down every thread, but I found it much easier to go up and down every 4 threads instead.

weave in ribbon

Trim the ends of the ribbon however you like.

trim ribbon into point

That’s it! Make as many placemats as you like.

finished burlap placemet

And check out all these other fun burlap crafts!

I love this mini burlap decor that Jen Goode wipped up!

Over at See Lindsay, Lindsay made this ruffled burlap wreath.

I love this Oogie Boogie Charger from Michelle’s Party Plan-it.

Loving this burlap hydrangea wreath from Mad in Crafts.

These Burlap Bags were stitched up by Katie of A Sweet Berry.

Over at Creatively Beth, our guest co-host Beth Watson made this cute burlap and pom pom necklace.

My long-time co-host Angie from the Country Chic Cottage made this burlap box.

No Mess Glitter Ornament

I don’t do a lot of crafting with glitter during the rest of the year. But during the Holidays, I like to add some sparkle. But I don’t want that sparkle to hang around year-long. So I’ve a method for working with glitter that will keep the glitter from getting on every surface of my home from now until forever. You’ll love this No Mess Glitter Ornament technique!

This craft is the last of Craft Lightning Week. All week long I’ve been sharing fast, 15 minute Holiday crafts along with my co-hosts Jessica from Mad in Crafts and Angie from The Country Chic Cottage. And we’ve invited our crafty friends to join in! Check out all their great projects at the bottom of the page.

No Mess Glitter Ornaments

To make this No Mess Glitter Ornament, you’ll need:

Glitter
Mod Podge
Cup & Popsicle stick
Paintbrush
Paper Plate

supplies


I picked an ornament that had two parts, so I started by putting it together.

put together


Mix the glitter and Mod Podge together in the cup. Paint the mixture onto the ornament.

paint on glitter

Make sure to add a nice coat that gets full coverage.

allow to dry

Allow the ornament to dry overnight before you hang it on the tree.

finished ornament


Now check out these great Holiday craft ideas!

Learn how to make these monogrammed Christmas ornaments over at It Happens in a Blink.

Happy Go Lucky made these great Snow Globe Mason Jars.

Frog Prince Paperie has a printable to make this cute sparkly light bulb garland.

You’ll learn how to make these cute holiday tea towels over on Lydi Out Loud.

Make Life Lovely whipped up this fun custom Christmas Sack.

How fun are these wreath pacecards from Creativities Galore?

Over at Becoming Martha, you can learn how to make these necklaces – such a great gift idea!

Katie shows you how easy it is to make your own Christmas Countdown Calendar.

My Co host Jessica made these great hot-glue-and-sequin ornaments.

She also made these sparkle-filled ornaments.

Angie from the Country Chic Cottage, my Long-time co-host whipped up these plastic snow globe ornaments.

and this great gift idea – a Lego travel case!

lego travel case

Super Simple Holiday Earring Craft

I love making simple earrings. Such a great way to add personality to an outfit – and so many earring crafts are so incredibly easy to make. Like this Super Simple Holiday Earring Craft. So crazy easy that when you tell people you made them… you’re going to feel a little big guilty! But you totally DIYed these fun earrings!

This project is part of Craft Lightning Week. All week long my friends Angie from The Country Chic Cottage and Jessica from Mad in Crafts and I have been sharing a 15-minute or less craft project every single day. And we’ve asked a bunch of our crafty friends to join in with us. Be sure to scroll to the bottom of this page for a healthy dose of Holiday Crafting inspiration!

Super Simple Holiday Earring Craft

This post contains affiliate links which help support this site at no extra cost to you.

To make your Super Simple Holiday Earring Craft, you’ll need:

Holiday buttons like these or these
E6000
Post-style Earrings
Wire Cutters

Make sure you have two of each design you’d like to use as a pair of earrings. Use the wire cutters to cut off the button-back of the earring.

trim backs

clipped backs


Use the E6000 to glue the earring posts to the back of the (formerly) buttons.

glue

Allow the glue to set. Overnight is usually enough.

allow to set

It is that easy to make some of the cutest holiday earrings, and at a fraction of what they would cost if you bought them at a retail store!

finished Holiday Earring Craft

I don’t know about you, but I am going to be on the lookout for ALL the cute buttons from here on out! This Super Simple Holiday Earring Craft is an all-time favorite!

Make Simple Holiday Earrings with this super simple DIY Holiday Earring Craft


Want more fun and fast Holiday crafts? Check out these great ideas!

How cute is this Popsicle stick snowflake from Gingersnap Crafts!?

Artsy Fartsy Mama made this sparkly Holiday sign.

Annmakes has a poinsettia bouquet that is prety and practical!

Over at CRAFT you can learn how to make these cute Ugly Christmas Sweater Ornaments.

SAMSUNG CSC

These Christmas Tree napkin rings from Try It Like It are sure to add some cheer to any table.

I love this pretty Joy sign from 5 Little Monsters.

This holiday gift tag from Michelle’s Party Plan-It is so pretty!

Learn how to add some cheer to a plain water bottle at Happiness is Homemade.

My guest co-host, Jessica From Mad In Crafts made these simple paint-pour ornaments.

And my long-time co-host, Angie from The Country Chic Cottage made a video to show you how to make her cute thumbprint tree ornament.


DIY Paint Marbled Ornaments

Marbling paint is not a new technique at all, but it has been made even more popular lately. I tried my hand at paint marbling on these DIY Paint Marbled Ornaments, using the paints and marbling medium that Plaid Crafts sent me. It was such a fun and satisfying experience to watch the paints blend together. Even times when I felt that I had over-marbled, gone too far, and completely ruined the project… within seconds the marbled effect was back, and the project was still perfect! Though I hesitate to say that any craft is fool-proof, this project certainly felt like any crafting skill level could make a marbled ornament that they would feel proud to hang on their tree!

This project is part of Craft Lightning Week. All week long my friends Angie from The Country Chic Cottage, Jessica from Mad in Crafts, and I are sharing a new Holiday project each day. And each of our Holiday crafts can be made in 15 minutes or less. And we’ve invited some of our craftiest friends on the internet to join us on our journey this week. Be sure to check out all their fun Holiday crafting ideas at the bottom of the page.

Make Paint Marbled Ornaments

To make your own DIY Paint Marbled Ornaments, you’ll need:

Martha Stewart Marbling Medium
Craft Paints – I used Folk Art Color Shift and Folk Art Metalic
Cardboard Ornaments
Cups
Stirring Sticks (I used popsicle Sticks)
Pin for popping air bubbles

You can watch this video to get all the details on how to marble your ornaments, or you can follow the steps outlined below.


  1. Mix your paint and marbling medium according to the instructions on the back of the marbling medium package. You don’t have to be perfect, estimate 1 part paint to 2 parts marbling medium.
  2. Stir well. Try not to get air bubbles into the paint.
  3. Allow to sit for 10 minutes.
  4. Pour a base color onto the ornament. Move around by tilting the ornament or spread it using the stir stick.
  5. Add drips of your other colors.
  6. Use the head of the pin to draw horizontal and vertical lines through the paint and/or tilt the ornament in all directions to move the paint around.Keep moving it until the surface is covered, and you are happy with how swirly your design is.
  7. Set aside to dry, in a place that excess paint can drip off.
  8. After drying, paint the sides and back of the ornament with a solid color.
  9. Enjoy your Holiday decor!

If you enjoyed making these DIY Paint Marbled Ornaments, you’ll love checking out these other fast and fun Holiday craft ideas!

Everyday Party Magazine made this cute Holiday Sign.

I’m mad for this DIY Gumball Machine Ornament that PS I Love You Crafts made!

How fun is the North Pole Craft that Albion Gould made?

Carla Schauer shows you how to whip up a button garland for your tree.

Over at Cupcakes and Crinoline you can learn how to DIY your own Gilded Pears.

Jessica, my Guest Co-Host for the week, came up with these fun and simple wire squiggle ornaments.

And Angie from The Country Chic Cottage, my long-time friend and Co-Host created these adorable snowman ornaments in just 5 minutes!

Come back tomorrow for more fast and fun Holiday Craft ideas!