Hanging Vase Necklace

30 Minute Crafts are my favorite kind of crafts. My second favorite kind of craft is the “whoa, you made that out of WHAT?” crafts. You know, the ones where a simple object is repurposed into something much less simple, but so much more awesome.

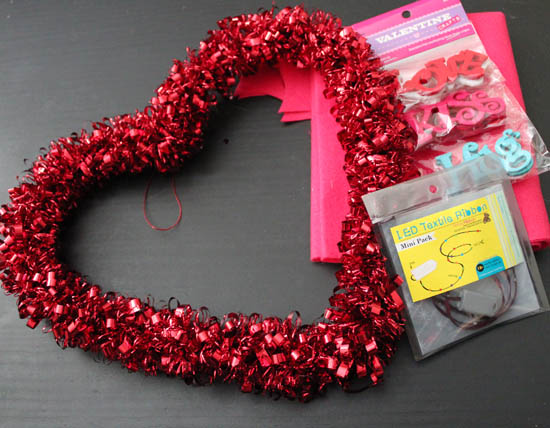
That’s what happened here with these hanging vase necklaces. Go ahead and guess what they are made of… and then find out what to grab at the store when you make your own!

5 minute hanging flower necklace - mitch in LA

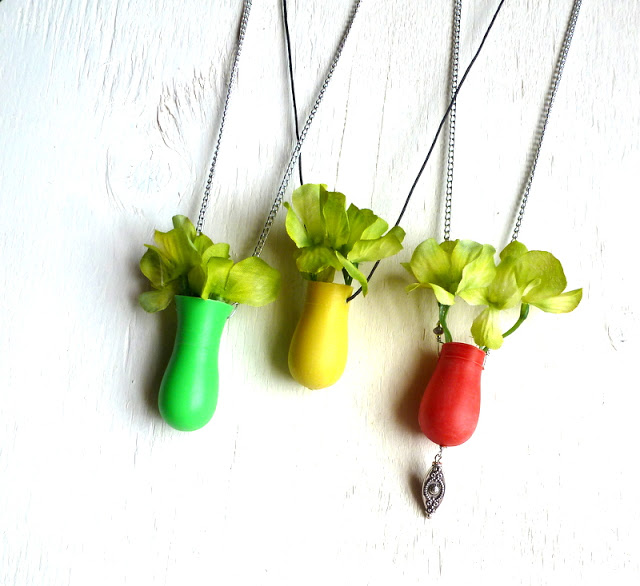
Once you learn the secret behind these necklaces, you’ll want to pin them to share with your friends. Before pinning, make sure to click through to the original source.

Valentine’s Kids Craft Button Votive

I’m super-excited about today’s guest post… my friend Amy from Mod Podge Rocks is here sharing a fun (and quick, of course) kids Valentine’s craft! Amy wrote the book on Mod Podge
… literally! She sent me a copy (which I love so much I lent it to my mother)… and a second copy to give to one of you! Make sure you scroll to the end of the post for a chance to win!

Valentine kids craft button votive

Well hello there! I’m Amy from Mod Podge Rocks. I’ve never been a big Valentine’s Day person until I did a Aqua Valentine series last year . . . in which I threw hearts on their head by turning them blue. It made for a more interesting Valentine’s Day in terms of crafting, and I’ve loved making projects for February 14th ever since. This year I’ve pulled together a quick craft for the kids, and not only is it fast, but it’s budget friendly. I got this votive from the dollar store and I had the tissue paper and buttons in my stash.

$1 for a kids craft? Yes please!

Not only that, but the Kids Wash Out Mod Podge
is a new formula and it’s very special. It comes out of kids’ clothes, which is awesome. No more crafting in fear of a destroyed wardrobe! Here’s how it’s done.

Gather These Supplies

Dollar store votive – got mine from Dollar Tree
Kids Wash Out Mod Podge
Tissue paper in the patterns of your choice (pink and red, of course!)
Craft glue
Button
Paintbrush
Scissors
LED tealight

IMG_6980

This is my before. These votives from Dollar Tree are really nice and come in a variety of shapes and sizes.

IMG_6996

Bigger kids can cut out the tissue paper into squares – I recommend cutting a bunch of squares for little ones.

IMG_6997

Give your child a paintbrush or foam brush and have them paint a layer of Mod Podge down, adhere the tissue paper and then paint more Mod Podge over the top.

IMG_6998

Keep adding layers and layers on top. It’s fun because it doesn’t matter how many layers and it can be random – kids will love that.

IMG_7007

Once it’s dry, add a button or other embellishment to the front with craft glue.

Kids Craft Button Votive

This votive was done in about 15 minutes. It will take some kids longer, but you can definitely be done in a short amount of time. This fun votive can be used for home decor or you can even add candy for a teacher gift! What do you think?

Come visit me at Mod Podge Rocks for daily decoupage ideas – also visit me at Facebook, Pinterest, Google Plus or follow my RSS feed for more!
a Rafflecopter giveaway

Tub Tea Bags in less than 30 minutes!

Crafting helps me to relax… but sometimes I need to tune out the entire world and soak in a tub of warm, fragrant water. I love that I can use things I already have around the house to craft up some tub tea bags during my crafting time, and then soak away my worries at the end of the day. Tub tea also makes a great gift for Valentine’s day, Mother’s Day, or Birthdays. Here is some tub tea that I whipped up:

bathtime is more relaxing when you make your own tub tea

Find my full step-by-step instructions for making your own tub tea bags at Home Made Simple.

disclosure: I was compensated for writing the post at Home Made Simple. This post does NOT contain any affiliate links.

Washi Tape Crafts!

craft lightning valentines washi tapeAngie and I are sharing Washi tape crafts with you today on our live crafting hangout! Watch at 4pm as we whip up some fun Valentine’s crafts using Washi Tape!

Washi tape is big in crafting right now because it comes in so many fun colors and is so easy to use!

Grab whatever washi tickles your fancy and come craft with us!

No Sew Valentine’s Day Owl Tea Towels

I love these Valentine’s Owl Tea Towels. And even better – they are a NO SEW project! You use iron-on adhesive to put the project together. These tea towels are great to hang in your kitchen, use in your guest bath as guest towels, or to give as a gift to a friend or neighbor. They are so simple to make!

Valentineshandtowels - crazy little projects

This project is totally pinnable. Just make sure you click through to the original source before pinning.

30 Minute Valentine’s Blinking Wreath

30 Minute Valentines Blinking Wreath

This Valentine’s wreath is so simple and easy to make! Just a few simple supplies, and one brand-new-on-the market supply… the LED textile light ribbon! I saw this ribbon at the Crafts and Hobby Association Winter trade show, and was smitten. They are just coming out with it in retail settings, so for now if you want it there is only one place you can purchase it, and there is an order minimum… but I loved it so much that I bought quite a bit, so you’ll be seeing it pop up in future craft projects!

blinking wreath supplies

Supplies:
Heart-shaped tinsel wreath (dollar store find)
Pink Felt
Felt Valentine’s Words (craft store)
LED Textile Ribbon
Hot Glue
old keys (optional)


Cut a piece of felt about 2.5″ wide, and at least 20″ long, and a second piece about 1.25″ wide and at least 7″ long. Cut V shapes out of the ends of the long piece.

cut felt bow

Fold the large piece into uneven thirds, with the ends longer than the center. Then wrap the LED ribbon into several loops, with the ends in the middle.

wrap up LED light ribbon

Glue the ribbon in the middle of the folded piece, with the battery unit on top. Make sure the on/off switch is facing up.

glue down LED light ribbon

Wrap the smaller piece of felt around the battery unit, gluing in place on the back. Test the button to make sure you can press it through the felt.

center of felt bow

Glue the felt letters on top, and then glue the whole bow into place on your heart-shaped wreath. Adjust the tails of the bow to make it look like a nice bow with even tails. Depending on where you put the bow, you may want to add some counter-weight on the other side to keep the wreath from tilting. An old key or two glued on the back will work as a counter weight.

blinking-valentine-wreath

Lost Parts Bin

If you have small children, then you have small toys in your house. And if you have small toys, you have small toy parts. And these parts get misplaced. Go missing. Get lost. When cleaning up the playroom, I never know what to do with all the spare bits and pieces until I can find them a home. These small toy pieces usually end up in the center of the table, an eyesore to the room I just cleaned. But with this genius idea of creating a spare parts bin, even the orphaned pieces can have a home!

Lost Parts Bin - That's what Che Said

If you have a pinterest board devoted to ideas for your kids, you’ll want to pin this there… but be sure to click through to the original source first!

Fast and Classy Valentine’s Day Favors

These favors start with a humble dollar store plastic heart, but with the addition of a little washi tape and stickers, they become upscale-looking favors. Quick and easy to make, the washi tape really makes the project pop!

valentine favors on dollar store crafts

If you’re going to need favors for a classroom and want to pin this project, make sure to click through to the original source and pin from there.

Fast and Sparkly No-sew Princess Crown

My birthday is this month. And although I lean more tomboy than girly-girl, I would absolutely wear this sparkly princess crown on my birthday. And what other day can you get away with it? This crown is super-simple to make and looks awesome. Plus, the stiffening material ensures that it stands up through all the demands of a full day of birthday partying, cake, and pinatas!

princess_crown at seven thirty three

You’ll want to pin this project to make for the princess in your life later… please click through and pin from the original source.

Simple Valentine’s Shell Art

It is nearly February and I am wishing for beachy weather! As much as I love snuggling under blankets with a warm mug of cocoa… I yearn for the summer months of shorts, tank tops, and toes in the sand. This fun Valentine’s shell art is super simple and quick to make, and if you turn up the heater full blast and slip into some flip-flops, you can pretend for just a moment that you’re on a beachy vacation…

Simple Shell Valentine Art by Sand & Sisal

If you want to pin this for a time when you have seashells handy, make sure that you pin from the original source.