Search Results for: dollar store

Simple DIY Caroling Lights

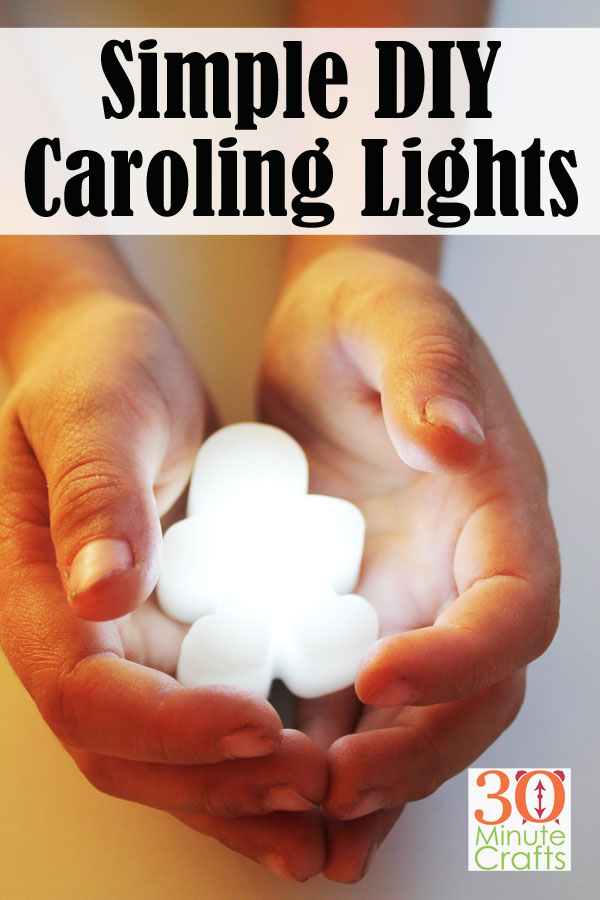
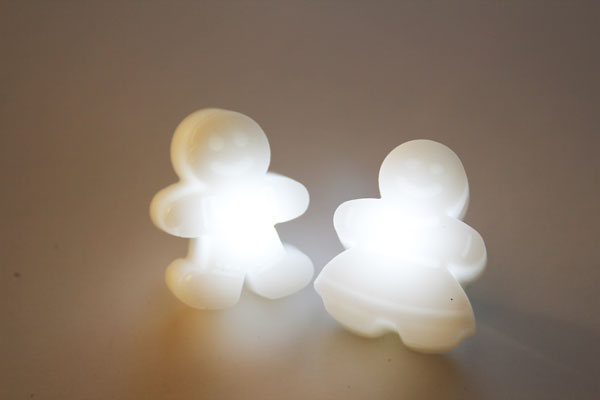
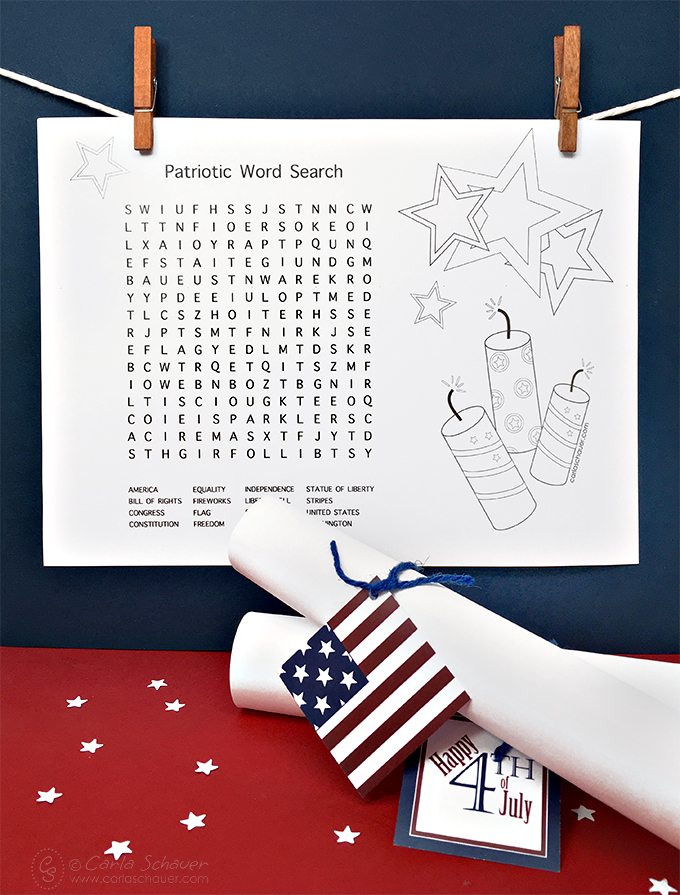
Does your family or Church group go Caroling during the holidays? If you’re looking for a fun alternative to traditional Caroling Candles, these Simple DIY Caroling Lights are perfect! They don’t take long to make, are completely safe for kids to hold, and give off the perfect festive glow for the holidays. Even if you don’t go caroling, you’ll want to make these to place around the house instead of tealights during the Holidays.

Simple DIY Caroling Lights - a fun alternative to candles or tealights during the holidays.

This post contains affiliate links which help support this site at no additional cost to you.


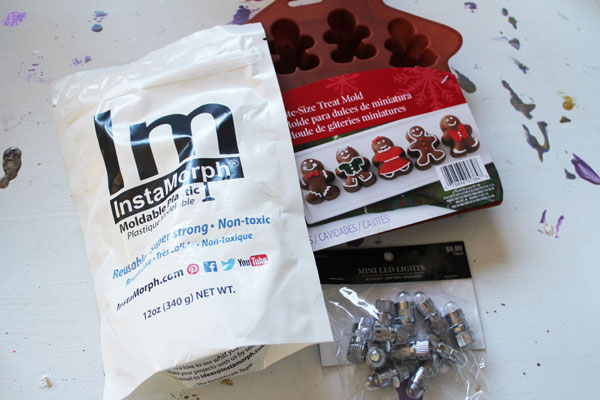
To make these Simple DIY Caroling Lights, you’ll need:

Gingerbread Man Silicone Mold
Instamorph
LED Lights
Mug or Bowl
Hot Water
Tongs

supplies for Simple DIY Caroling Lights

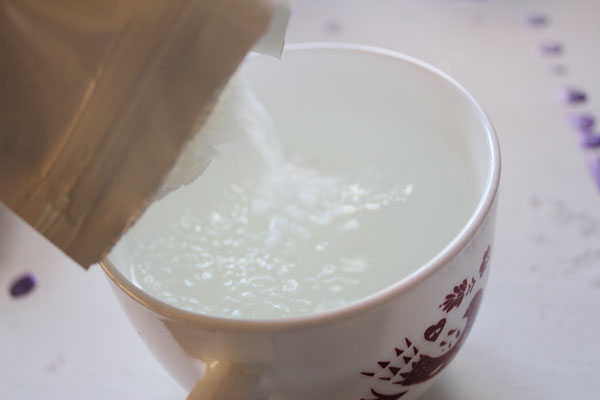
Pour the InstaMorph into the hot water. Allow to sit for 2 minutes.

pour in pellets

Pull out with tongs. When it is cool enough, you can shape it with your hands.

pull out of water


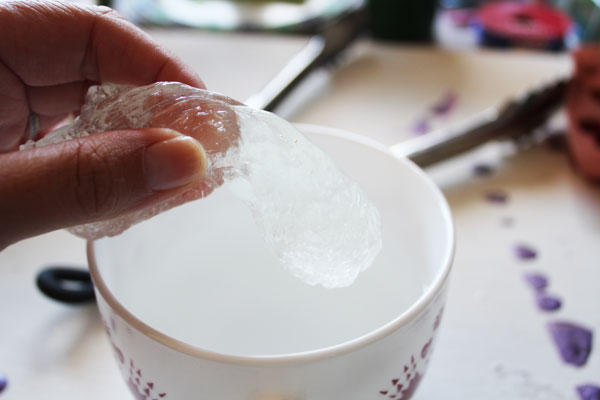
Wrap it around the light.

mold around light

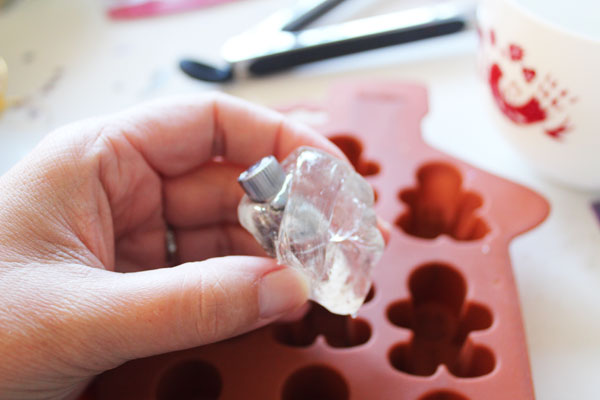
Push into mold.  Make sure to adjust the back of the mold.

mold back

Allow to set.

allow to set

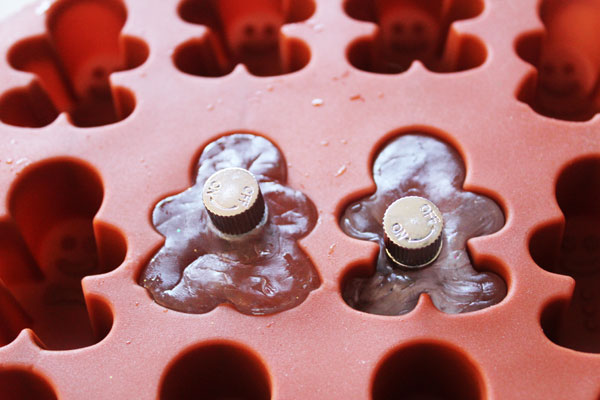
The plastic will turn white when it cools.

plastic is set

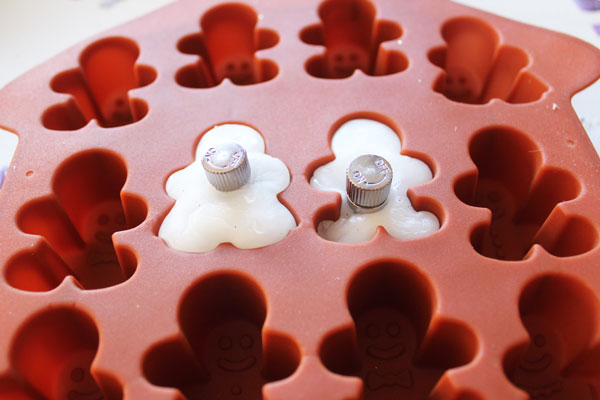
Unmold. Turn the back of the light to turn on.

simple DIY Holiday lights


Check out these great ideas for fun and fast Holiday Crafting!


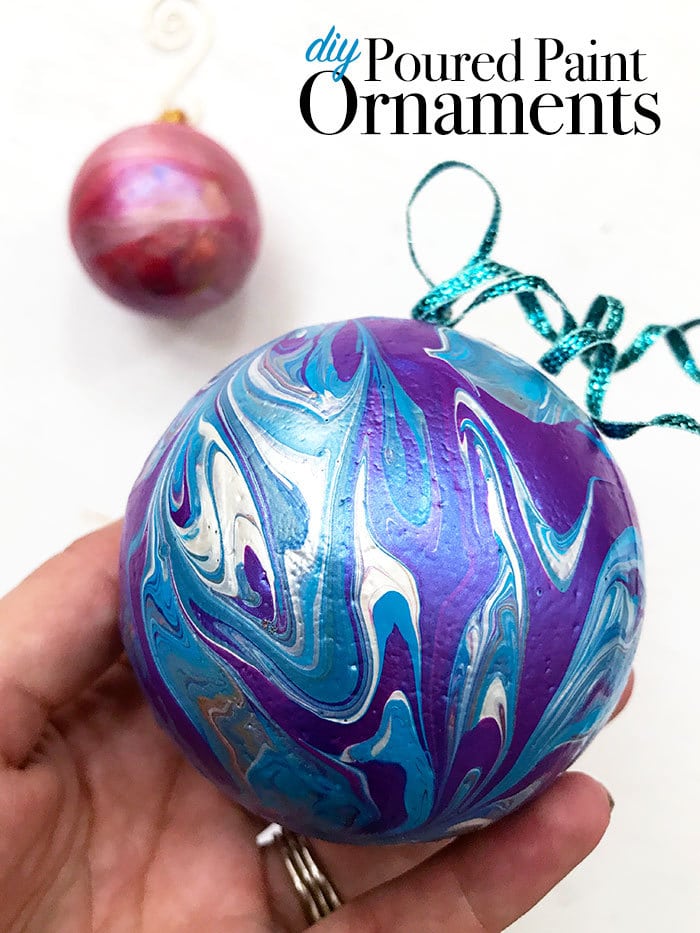
I love these poured paint ornaments over at 100 Directions – they look so much harder to make than they actually are!

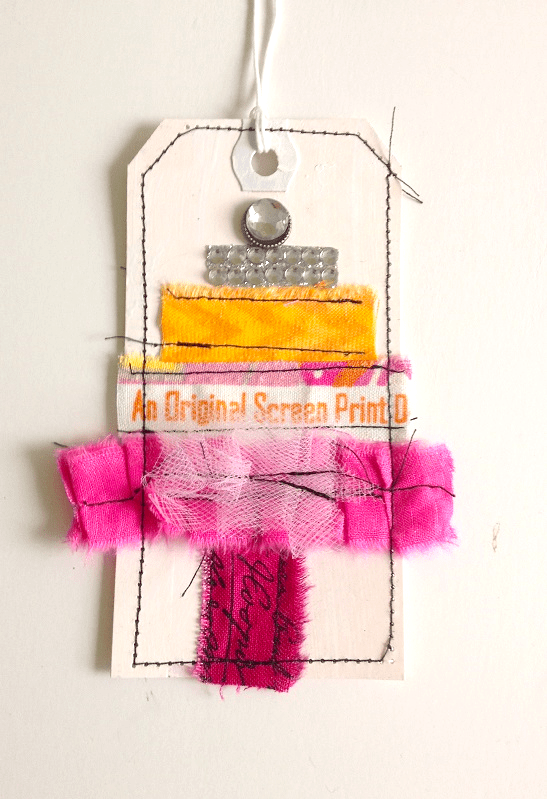
Check out these fun selvedge edge gift tags from 365Days of Crafts!

You can learn how to make this farmhouse-style Christmas wreath over at See Lindsay.

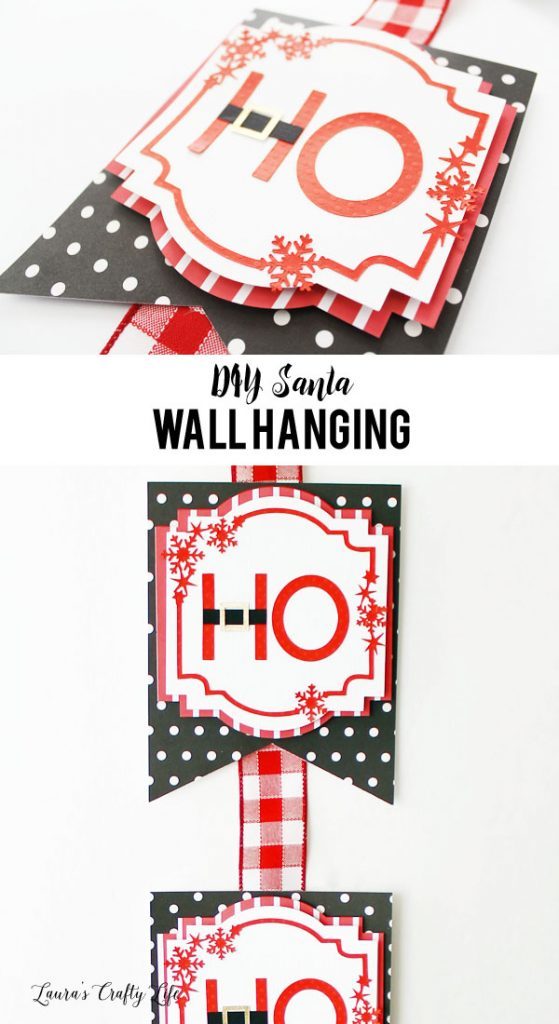
How cute is this DIY Santa Sign from Laura’s Crafty Life?

I love this DIY Farm Fresh Sign from the DIY Village.


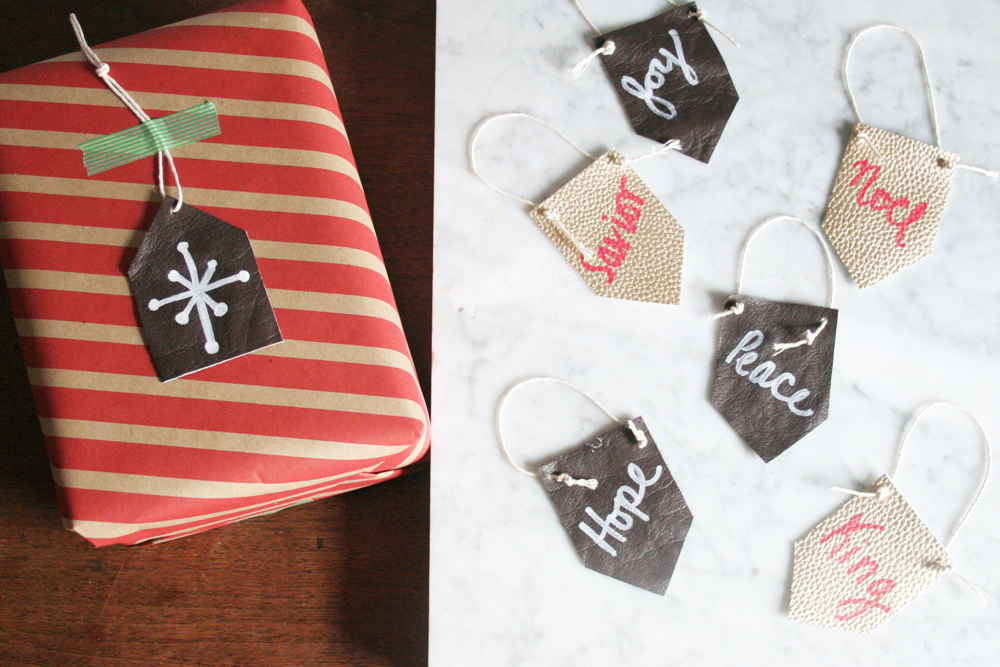
Craftivity Designs makes these DIY Leather Gift Tags and Ornaments.

Whip yourself up a pair of these leather snowflake earrings from Hey Lt’s Make Stuff.


My guest co-host, Jessica from Mad in Crafts created these fun sequin dipped ornaments.

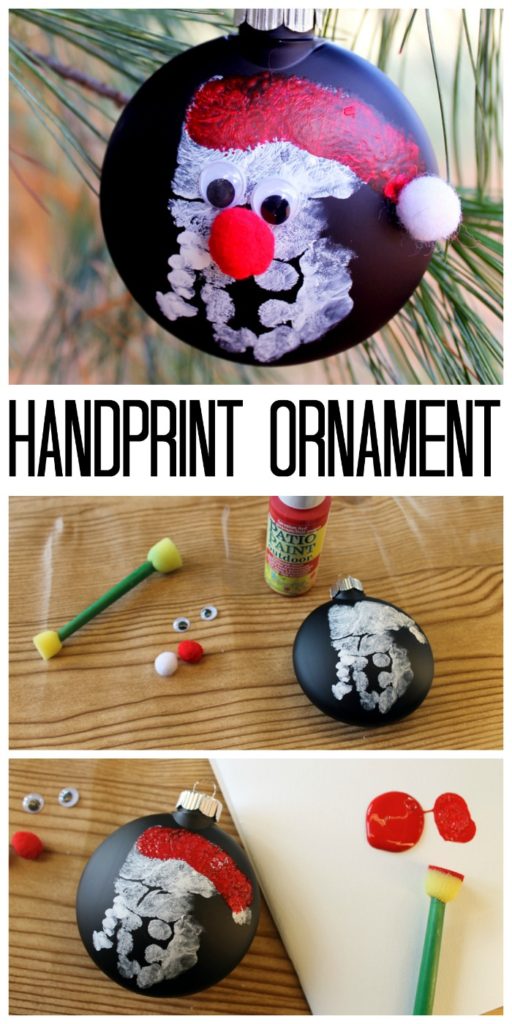
And my long-time co-host, Angie from the Country Chic Cottage shows you how to make a handprint ornament.

Check back tomorrow for more fast and fun Holiday Craft Ideas!


THINK Classroom Letters

A couple years ago, someone gave us a printout with the letters THINK to help kids decide to say something. Is it True, is it Helpful, is it Inspiring, is it Necessary, is it Kind? Kids can review these benchmarks to decide if what is in their mind is worth saying out loud. When I saw the wooden THINK letters in the Dollar section at Target, I snatched them up. I knew they’d make great classroom art for my son’s teacher.

And they’re the perfect project to share this week! All week long I’m sharing quick crafts as part of Craft Lightning Back to School Week! My friends Angie from The Country Chic Cottage and Kara from Happy Go Lucky are crafting along with me creating their own fun and fast 15 minute craft each day. Check out their fun and fast craft ideas below, along with some more ideas from our craftiest friends around the internet!

THINK Classroom Letters - a great teacher gift, perfect in a Homeschool Classroom

To make these THINK letters, you’ll need:

Letters T-H-I-N-K. I found wooden letters as one set. You could use paper mache letters from the craft store.
Paint Pens

letter supplies

Prep your paint pens by shaking them. Write on each letter.

write on letters

Write on all the letters.

On the T: Is it True?
On the H: Is it Helpful?
On the I: Is it Inspiring?
On the N: Is it Necessary?
On the K: Is it Kind?

finish writing letters

That’s really all there is to making these letters! Sometimes crafting is just adding your personal touch to something.

If you’re not confident with your handwriting, you can cut vinyl or use stencils to write on the letters.

Think Letters for classroom

That’s it!

finished letters

Check out these other fun and fast back to school crafts!

How clever is this Locker Organizer made from an Embroidery Hoop by Organize and Decorate Everything!?

Bling your locker by making this Locker Chandelier from the DIY Village.

Yesterday on Tuesday shows you how to make this simple DIY Stuff Bag.

It isn’t officially the first day of school until you’ve photographed your child and shared on Social Media. Add this fun back to school sign from Ginger Snap Crafts!

Welcome kids back to school with this adorable “One Smart Cookie” Printable from Creating Really Awesome Fun Things.

My Crafty Co-Hostess for the Week, Kara from Happy Go Lucky created a super fun Teacher Notebook.


My long-time co-hostess for Craft Lightning, Angie from The Country Chic Cottage, is also the queen of Mason Jar Crafts. And she has outdone herself with this adorable Pineapple sugar scrub back-to-school teacher gift!

Cars 3 Craft: Miss Fritter Inspired License Plate Bracelet

My boys have grown up loving the Lightning McQueen, and all the Cars characters that create the movies. Mater, Sally, Doc, Luigi, Guido, Miles Axlerod, Professor Z, Finn McMissile, Holly Shiftwell, and so many more! To celebrate the new Cars 3, I created this fun Cars 3 craft – a License Plate Bracelet inspired by Miss Fritter. She is a Thunder Hollow Speedway Legend – a schoolbus weilding a stop sign blade, and wearing a collection of license plates commemorating former victims.

Recently, my 8 year old and I were invited to the “Road to the Races” tour here in San Diego. Lightning McQueen and his friends are going on a cross-country tour to celebrate the new Cars 3 movie that will be in theaters starting June 16th. We got to see a short clip from the movie that featured Miss Fritter, as well as see Lightning himself, and make some fun Cars themed crafts. Scroll all the way down to check out photos from the event.

Cars 3 Craft - Miss Fritter inspired License Plate bracelet

To make the Cars 3 Craft: Miss Fritter inspired License Plate Charm Bracelet, you’ll need:

License Plate Printable
Shrinky Dinks (printable kind is best)
Oven/pan/brown paper bag for baking Shrinky Dinks
Scissors
Hole Punch
Clear Nail Polish
Jewelry chain
Clasp
Jump Rings
Jewelry Pliers

license plate charm bracelet supplies
Print the license plates onto the shrinky dink material.

A huge thanks to family and friends for helping me come up with the Vanity Plates for this project. Shout outs to Frits, Heather, Keri, Rebecka, Christie, Noah, Jasmine, Francina, Neil, Stacie, and Catherine!

License Plates Printable

Don’t worry if it bleeds a little – remember that the final version is 1/3 this size, and it will look fine. Also, we’ll be trimming the edges in the next step.

If you don’t have shrink plastic, you can print these license plates at 30% on paper, and use resin like I did in my resin jewelry.

printed license plates

Trim the license plates with scissors. Try not to touch the ink if you can, it can stay wet for quite a while, even when it looks dry. Use a hole punch to punch a hole in each. The holes don’t all have to be in the upper left hand corner – you can do some on the right, and some on the bottom, depending on where it fits best.

punch holes

Bake according to the Shrinky Dink instructions. To keep the ink from smearing if the bracelet gets damp, seal in the ink side. My favorite way to do this is with clear nail polish. If you think the bracelet is going to get a lot of wear, add a second coat.

add nail polish

Measure the chain for your bracelet, and cut to length.

measure bracelet

Add a clasp on one end, and jump ring on the other.

bracelet

Lay out your license plates to determine an order, and to see how far apart to space them. I’m putting mine on the large links in this chain so they will be evenly spaced.

lay out plates

Use the jump rings to attach the license plates.

add plates

Once you have them all added, your bracelet is ready to wear! I love the noise the plates make when they tap against each other… makes it feel so authentic!

finished bracelet

Enjoy wearing your bracelet… maybe on the 16th to the opening of Cars 3?

Cars 3 license plate bracelet inspired by Miss Fritter

Here are some photos of the fun we had at the Road to the Races event in Belmont Park!

Save

Patriotic Star Coasters for 4th of July

I love adding touches of holiday decor that aren’t overwhelming. These star coasters are easy to make, easy to set out and enjoy during the holiday, and easy to tuck away when not in use. You can make your own 4th of July Patriotic Star Coasters with very little work – and the raised star center makes them look very labor-intensive!

I made these Star Coasters as part of Craft Lightning week. All week long, I’m sharing 15 minute or less Patriotic-themed crafts along with my Co-Host Angie from The Country Chic Cottage, and our guest Co-Host, Laura from Me and My Inklings.

Star Coasters

Plaid sent me some of their new Folk Art Coastal paint line. I love the texture that this paint adds – a rustic look without having to pull out the sand paper. I was excited to use it as part of this project.

To make these Star Coasters, you’ll need:

Wooden Star blocks – found in the decorative wood trim section of the Hardware Store
Folk Art Coastal Paint
Mod Podge Dimensional Magic
Paintbrush
Optional – red and white paints

supplies for coasters

Start by painting the wooden block. Set aside to dry.

paint with coastal paint

Fill the center with Mod Podge Dimensional Magic. Do your best not to let air bubbles in.

fill with dimensional magic

Allow to dry overnight. If, in the morning, your coaster looks like this… don’t worry! The thick layer of Dimensional Magic sunk in the center.

after drying

Just re-fill any holes and allow to dry for another day. You might have to fill a hole or two the following day. But then they turn out awesome!

fill again

If you like, you can add touches of red and white paint to really add to the patriotic theme.

add red and white paint

Allow to dry, and your fancy-looking but oh-so-simple Coasters are complete. And with less than 15 minutes of hands-on crafting time!

finished star coasters

If you enjoyed these patriotic coasters, you’ll love checking out these other fast and fun patriotic crafts:

Emily at My Mom Made that whipped up her own Star Coasters… how fun are these?

Learn how to customize a drink bucket for the 4th over at Everyday Party Magazine.

Jessica at Mad In Crafts made this Patriotic Floral Centerpiece – with waterproof LED lights!

Albion Gould shows you how to make your own rustic Americana Banner.

Over at Sparkle Living, you’ll learn how to whip up this patriotic wreath.

Carla Schauer has a Patriotic Word Search that will keep the kids occupied while you’re waiting for dusk so you can light the fireworks.

Karen Marie at Dragonfly and Lily Pads has some fun tied-ribbon decor.

And be sure to check out Rita Barakat’s Patriotic craft video on her site.

Googly Eye Headband

I have a thing for googly eyes. They make me go completely googly on the inside. For realz. And I can’t explain it. Googly eyes are my catnip. And Halloween is the perfect time to break out my giant stash of googly eyes. Like this Googly Eye Headband. It is crazy simple to make, and is the perfect “un-costume”. Maybe you work in an industry where you can’t dress up for Halloween, but want your attire to be a nod to this festival of tricks and treats. Or maybe your child’s school doesn’t allow costumes, but you can’t resist bending the rules on the 31st of October. Take a few minutes, and whip up this fun Googly Eye Headband!

This project is part of Craft Lightning Week. All week long, I’ve been sharing 15-minute-or-less crafts here on 30 Minute Crafts as part of the series – so have my friends Angie from The Country Chic Cottage and Jen from 100 Directions. AND, we invited a bunch of our crafty friends from around the internet to join in. Scroll down to check out all their fun projects!

Googly Eye Headband - easy to make Halloween accessory!

Supplies for Googly Eye Headband:

Googly Eyes (you can use all the same, or different sizes and colors)
Hot Glue
Headband (wide or skinny – up to you!)

supplies for googly eye headband

Just glue the eyes in place. On a wide headband, you’ll want different sized eyes, Stagger them for a less structured look.

glue on eyes

I really like the thin band with the row of same-sized googly eyes. It is also easier to make. Just add a line of glue about an inch or an inch and a half long. Then put on googly eyes. Repeat all the way around the headband. Your Googly Eye Headband is complete.

glue eyes in a row

I’ve got one more day of 15 minute Halloween craft ideas… be sure to come back tomorrow to check it out!

Check out these other fast and fun Halloween Crafts:

Try it Like it shows you how to make a simple mummy wrapped candle.

50075450321436980d654c9a483de8373feb532ded563c

Midge and Madge show you how you can make your own Halloween Treat bag – these are so simple, you could make them the morning before!

trick-or-treat-bags_orig

Crafty kids will love making these Halloween beadie buddies – this is a great scout craft project, and The Gagen Girls will show you how!

halloween-pony-bead-beadie-buddies

Over at Laura’s Crafty Life, you’ll learn how to make a Halloween wreath that is pretty and spooky at the same time!

create-a-halloween-wreath-in-under-10-minutes-with-supplies-from-the-dollar-store

Albion Gould used glow in the dark embroidery thread (how did I not know about this stuff??) to make a cute ghost tassel necklace.

tassel-ghost

Our crafty-guest-co-host, Jen from 100 Directions, made these fun Boo Bags using adorable Halloween printables.

mini-boo-bag-jen-goode

And Angie over at the Country Chic Cottage, my crafty co-host for this series, made these cute burlap candy corn gift bags!

candy-corn-halloween-treat-bags-006

Spooky Halloween Table Setting

This is a Sponsored post written by me on behalf of Dollar General for SocialSpark. All opinions are 100% mine.

Spooky Table Setting at 30 Minute Crafts .com

I took a trip to my local Dollar General earlier this week to get some Halloween crafting supplies. I love Halloween, and wanted to put together a table perfect for a Halloween dinner party. Dollar General had everything I needed to set a spooky table.

Dollar General Items for Halloween Table


I bought these awesome Halloween supplies at Dollar General:
Store Brand “Dew”-style soda
Halloween Striped Tights
Plastic Body Parts
Skull Straws
“Undead” Caution Tape
Cobwebs (optional)
Plastic Spiders (optional)
To this I added:
Mini Jars (shown)
Lace Tablecloth
Dark Placemats
White Plates
Silverware
Black Napkins
Everyday Glassware

Creating my table setting was simple. I started by layering my tablecloth, placemats, and china. I set out the silverware, then got to work making everything spooky.

I started with the tights and straws.

Halloween tights and Straws

I cut the tights into sections the height of my glasses. Then slipped the tube over my glass. You can cover about 6 glasses with a single pair of tights.

Halloween Glasses

Add a skeleton straw, and you’ve got some great Halloween glassware!

Next I put the body parts in my small jars.

Body Parts in Jars

The “Mountain Explosion” drink is the perfect color to mimic formaldehyde. I poured it in each jar to cover the fake body part, then closed the lid.

Body Parts in Jars

The carbonation makes it extra spooky – don’t you think?

Finally, I used the “Undead” caution tape.

Undead Caution Tape

I cut off 18″ pieces to tie around the napkins, and put everything together to make the perfect spooky table setting.

Spooky Table Setting


The cobwebs and plastic spiders can be added to the backs of your chairs, or just the general decor.

This is the perfect setting for a Halloween Dinner, Murder-mystery dinner, or Friday the 13th Dinner. Now to figure out what to serve…

Spooky table Setting

As you can see, Dollar General had everything I needed for the perfect spooky table decor! For more great Halloween Crafting ideas, check out Dollar General on Twitter (@DollarGeneral) and like Dollar General on Facebook.

Visit Sponsor's Site

Popcorn and Bead Garland

This is a fun and colorful update to the traditional popcorn garland from when I was a kid. Chances are you have some of these pony beads hanging out around your house – and what a fun way to incorporate them in your holiday decor!

Once you’ve tried pony beads – try adding other items to your popcorn garlands – bells, pasta, perler beads, buttons… whatever you like!

popcorn bead christmas tree garland

If you’ve already put up your tree, you’ll want to pin this idea to remember it for next year. Make sure to click through to the original source and pin from there.

Want more 30 minute crafts? Like 30 Minute Crafts on Facebook, Follow 30 Minute Crafts on Twitter, and check out 30 Minute Crafts on Pinterest.

Halloween Lanterns

These Halloween Lanterns over at the V Spot are so super simple… and cheap, too! You simply MUST click over to see what she made them with! Since Halloween is just around the corner (have you started thinking about your costume yet), and you can already find some Halloween stuff in the stores… now is a great time to whip up some of these… or at least start collecting the supplies!

We all love Pinterest, but please do not pin from this post. Click to go to the original post and pin from there.

Want more 30 minute crafts? Like 30 Minute Crafts on Facebook, Follow 30 Minute Crafts on Twitter, and check out 30 Minute Crafts on Pinterest.

Duct Tape Dry Erase Board

My son loves dry erase boards. Loves them. He and my husband like to draw “boy” pictures on mine. For those of you who don’t live in a house filled with boys, let me tell you, it is pretty entertaining to walk into your sewing room and see boy pictures on your dry erase board. Like machine guns and tanks… and toilets.

With all the awesome patterned Duct Tapes out there, I could make us each a duct tape dry erase board like this one from Pink Pirate! And I could draw “girl” pictures on mine. Like bows, and princesses, and brand new sewing machines…

We all love Pinterest, but please do not pin this post. Click through to the original post and pin from there.

Tea Towel Apron (for $1.50!)

I ran by my local Dollar Tree the other day, and picked up some awesome goodies. I grabbed a couple tea towels, and a spool of grosgrain ribbon. For this apron, I used one towel, and half of the ribbon, making a cute little apron for Little Moore. Not only did I whip this baby together in less than 30 minutes – it only cost me $1.50 to make! Woot!

30 min crafts teatowel apron
The apron was a big hit – he refused to take it off to go to bed! Eventually, I was able to get it off of him… I didn’t want to risk him getting tangled in the ribbon and possibly hurt himself.
I’m really happy with how the apron turned out, and will have to go pick up some more towels and ribbon. There’s a certain Southern California Baking Momma with 2 little boys that love to help out, and I have a feeling these would come in handy. Especially for the older of the two who has decided that when he grows up, he wants to be a “boy cake decorator.” Too cute!

Start out with a towel and some grosgrain ribbon from your local $1 and under store.
1 supplies
For my practically-3-year-old, I measured in 4″ on the top, and 7″ down the side. I drew a line down from the top, and in from the side, then traced the curve of the ribbon spool where the lines met. With the towel folded in half, I cut this armhole out of both layers.
2 trace
Using the grosgrain ribbon folded in half, and leaving 12″ of ribbon loose at the top (neck) of the apron, I pinned all the way around the curved edge, the fold covering up the raw edge of the towel.
3 add on ribbon
When I got to the curve, I just stretched the towel more-or-less straight, and kept pinning the folded ribbon.
4 stretch to attach
I stitched the ribbon on, close to the edge of the ribbon, but not too close. I wanted to make sure that my stitching caught both the top and the bottom of the ribbon.
I then folded up the bottom of the towel, and stitched straight lines down each side, and then two extras in the middle to make segmented pockets in the front.
pockets on tea towel apron
Instead of folding over the raw ends of the ribbon and stitching down (which is an option), I just trimmed them with pinking shears to prevent them from unraveling.
I’m off to whip up some more of these!