Wine Bottle Stopper with Supplies from Lowes

I got back from BlogHer last night, and had a great time. Check out Always Expect Moore for the mini recap.

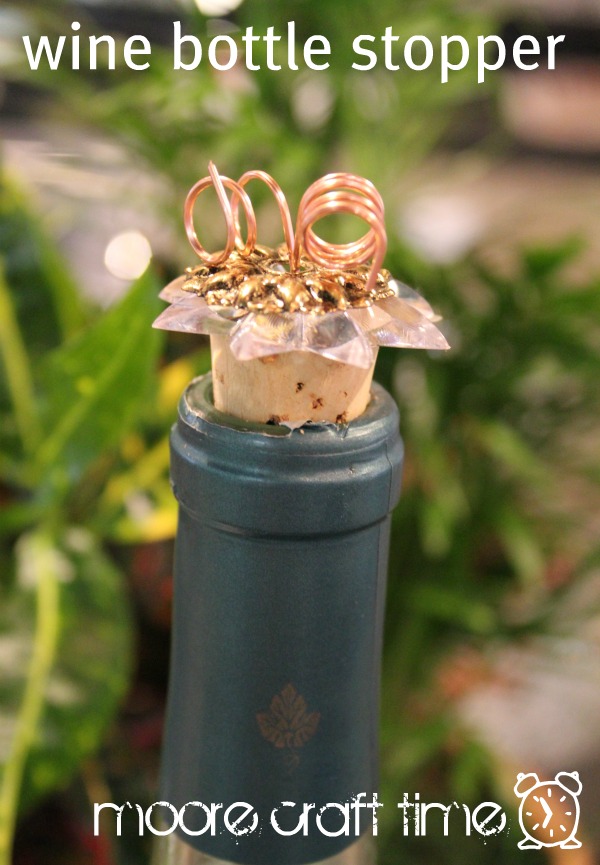
While there, I stopped by the Lowe’s booth to get my craft on. Yup, you read that right… I did some crafting at BlogHer… and I did it with supplies from the hardware store.

Normally, when I think of running to my local craft supply store to get some DIY inspiration, I don’t think of Lowe’s. But I will in the future. There are so many fun and fabulous supplies that just need a dose of creative thinking to become amazing.

I took the picture to the left, as well as all the step-by-step photos in the Lowe’s booth where they had all the fun supplies to make this cute wine bottle stopper. I can’t take credit for the idea, but I CAN show you how to make your own in just a few quick minutes.

Here are the supplies you need. You can find the cute little “do-dads” in the cabinet hardware isle. If a Lowe’s employee asks what you’re looking for, you might want to call them “Cabinet Knob Backplate.” You know, to sound like you know the difference between a Phillips Screwdriver and an Allen Wrench.
Cut a couple lengths of the copper wire… nice long ones are good, you can always cut them shorter later. Stick one end of each down into the middle of the cork. Go deep enough that they really stay put.
String on the drawer knob backplates (the do-dads).
 Curl the ends of the wire around the base of the pen. Curl all the way down to hold everything in place.
Now all that’s left is to open a bottle of wine! Hmmm… maybe all craft projects should end with a glass of Merlot?

Until next time,

This is NOT a sponsored post. I was NOT compensated by Lowe’s or any other company for writing this post. I just had a good time, thought this was a clever project, and wanted to share.

Feature: Simple Magnet Boards

I immediately fell in love with this idea! I’m in the process of updating Little Moore’s room from a child’s room to a “Big Kid” room, and this is simple and perfect. It fame from the Crate Paper Blog, and along with simple to follow instructions on these cookie-sheets-turned-magnet-boards, they also show you how to make the super-cute magnets.

Excuse me while I go make some of these for LM in cherry red… and then commandeer them for my craft room. : )

Until next time!

Fabric Covered Notebook with Elastic Page Holders

Lately, my schedule has gotten crazy. I’m trying to juggle a lot more… between a full time job, an almost 3-year-old, my first blog, this blog, and family events and such going on… keeping it all straight in my head is an impossibility. So, in addition to the big white board calendar, I got a little planner to keep myself organized.

But, it isn’t exactly pretty. And the tabs are helpful, but it doesn’t just automatically open to the current month. If I’m so busy that my crafting life revolves around 30 minute crafts, I’m also too busy to go fiddling with monthly tabs.

This project fixes both problems – I now have a cute planner cover, elastic bands to keep me focused on what’s going on now… and it was a cinch to make. Here’s how I did it:

I started out with my supplies. My planner from Target, 3 fabrics, and some elastic were all that I needed.
I stacked up my fabrics and wrapped them around my notebook to decide how long I needed the fabric. I made sure to add at least a 1/2″ on each side. For my 6×8.5″ notebook, I ended up cutting my pieces 9.5 x 13.75″, which also gave enough room around the spiral binding.
First I put down the cover fabric, right side up, and pinned a piece of elastic in place on each side, about 1.5-2″ away from the sides.
I cut my flap fabric in half (making 2 9.5×6.8″ rectangles), and folded them both in half. I covered the elastic with this fabric, with all the raw edges touching an the folded sides in.
I then put the backing fabric face down, and pinned all the way around.
I stitched all the way around, leaving a hole for turning, and clipped my corners.
I turned the whole thing right side out, and…
Pressed it down.
  
I double-checked the fit by trying the cover on the book. I saw that there would be enough room to top stitch 1/8″ from the edge. If the cover is super-loose, I would top stitch further from the edge, if the cover is a little more snug, I would top stitch closer to the edge. I made sure to stitch carefully over the elastic. Once it was all top stitched, I put it on my notebook, and was all set!
I’d show you the inside, but you would totally faint at how crazy-busy I am. Seriously. Kind of.

Until Next Time!

Feature: 10 Minute Pencil Roll

This morning I showed you how to make a quick baby bib, and earlier this week I showed you a fun little tag blanket. These make great shower gifts, but also great “welcome home baby” gifts. I find when you bring a gift for baby, it is a good idea to bring a little something for the big brothers or sisters. A quick pencil roll like this one over at My Poppet would be a great choice. Add a coloring book, and you’ve got the perfect gift to keep the “big kid” occupied while you ooh and aah over the little one!

If you don’t have a serger (overlocker), she gives directions for making one without as well.

Until next time!

Quick and Easy Baby Bib

30 Minute Baby Bib

Bibs are an all-time handy must-have for every baby. And handmade bibs are a perfect baby shower gift. This is an easy baby bib that is simple to make, with no fancy applique or stitching. But it is still cute because of the printed fabric! And, they are  reversible with the chenille side being extra-absorbent! If you want, you can use terrycloth instead of chenille for the backside of your easy baby bib. Your local fabric shop should have terrycloth you can use… but if they don’t, you can buy a towel. You’ll get several easy baby bibs out of a single towel.

Supplies for 30 Minute Easy Baby Bib:

2 fabrics (I used a cotton print and a chenille)
freezer paper
marker or pen
a couple pins
your iron and sewing machine
Snaps and snap tool (if you want to use velcro, check out the 30 Minute velcro bib)

To download the bib template, sign up for our free newsletter here:

Get the FREE Printable Template!
Sign up for our email list to get your free Printable Template download!
You’ve successfully signed up! Check your email for details.
Print out the bib template, and trace it on freezer paper. Cut out on the traced line and iron the template onto the wrong side (back) of the cotton fabric. The paper side of the freezer paper is easy to write or draw on, and the plastic side irons easily onto the fabric (and removes easily later).
 
Next, put the cotton fabric onto the chenille, with the right sides together (the print side and the fuzzy side towards the middle). Pin the bib template in place through both layers of fabric. Stitch around, right next to the line. If you are careful and stay right next to the line, you can re-use the stencil on another bib. Don’t stitch along the side between the two little marks so that you have a hole for turning.
 
 
Pull off the freezer paper, and cut around the bib with pinking shears (that’s the “official name” for the sewing scissors that cut a zig-zag). Cut close to the stitching, but not so close that you risk cutting the stitches you just made. Also, cut carefully in the gap between the bib and the strap, and cut some extra “room” next to the turning hole to make it easier to tuck it in when stitching it closed.
Using pinking shears instead of regular scissors means that you don’t have to clip the corners before turning it. Yay for time-saving steps!
 
 
The next step is to turn the bib right side out through the hole you left for this purpose. If you have a turning tool or some long pointy object (but not too pointy!), use it to help poke out the curves and corners, and to turn the strap.
 
 
Once you have the whole bib turned right-side out, tuck in the fabric at the turning hole, and press everything down with an iron.
 
Once pressed, bring it back to the sewing machine and top-stitch close to the edge. This gives the bib a nice finished look, and closes the turning hole at the same time.
 
All stitched together, the bib looks like this:
 
The last step is to add a fastener for the bib strap. I love this little tool to attach snaps. I know a lot of bibs nowadays use velcro, but with a double-sided bib, I didn’t want the scratchy side of the velcro face the baby’s skin. Also, velcro can get stuck on other things in the washing machine. Plus, these snaps are super-easy to put in. Just have a hammer handy, and follow the directions on the package. However, if you really want to know how to make the bib with velcro, you’ll want to check out How to make a velcro 30-minute bib.
 
EDITED TO ADD: I’ve had lots of people e-mail me to ask about the snap setting tool. I love this tool, and actually own two (I misplaced the first one, and ended up buying a second one when I was whipping up some bibs and couldn’t find the tool). Here is an Amazon affiliate link that you can use to buy it, or just get more details: Dritz Snap Fastener Attacher Kit – “Easy Attacher”

Who knew that making a bib could be this easy? You can whip up an easy baby bib or two on the morning of a baby shower, and still have time to do hair and makeup before you go!


Pin It

Save

Save

Googly Eyes Make Everything Cuter

Yes, googly eyes make everything cuter. If you don’t believe me, you should check out all the awesome pics over at Simple As That, where she shows you that some shells, rocks, and strategically placed eyeballs can quickly become an adorable pet.

And even if you do believe me, you should still go check it out… seriously. Amazing cuteness coming your way in 5, 4, 3, 2, 1…

Until Next Time,

Fun Fabric Tassel Pen

Pens get stolen all the time. That’s why some doctor’s offices and other businesses have started putting flowers or large strips of paper on the backs of their pens. I happen to know a couple people who work at doctor’s offices… and they claim that although the pens do hang around longer than average, there are still plenty that make it into patient purses and pockets.
If you’re looking for a cute way to mark a pen as belonging to you, this tassel might be a good option. Yours may be so cute that it still gets snatched right off of your desk… But, since it was mostly made from scraps, and goes together very quickly, you can always make yourself another one.

A tassel is also a way to get more mileage out of your favorite fabrics… and be able to bring them to work with you! This pen was made with fabric from Tula Pink’s “Parisville” line. It has this fun dot print that looks great all cut up, but any print with a lot of color would look great as well.

Supplies:
I made the tassel for this pen with a long scrap strip of fabric. I had it left over from trimming the backing on a quilt. You could use ribbon instead. I also needed a pen, some embroidery floss, and a couple drops of glue.
I started by lining up one end of my fabric strip about an inch down on my pen.
I made loops all the way around the pen, holding down the pen-end as I went along. I tried to keep the loops about the same size, but didn’t worry about being exact.
Once I finished making all my loops and had them pretty much evenly distributed around the pen, I made a loop of embroidery floss going the other direction.
I then wrapped the floss around the pen, fabric, and embroidery floss loop as tightly as possible, starting from the top of the pen, and working my way down to the embroidery floss loop.
Once I got close to the end of the fabric, I trimmed the embroidery floss, and tucked the end into the loop.

I pulled the other end of the embroidery floss, which made the loop smaller and smaller… until it pulled the other end underneath the embroidery floss wrapping. I then trimmed both ends of the embroidery floss.
My fabric wasn’t perfectly lined up along the pen, so I trimmed it with some scissors to make it look a little neater.
I then put a couple drops of Gorilla Glue at the end of the pen, to help keep everything in place.

After the glue was dry, my pen was all done, and ready to use!

You can choose to trim your loops to give it more of a “shaggy” rather than a “loopy” look. This may cause the ends to fray, which can also look cute. The final outcome is up to you!

Until next time…


Bookmarks as Quick Crafts

Often, my quick crafts are for gifts. Although I love giving handmade gifts, I don’t always have the time to spend hours on something, and I know that there are some people who just don’t appreciate all the time and love that goes into a handmade gift.

I know electronic readers are popular nowadays. I’ve had my kindle since Christmas, and even have this blog as well as the other blog set up so that if you have a kindle, so you can subscribe to them and read on the go. However, there is nothing quite like turning the pages on a good book. Which is what makes a good book an awesome gift. Pick up the right book for someone, make one of these fun, quick bookmarks, and you’ll have the perfect combination of handmade and store-bought! Or, if you have no idea what their reading preference is, you could wrap up a gift card to your favorite bookstore with a couple handmade bookmarks.

I’d love to have one of these fun bookmarks munching on a page of my book!

How cute are these paint chip bookmarks from That’s My Story… and I’m sticking to it? This gives me another excuse to collect paint samples from the hardware store!

And these paperclip fabric bookmarks are actually sewn! You can get all the details over at Life Through the Lens, who also shares an awesome printable for a card that any teacher would be touched to open.

Until next time…

Quick Baby Tag Blanket

I can’t believe how fast time has gone by! Little Baby K is about 2 months old now… with no handmade gifts from her Tante! Yes, I’ve been busy… but that’s no excuse not to whip up something fun for her… or several fun things!

When I was a baby, I loved the tags on stuffed animals. So much so that I would wear them out and my mom would need to stitch on replacement tags. True story. Since that time thirty-teen years ago, someone came up with the awesome idea of adding tags around a blanket. And, these little tag blankets are super easy (and super quick) to make. By using different kinds of tags and ribbon, it becomes a fun tactile blanket for the little one – and something that can easily be tossed into the wash when it gets dirty!

First things first – gathering supplies. I picked out some fun pink fabric, and all the coordinating ribbon I had – satin, grosgrain, even some actual tags.

I cut a double layer of the fabric into a 10″ square, then removed one layer. The layer that was left I placed right-side-up, and pinned folded bits of ribbon around the edges. I pinned the ribbon so that the folded edge was on the inside, and the two raw edges lined up with the edge of the fabric. The ribbon was cut all different lengths, I didn’t worry about keeping it consistent. I did make sure that they were small enough not to choke/strangle/harm Baby K in any way.

Once I had enough of the first ribbon, I added more “tags” with a second ribbon, and a third… and kept filling in until I was happy with the way it looked.
Important: I made sure to stay more than 1/4″ away from the corners, so that the tags wouldn’t get stuck in the seam allowance. Also, I left a “no tag zone” of about 3″ on one side… you can see it on the left, near the bottom.

I then put the other 10″ square back on top, right side down, and pinned a little.

I stitched all the way around, except for in my “no tag zone.” This will be the hole that I turn the project through. Before turning I clipped the corners close to the stitching. Most people just cut across, but I like to do a little “seagull” shape to reduce the bulk in the corners even more. When clipping the corners, you want to clip close… but not damage the stitching.

Using the hole left in the no tag zone, I turned the whole thing right side out. I used a turning tool to poke the corners out. A chopstick works well here, too.

I pressed all the edges down, tucking in the edge along the turning hole. I then top-stitched all the way around, about 1/8″ away from the edge, which closed the turning hole and gave the whole tagged blanket a nice, finished look.

Now I’m going to throw it in the washing machine with some free & clear detergent, so it is snuggly soft and ready for Baby K!

Until next time…


Pin It

Madigan Made’s 20 Minute Pillow

I have been needing to cover my couch pillows for more than 6 months. I have had the fabric since last fall, and it keeps getting pushed down on the to do list in favor of other projects.

With this fantastic tutorial from Madigan Made on how to make a 20 minute pillow, I could have all 5 pillows finished in one nap time! Wow! Those pillows are going to make their way back to the top of my to do list.

 You should check out her simple tutorial on how to “whip up” one of these yourself!

Until next time…