Quick Sewing: Origami Bag

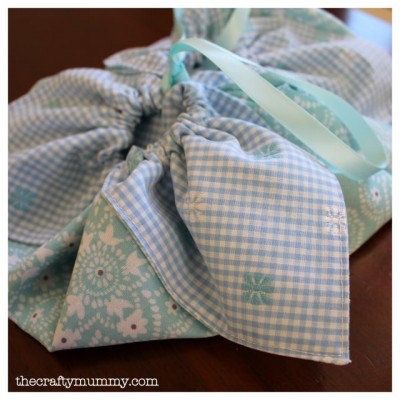
I’m a bag junkie. I carry all kinds of bags, and in those bags I often have other bags – small draw-string bags, zippered bags, pouches… bags are just so handy for sorting, organizing, and carrying all of the day’s essentials. That’s why I’m always on the lookout for new bag tutorials – especially quick bag tutorials. What I really love about this Origami Bag Tutorial is that the bag has a fun decorative element, with the lining fabric also showing up on the outside of the bag! How cute is that!? That makes this bag great to give as a gift – just wrap a small gift up in this bag, and you’ve both wrapped and doubled the gift! AND – when the recipient asks if you made the bag, you get to say, “Of Course!” … and you don’t have to tell them how quick and easy it was to make! They’ll never know…

origami bag at crafty mummy

Pin this to your “Must Sew” Pinterest board… but be sure to pin from the original source.

Freehand Fabric Flower

It is great to know how to make some simple embellishments. Having quick and easy embellishments in your sewing arsenal gives you so many more options when creating projects. For example, these freehand fabric flowers would look great on a headband, a bag, a shirt… really, just about anywhere! These flowers are simple to make with a few scraps of fabric, a button, and some thread… check out exactly how it is done, and make your own!

fabric flower by the stitching scientist

Pin this to your “sewing stuff” board, but be sure to pin from the original source!

5 Minute Scarf

With fall weather comes fall clothes… and fall fashion! Even if you can’t afford to update your whole wardrobe this fall (and with as much as the average crafter spends on supplies, that’s probably the case – ha!), you can add touches of fresh color and style with a simple 5-minute scarf like this one. No need to know how to do something fancy – like adding a roll hem, or use a serger. Just a few quick stitches on the sewing machine, and you’ll have whipped up this fast scarf!

5 minute scarf - crafty mummy

Pin this to your great DIYs board – but be sure to pin from the original source.

Simple Beaded Bracelet

Yesterday I shared with you my simple twisty friendship bracelet. Today I’m featuring another fun and simple bracelet you can make with the same materials – just add some beads! In this example she used pearl beads, but you can use whatever beads strike your fancy – you could even use different colored beads to match an outfit or school colors. Yesterday’s bracelet used simple knots, this bracelet you need to know how to braid… you can check out the step-by-step details over on the simple beaded bracelet tutorial.

Simple Pearl Bracelet - Cute DIYs

Pin this to your “simple jewelry” board – but make sure to pin from the original source.

Twisty Friendship Bracelet Tutorial

I’m excited to share this friendship bracelet tutorial with you! These are the friendship bracelets I made as a kid. They require very few supplies, are easy to make (even for little hands), and are a great portable craft! My elementary school friends and I swapped these friendship bracelets with each other, and wore them until they fell off… or until they started looking gross and our moms made us take them off… ha!

Twisty Friendship Bracelets at 30 Minute Crafts

To make your Twisty Friendship Bracelet you need (Amazon Affiliate links added to help you find supplies):
String – I used Pearl Cotton because that is what I had on hand, but as a kid I used Embroidery Floss
Clip or Safety Pin. I love the Clover Jumbo Wonder Clips because they clip securely to pants, my shoe, whatever, and doesn’t leave holes or damage fabric the way a safety pin can. Plus, these wonder clips are surprisingly strong!

Start by cutting the string you’ve chosen – You’ll want one piece of each color, each piece 2 yards long.

Fold the string in half, and tie an overhand knot at the folded end. You can secure this end with the wonder clip or safety pin to your clothes or shoe. This will help keep it tight while you tie.

clip string to shoe for friendship bracelet

Pick up one of the strings. Use it to tie a knot around the other 3. Hold the 3 tight in one hand as you pull the knot up to the top. The two strings should be at a 90-degree angle as you pull the single string up the group of strings.

Keep tying knots. I like tying 10 or 20 of a single color before switching colors.

pull knot for twisty friendship bracelet

To switch colors, grab the longest string of the other color, and begin tying knots in the new color around the three strings.

select the longest string

Keep tying knots and switching colors until you only have a few inches of string left. Tie an overhand knot at the end, and then tie to the wrist of the closest friend!

twisty friendship bracelets

Simple Cluster Earrings

I love fast jewelry. The thought that you can make custom accessories while eating breakfast and then wear them the same day just tickles me! As a blogger, I don’t have a lot of excuses to wear cute jewelry. And as a mom with a young toddler, my jewelry can take a serious beating from the little one pulling on it… but that doesn’t stop me from loving fast jewelry tutorials… and it doesn’t stop me from whipping up fast jewelry projects, either! And I love these simple cluster earrings! How darling are these? And so easy to make!

cluster earrings from 1 Dog Woof

Pin these to your “must make jewelry” board… but be sure to pin from the original source!

Styrofom Linocut Blocks

For years I wanted a Linocut block printing set. I thought it would be fun to make my own block prints. It was on my Christmas list for years. I got it last year, and now it is on my shelf. Yup, I haven’t had a chance to pull it out and play with it. But even if I didn’t have a fancy linocut kit, I could replicate the effect with this great tutorial for making relief stamping blocks from recycled styrofoam! This is a great project to do with kids, and I might pull this out for the kids to do while I work with the Linocut tools… but who knows… the styrofoam might be more fun!

Printing with recycled styrofoam - grow creative blogspot


We all love Pinterest… if you pin this tutorial, please pin it from the original source.

If you want to find an inexpensive kit Linocut kit online, here is an Amazon Affiliate link for you: Linocut Block Printing Kit

Mason Jar Lanterns

Are you looking for kid-friendly crafts to finish out the summer, or to get you through those first days of school where it seems that all of your child’s homework is actually paperwork for you to do, and not math problems for them to work on? Maybe you’re planning one last camping trip to hang on to summer, and want a fun activity? These Mason Jar Lanterns are an easy craft for just about any age and crafting skill level. Grab some paint and mason jars, and set your kids to crafting making their own Mason Jar lanterns! These lanterns give off a soft glow through the paint, and using Outdoor Mod Podge will keep the paint in place beyond long summer days and into long winter nights.

Mason Jar Lantern - Suburble

Pin this to your Summer Crafts board, but be sure to pin from the original source.

Easy Button Hair Clips

It is back to school time, and with it comes new clothes… and new accessories! I’m finding myself severely crunched for time as the big day approaches. Luckily, my son won’t be needing hair clips… but if there is a little girl in your life who would appreciate new hair accessories to go with her new back to school clothes, these button hair clips are perfect.

They are simple and inexpensive to make. If your child is young, you’ll want to handle the hot glue, but she can pick out the buttons herself – making a completely custom set! You might want to pull out several sets of clips and spools of ribbon, because after making one set, chances are that you’ll both want to whip out several more pairs!

Easy Button Clips - Scattered Thoughts of a Crafty Mom

You’ve got a pinboard filed with crafts you plan to make someday… pin this, but be sure to pin from the original source.

Fast Scrapbooking Layouts in less than 30 Minutes!

I was invited to try out Project Life, and after playing with this scrapbooking system, I’m SO excited to share it with you! I used to be a major scrapbooker. I have albums full of photos from before I was married. Vacations, everyday photos, and a giant album filled with the photos from the disposable cameras we had at the tables at our wedding. We had an official photographer as well, but I love going through my wedding scrapbook filled with candids. I’ve even made scrapbooks that I’ve given away as gifts.

My love of taking photos has only grown over the years, and between the increased number of photos I am taking, and the decrease in free time now that I have two kids, the amount of time I have in my day to scrapbook has dwindled down to almost nothing. In the last year, I’ve probably completed half a dozen scrapbook pages… until now.

project life cards

Project Life is a modular scrapbooking system. It includes plastic sleeves for holding photos and cards, and sets of themed cards for embellishment and journaling. I’ve seen modular scrapbook systems in the past, but never tried them out because they felt too limiting. I didn’t want to be locked in to one way of putting together a scrapbook – my creative mind doesn’t like being boxed in. But Project Life didn’t lock me in at all.

First, there are so. many. different. cards. I was sent the 5th and Frolic line, and these are just some of the cards from the line – plus, they are double sided! There are several copies of each card in the package as well, so this gives me lots of design possibilities.

Second, the Project Life sheets fit into a standard scrapbook. So I can create fast layouts when I have lots of photos (like for this birthday party I was scrapbooking), but can add in full page layouts in between, like if I want a special, large layout for the smash cake. This also makes the Project Life line perfect for the novice scrapbooker (or the scrapbooker who is crunched for time) who just wants to fill the pockets, add a little journaling and embellishment. You can put together the pages without any tools at all – no scissors or adhesives.

The line is equally perfect for an experienced scrapbooker. There are tons of ways to “hack” the modular pages – you can have things stick out of the pockets, cut the pockets, and cut photos in all kinds of ways to take advantage of the page.

I started my layouts by sorting photos. I was working through photos of my son’s first birthday. My older son. Who is about to turn 5. Yes, I’m that far behind. (But not for long!)

sorting through photos

I picked cards from the 5th and Frolic line that coordinated with my pages, and went to work. In 30 minutes, I whipped up several double-sided layouts, and kept going… these layouts are addicting!

arrows in layout

This layout was super simple, and super basic. I added a photo in each of the large photo slots, and then a journaling card in each of the small pockets. On each of the journaling cards I put an arrow to the photo that the note references. Four big pockets, four small pockets, it all comes together perfectly.

large cards

I love that the card sets also have large cards to put in the large pockets, and it is super easy to cut down the photos to fit the small pockets.

chairs layoutI liked this very vertical layout, but thought it needed a little something more… so I chopped up some photos to add more images to the layout.

lots of photos layoutYup… more photos. I haven’t tacked them down yet, though. I think I like them better in the center of each card, instead of staggered the way I have them in this photo.

birthday party layout

I love the way the 5th and Frolic cards add a pop of color, and at the same time give the eye a place to rest in a series of busy photos.

coordinates with rest of the line

The cards also coordinate with others from the Project Life series. I went out and bought the Childhood Edition – Wellington and the Baby Edition for Him, to give me lots and lots of options as I catch up on photos.

The boxes that the Project Life system comes in are fantastic, and make for great clean-up as well! Here are 2 boxes of the page protectors, two albums (one for each of my boys), the large 5th and Frolic Collection, and the two smaller collections all tucked into a milk crate! There is plenty of room to add a paper cutter, a couple scrapbooking adhesives, and some acid-free pens, to have a full kit ready to scrapbook any time I have a few minutes to spare!

project life crate

I used the The Dear Lizzy 5th and Frolic Core Kit for these pages. The cards in this collection feature an array of light blues, pinks, greens, yellows and airy neutrals. The fun icons are very modern, and include birds, trees, foxes, houses, keys and clipboards with a distressed feel. This set is brand new, and you can find it at Michael’s. The other new core kit you can find at Michael’s is the The Vintage Travel Core Kit. It features deep blues, reds and browns, combined with darker neutrals. The icons in the Vintage Travel collection include trains, airplanes and maps.