Glue Gun Snowflake


glue Gun snowflakes
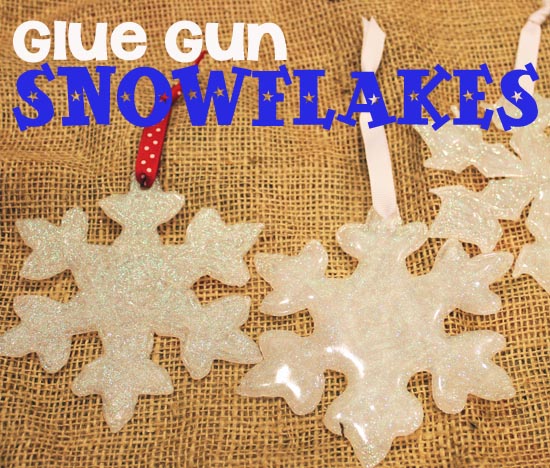
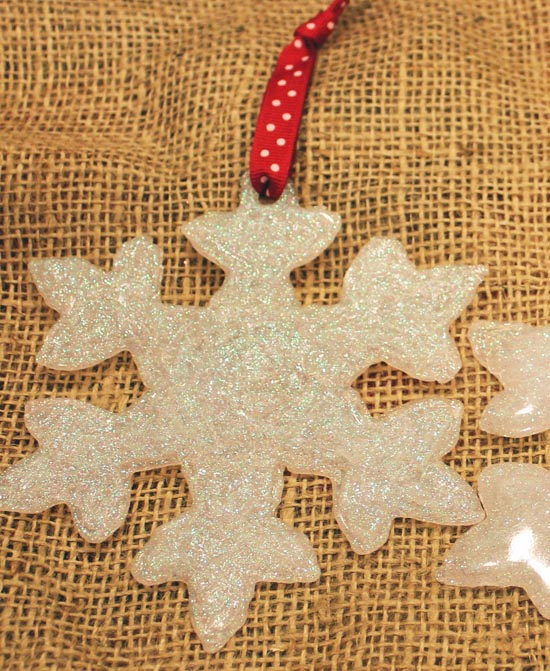
You can make a beautiful, glittery snowflake fast and easy using hot glue! They make glitter hot glue, and if you’ve never tried it before, this is your excuse! This is a fun craft to make with kids that are old enough to wield a glue gun – the more wonky these snowflakes end up, the more fun you’ll have!

Supplies:
Snowflake Template
Glitter Hot Glue Sticks (like these: Glitter Glue Sticks for Hot Glue Gun – Pack of 12 Sticks)
Old glue gun (or pick one up at the Dollar Store)
Tissue Paper
Scrubby Dish Sponge
Ribbon

make glue gun snowflake

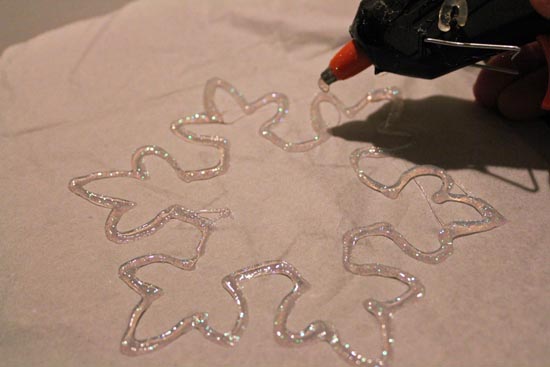
You can draw your own snowflake, or you can print a template. I printed my snowflake templates from here. (scroll halfway down to “snowflake activity sheet printables.”

Put your template under a sheet of tissue paper. Insert the glitter hot glue stick into your glue gun, and outline the shape, then fill it in. To avoid making a hole later, draw one in with the glue, and don’t fill that part in.

Allow your snowflake to cool, then rip off as much tissue paper as comes off easily.

tear away tissue paper

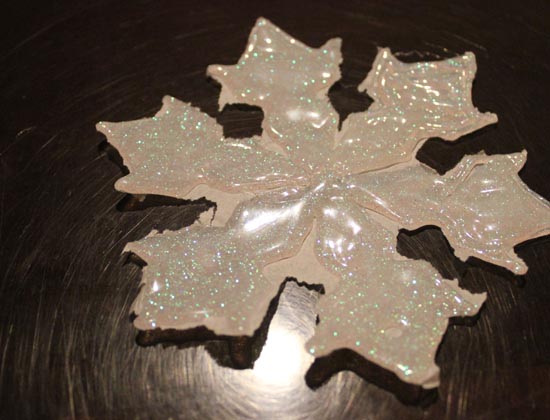
Rinse off the back of your snowflake with warm water, and use the scrubby side of a dish sponge to scrub off the tissue paper.

Allow to dry, insert a ribbon through the hole, and hang up your glitter snowflake.

single glue gun snowflake

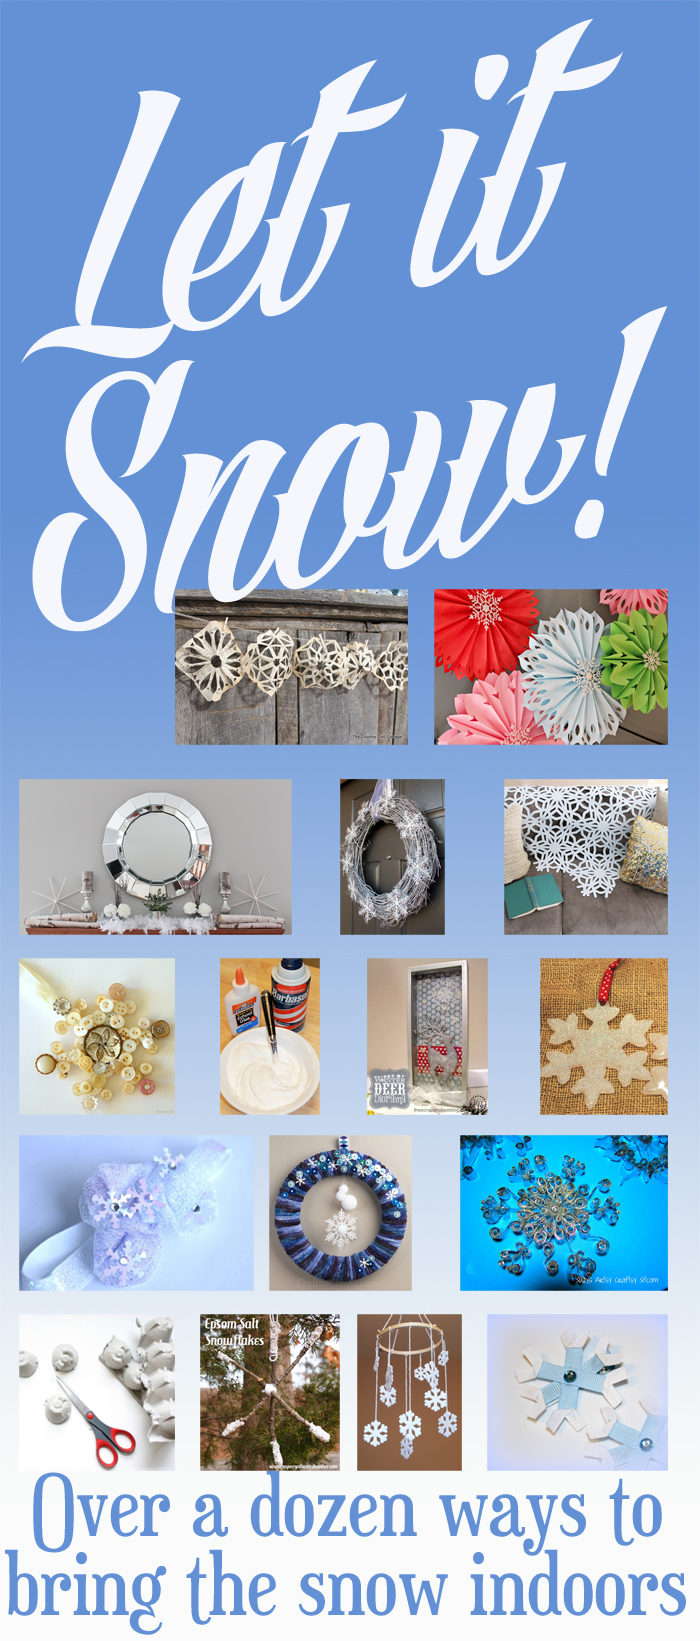
Want to bring in more snow this winter? Try some of these fun snow crafts!


Let it snow - over a dozen ways to let the snow in

Turn a Freebie T-Shirt Into a Reusable Bag

t shirt made into reusable bag

If you’re like me, you pick up random t-shirts. From events, charities, family… wherever. I often pair my freebie t-shirts with comfy sweats. But when the shirts threaten to take over my closet, I find other ways to use them. With the New Year, I’m committed to using more reusable bags. With just a couple snips of the scissors, and one straight line of stitching (or relatively straight, if you’re not great with a sewing machine), you can turn a t-shirt into a bag!

cut shirt to form bag

Start by laying your t-shirt out flat. If there are designs on the front and back, put the design that comes up the highest (usually the back) face-up. Cut off the sleeves, being sure to preserve the stitching. That means, when you’re cutting off the sleeve, cut on the sleeve part, so that the stitching stays attached to the shirt. This will make your finished handles stronger.

Cut the neck out of the shirt, making an overly-large U shape. You can cut one half, fold it over, and then cut the other half so that the two parts are symmetrical.

Turn the shirt inside-out. Determine how deep you want your bag, and cut off the excess (this shirt is a size M, and I cut off the bottom 5 inches). Sew the bottom closed using the stretch stitch on your sewing machine (leaving a 1/2 inch seam allowance), or with a serger.

Turn right-side-out and you have a finished bag!

Linked up at: Today’s Creative Blog

10 Minute Felt Tassel

This tassel tutorial is awesome. Not only is the tassel simple to make, but they made sure to include some extra elements, like the stitching along the top, to keep it from looking overly simple and cheap. I can’t wait to use some of these tassels on future projects! Perfect for adding to a zipper, or embellishment on a bag, I know you’ll come up with lots of ways to use this tassel tutorial as well!

10 Minute Felt Tassel

If you haven’t already pulled out your felt, you’ll want to pin this tutorial to use later. Please click through to the original source and pin from there.

Label Cords with Ribbon

Label Cords With Ribbon

Today is the last day of the cleaning and organizational series I’ve been doing with Angie from the Country Chic Cottage. I thought we’d tackle the tangle of cords today. I have cords running across the room to various outlets. And when I want to unplug one to move the iron from the sewing room to the bedroom, or unplug my sewing machine to take it to class, I need to figure out which cord is which. This method also works to label the power cords for all the electronic devices that are slowly taking over our lives.

I used a spool of extra-wide ribbon, but you can use a less wide ribbon if you like. Cut the ribbon into a parallelogram by cutting each end at a sharp angle with pinking shears. Fold one end in half, and cut a small slit in the end. Label the other end of the ribbon.

make tags for cords out of ribbons

All you have to do is pull the opposite corner through the small slit, and you’ve labeled your cord! Make sure that your ribbon isn’t so long that it interferes with the plug itself.


Unfinished Project Management

I love to quilt. I buy fabric and patterns. I cut into the fabric and start stitching together quilts. If there is no specific deadline for the quilt, I might get distracted, or a project with a deadline comes up, and the current project is shoved aside, put in a bag, tucked in a basket under my sewing table. It could be there months before it is pulled out accidentally as I try to resurrect a different project. And I remember, “Oh yeah, I still have this to work on…”

photos of projects in progress

Out of sight really does mean out of mind. Every year I promise myself that I’ll pull out my “UFOs” (UnFinished Objects) and PIGS (Projects In Garbage Sacks) and finish them up. Instead of leaving my projects buried in a bin, I pulled them all out to assess my mess. I took a picture of each project, and printed the photos. On each print, I wrote with a marker the progress of the project. Some just need a backing so that they can be quilted. Others already have a backing, and just need to be sent to the quilter.

tracking projects in progress

In order to reduce my projects in progress to at least a single-digit number, because zero is an unrealistic goal, I’ve put the photos up on my quilting wall. I could pin them directly to the wall, or use a bulletin board. The point is that I want these projects front-and-center to remind me of the projects I’ve committed to.

As a bonus, I can enjoy some of these projects now… with the photos adding a little color to the decor in my sewing room!

How do you sort your projects needing finishing?


Laundry Sorting Station

Clean Laundry Sorting Station

To me, doing laundry is the worst chore. Dishes are a close second, but laundry is the worst. There are so many steps. Sorting, washing, drying, folding, putting away… and laundry never ends. Every day, more laundry arrives. With a family of four, it seems our laundry has multiplied exponentially. So, anything I can do to make the laundry process easier is a big win for me.

This laundry station for sorting and hanging clean laundry took me about 10 minutes. There are no fancy labels or cute signs… it is purely meant to be functional. I might add some cuteness to it later, we’ll see.

Set Up Laundry Hanging Area

I bought a rack at Target, along with small bins. I’ve been folding laundry as it comes out of the dryer lately, to avoid the game of musical chairs my laundry often plays after being removed from the dryer. This rack helps. Anything that needs to be hung up can immediately be hung on the rack. There are bins above to put socks for us and the kids, so that the socks can immediately be sorted by wearer, making sorting them into pairs easier later on.

Quick, simple, and functional. Hopefully this little bit of organization will find lots of use – saving me time.

Sort through your Make-up Drawer

This week Angie from The Country Chic Cottage and I are talking about Quick cleaning and organization for the New Year. As someone who loves to craft, it makes sense to delve into cleaning in January, because after the tree, stockings, and other holiday decor come down, cleaning the rest of the house seems to flow in naturally. And since I, like many of you, wear many hats which include crafter, but also mom, wife, chef and chief chauffeur for my family, I prefer that this cleaning happen quickly so I can move on to something else!

Cleaning out the make-up drawer is a much needed chore that, let’s face it, nobody else in the house is ever going to tackle. Here is a quick cheat-sheet to let you know when different types of make-up have passed beyond their freshness window.

when does makeup go bad

Liquid concealer can last up to a year, as long as you are using a clean sponge or applicator each time. If you delve in with your fingers, it is best to toss it after 3 months.

Lip and eye pencils can last several years. Sharpen them before each use to keep germs at bay.

Eyeshadow, and other powders like powdered blush and face powder can last several years as well. Make sure that you are using clean brushes and applicators to extend their life.

Mascara should be tossed after 3 months, or when it starts to go clumpy. Make sure you always have a new tube of mascara around so that you feel fine tossing the old one.

Lipstick can be kept 1-2 years, and will sometimes last longer. If you keep your lipstick refrigerated, it will extend the life of your lipstick.

Any makeup that smells bad or is becoming discolored should be thrown away. And any makeup that has come into contact with illness or infection (like eyeliner or mascara after an eye infection or bout with pink-eye) should be thrown away.

While you’re at it… toss anything you haven’t used in the last year. Chances are if you haven’t used it in 12 months, you’re not going to be using it any time soon… so toss it to make room for something you’ll genuinely enjoy!

Sorting through your makeup with a trash can near by should take you less than 30 minutes… and then you can move on to more crafty fun projects, knowing that you’ve earned a little “me” time!

Quick Inbox Cleaning

Like most people, my e-mail inbox starts overflowing on occasion. Every few months I dedicate a half hour or so to clearing out my e-mail. As part of the Quick Clean for the New Year series I’m doing with Angie from the Country Chic Cottage, I’m sharing with you my steps for cleaning out your e-mail inbox in a hurry.

Organize your e-mail inbox quickly

1. Sort by Sender
Don’t sort your e-mails by date, sort them by sender. This groups like messages together much more easily than sorting by date. In some cases, sorting by subject helps organize group e-mails.

2. Unsubscribe
Rather than continuously sorting, avoiding, and deleting e-mails you’ll never read, open the newsletters you subscribed to but never have the chance to really read, and unsubscribe.

3. Delete, delete, delete.
Get rid of any e-mail you don’t need. Junk, newsletters, or ancient information you no longer need.

4. File into folders.
If you’re keeping an e-mail, it is because you will need it at some point in the future. File appropriately, and your e-mails will be easy to find if you need them later

5. Claim e-mail Bankruptcy
If all else fails, just claim e-mail bankruptcy, and delete the entire contents of your inbox and start over. If you really want to, but find this solution a bit radical, create a folder labeled “2012 Archive” and dump all of last year’s messages in that folder.

Now that you’ve whipped your inbox into shape, you’ll have more time for crafting! Check out my favorite tutorials to see what you’re going to do with all that spare time. And come back tomorrow… Angie and I are sharing new tips all week!

Quick Clean for the New Ye


Pop of Color Accessories

Want to add a quick pop of color to an outfit? Using supplies you probably already have on hand, you can make this quick pop of color necklace. As you can see, it looks great with a t-shirt and denim, but can also add a touch of color to a less casual outfit.

Pop of Color Key Necklace

Make sure you pin this project – but click through to the original source first!

Kids Handprint Tie

This project was originally designed for Father’s Day, but I love it for just about any time. A birthday present for Dad, Grandpa, or Uncle. A “just because” gift for a family friend. If you have a man in your life who could use a fun tie that still looks professional, then you can whip up one of these handprint ties!

Handprint Tie

If you plan on pinning this as an idea for later, make sure you click through to the original source and pin from there.