Paper Butterfly Hole Punch Art

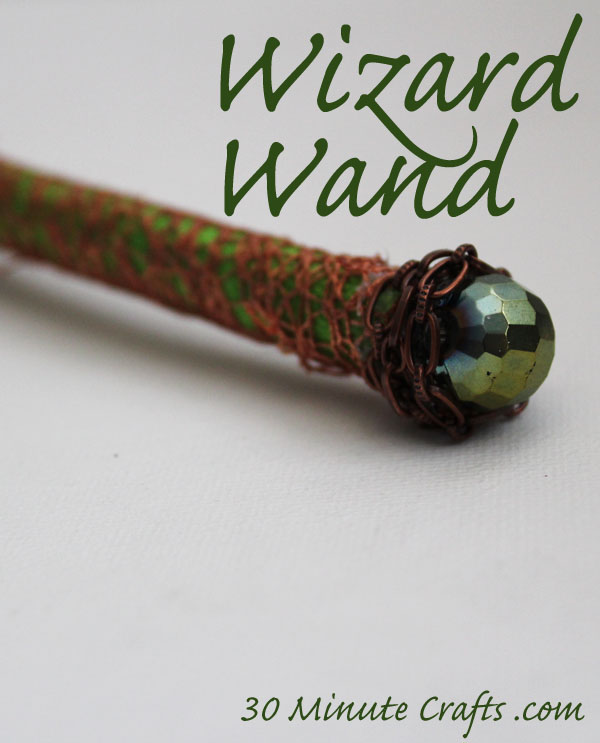
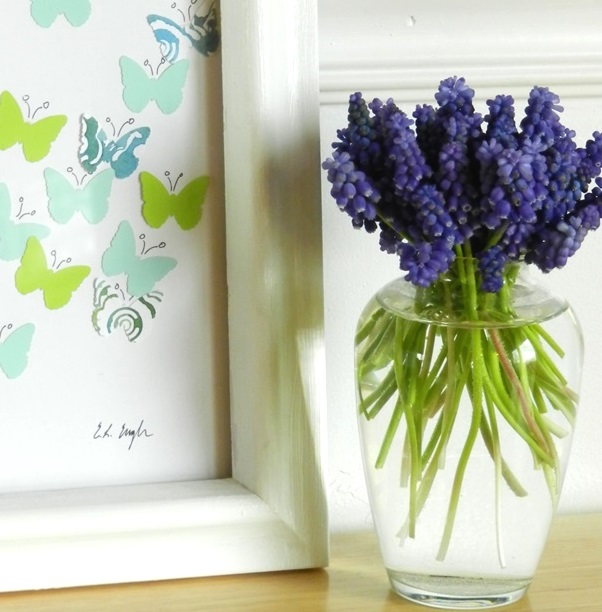
This paper butterfly art is one of those simple projects that can be fun to do with kids or by yourself. Grab your hole punch, customize the colors to match your decor, pop it into a frame, and you have inexpensive art you’ve made yourself.

You can easily adapt this art as well. Put on notecards to make invitations or handmade thank-you notes. Put on hanging tags to add a little handmade pretty to a wrapped gift. There are so many ways you can make this craft your own!

You don’t have to use butterflies, either. Use any fun shaped punch you have on hand. Don’t have a shaped hole punch? Use a regular hole punch for more abstract art. The possibilities are endless!

Paper butterfly art - grow creative blog

Pin this hole punch art to your “crafts to make” Pinterest board… but be sure to pin from the original source.

Simple Wizard Wand

Make a simple Wizard Wand

Last week was Wizard Week at summer school, so all the kids dressed up like Wizards. No Wizard Costume is complete without a wand, so I made my son a wizard wand to go with his costume. The wand was simple to make, you can whip one up in less than 30 minutes!

Here are the supplies I used, you can customize them to your color scheme. My color scheme was aqua & green with copper.
wand supplies

Green Grosgrain Ribbon (you could use satin – it doesn’t matter)
Copper ribbon (this was like a lace/mesh and was PERFECT)
Copper chain
Dowel
STRONG double-stick tape (not shown)
Glue Gun (not shown)
Large bead – mine went with my color scheme perfectly, if you can’t find one that works with your Wizard colors, a crystal or glass bead would be a great option.

Cut the dowel short – I think mine was about 8″. With young kids, the shorter the dowel, the more likely they won’t try to use it as a weapon. For some reason long sticks invite trouble.

I put a length of double stick tape down the dowel. This double stick tape is from American Crafts and is fantastic. Curve it to the shape of the dowel, and take of the orange-y plastic sheet to expose the other side of the adhesive.

use double stick tape

At an angle, wrap your green ribbon around the dowel from one end to the other, completely covering the wood.

Once you’ve covered the dowel with the green, go back and wrap the copper around the dowel. The green shows through the holes in the lace-like ribbon.

second layer of ribbon on wand

Use hot glue to glue the bead to one end. Point the holes to the sides, they’ll get covered up in the next step.

wrap copper ribbon around wizard wand

Wrap the copper chain around the base of the bead, about half way up to cover the holes in the bead. Use hot glue to secure it.

add copper colored chain

That’s it! Your little Wizard can start playing with their new Wizard Wand while you work on the rest of the costume…

Wizard Costume

When making a big project like this, it is great to have quick parts to get done fast. I was able to make the wizard hat and wizard wand before bedtime, and finish up the wizard robe after my son was asleep. But he could sleep soundly knowing that mom already finished his hat and wand, and they were satisfactory, so the rest of the costume was sure to be just fine!

Patriotic Mason Jar Glasses

Raspberry Tea Floats served in patriotic mason jar

Serving drinks in a mason jar isn’t new or earth-shattering, but having glass paint to customize your mason jar is pretty new! I decorated some mason jars with a little patriotic flair as part of the Cook and Craft series I’m doing with my friend Brandie from Home Cooking Memories. She whipped up a delicious Raspberry Tea Float to serve in the patriotic mason jar glasses. Doesn’t it just look yummy! Sure, you could serve lemonade or plain ol’ iced tea in these decorated mason jar glasses… but Raspberry Tea Floats? Yum!!

mason jar suppliesDecorating the mason jars is simple. You need:

Mason Jars with metal rings (you don’t need the flat lid)
Ribbon
Hot Glue
Alcohol (the rubbing kind, but if you want to grab some Vodka to spike your lemonade, go for it!)
Glass Paint
Paintbrush


Start by tying the ribbon around the metal ring of the mason jar. You can double-knot and trim the ends like I did with the red ribbon, or tie a bow like I did with the blue. Secure with a dab of hot glue.

Ribbons on Mason Jars

Clean off the surface of your mason jar with the rubbing alcohol, and start painting on your stars. Glass paint doesn’t go on perfectly smooth, so embrace the imperfections. They add character.

paint star on mason jar

Follow the instructions on your paint to cure it. Let set for several days and/or bake in an oven to make it dishwasher safe. Then serve your favorite drink in them… which just might be Brandie’s Raspberry Tea Float!

patriotic mason jars

Cereal Box Sketchbook

My son loves to draw, and leaves his drawings all over the house. They get lost, his little brother destroys them, or they just find their way into recycling… a much better way to keep all his drawings together would be with this simple and easy sketch book! Just an empty cereal box and some computer paper whips up the perfect sketch book! Of course we could decorate the front, but I love how graphic and colorful it is as is. A simple, fun, and inexpensive way to organize children’s drawings. Also a great alternative to a traditional coloring book. A great impromptu craft to do at grandma or auntie’s house… though you may have to use the box from their fiber-rich cereal instead… ha!

This would also be perfect for drawings that are already made. They could be put together this way to create a “portfolio” perfect for any budding artist! Use materials you already have around the house, and simple enough that your little one can help to create it.

cereal box sketchbook - grow creative

Pin this idea for the next time you have an empty cereal box… but be sure to pin from the original source!


Modern Yardage Fat Quarter Fish Softie

fast floppy finned fat quarter fish

I met up with Modern Yardage when I went to SNAP in April, and fell in love! They have designers create awesome fabric designs, and then they custom print them for customers. If you want yardage, half-yards, fat quarters… they print out what you need, and mail it off to you (super quick)! I was looking through their panel options and fell in love with this scallop panel and coordinating fabrics!

MAKE SURE YOU SCROLL DOWN TO THE BOTTOM OF THIS POST – I’M GIVING AWAY FREE MODERN YARDAGE FABRIC!!

I just knew they were destined to become a fish. A fast, floppy-finned, fat quarter fish. If you want to make your own fish, you can… and it is so simple to make, it requires no pattern at all! Yup, you’re free to add your own style to this little fish as you stitch him up! And the more wonky you cut the pieces as you make him… the more modern he is going to look!

Along with the panel, you need:
3 coordinating fat quarters
scraps of batting
Polyfil
2 coordinating buttons

Note: all seam allowances should be about 1/4″, but this tutorial is very forgiving – making it a great project for a novice stitcher!

Start by folding your panel in half, matching up the scallops, pinning, and then stitching just inside the printed circle.

stitch fish head

Cut the semi-circle out, about 1/4″ away from your stitched line. Fold in half. Grab the fat quarter you are using for the body, and fold into quarters. Line up the head and body as shown in the picture.

prepare body fabric

Cut your body from this fabric. You should be cutting through 4 layers.

cut body

When unfolded, the fish head and body should look something like this:

head and body

Make your fins. Fold your fin fabric into quarters, and cut a large oval-ish shape for the side fins. Fold your tail fin fabric and cut a half-crecent-ish shape for the tail fins. You should be cutting through 4 layers, making 4 of each.

Place two fin pieces, right sides together, on the batting. Repeat for both side fins and both tail fins. Pin in place.  Stitch all the way around each, leaving a hole for turning.

stitched fins

Trim each fin, about 1/4″ from your stitching line, and turn right side out. Press flat.

finished fins

Pin your tail fins to the back of your body piece. Play with the placement until you are satisfied.

pin back fins

Put the other body piece on top, right sides together, and stitch around the entire curve, leaving the flat side open.

Leave the body piece right sides together, turn the head right side out, and tuck the head into the body so that all the flat sides line up. Pin at the top and bottom seams. tuck the two oval fins on each side, trying to match up the placement, with the opening sticking out from the flat side.

pin on head

Home stretch! Stitch all the way around the flat edge, leaving about a 2″ hole between one of the fin edges and the top or bottom seam.

stitch on head

Turn the fish right side out through the hole.

stuff in hole

Stuff Polyfil into the hole, and stitch closed.

stitch hole closed

Add buttons for eyes, if you like.

add button

That’s it! Your fun, modern fish softie is all done! Go back and make more… you should be able to make 3 fish from the 4 fat quarters!

floppy finned fish tutorial

And now for a giveaway! Modern Yardage is giving away 1 yard of fabric to a lucky winner! You can pick one yard, 2 half yards, 4 fat quarters, a half yard and 2 fat quarters… such fun options!  Just use the Rafflecopter entry form below!

 
a Rafflecopter giveaway

Quick Patriotic Crafting with American Crafts

Light Up Patriotic Wand

I’m getting together with Angie again for some more quick Patriotic crafts! Angie is making a fun chalkboard with a patriotic theme, and I’m making a light-up wand – the perfect alternative for those too young for sparklers this 4th of July!

Patriotic Wand SuppliesYou can follow along in the video as we each put together our crafts. If you want to craft along with me, here is what you’ll need:

Dowel (cut short for a nice wand)
Double-sided tape
American Crafts Ribbon
American Crafts Scrapbook paper
LED light (found in the floral section of the craft supply store)
Hot Glue Gun
Pencil
Scissors


Monsters University TShirt

Monsters U t shirt - 30 Minute Crafts

Monsters University opens in Thearters everywhere today! I was one of the lucky few who got to see this great movie early (and in 3D!), and I took my son along. HE LOVED IT. And so did I.  And we dressed up. But before we get into that, let’s chat about the movie…

Here is what Disney/Pixar says about the movie:

Mike Wazowski and James P. Sullivan are an inseparable pair, but that wasn’t always the case. From the moment these two mismatched monsters met they couldn’t stand each other. “Monsters University” unlocks the door to how Mike and Sulley overcame their differences and became the best of friends.

Screaming with laughter and fun, “Monsters University” is directed by Dan Scanlon (“Cars,” “Mater and the Ghostlight,” “Tracy”) and produced by Kori Rae (“Up,” “The Incredibles,” “Monsters, Inc.”). The film opens in U.S. theaters on June 21, 2013, and will be shown in Disney Digital 3D™ in select theaters.

We love watching Monsters, Inc. and were hoping that Monsters U would be as fun. It really was. This movie tells you so much more about this unlikely pair – and especially about Mike Wazowski. They brought in several of the characters we already love from Mosters, Inc. but added a whole new cast of lovable, scary, and unusual monsters. And then put them in a college setting. With scary teachers. And exams. And peer pressure. I’m always nervous taking my son to see a movie I haven’t pre-screened first, but we both really enjoyed this movie, and I’m glad that I brought him along.

To go to the screening, I made my son a Mike Wazowski shirt. This shirt is seriously easy to make (it took me less than 30 minutes), and I know he’ll enjoy wearing it all summer long. Plus it is a fun souvenir from our fun night out.

Supplies:
Green t-shirt (try to find one in “Mike Wazowski” green)
Freezer paper
Pencil
Fabric paint in white, black, green, and 2 shades of blue
Paintbrush

I prepped my t-shirt by ironing freezer paper to the inside of the shirt. This will keep the paint from seeping through and making the shirt stick together. I printed out a picture of Mike Wazowski, and lightly drew an outline on the shirt. This is easier than it sounds – a large circle for the eye, with a smaller circle for the iris and an even smaller one for the pupil. A crescent at the top and bottom of the eye for the eyelids. For the mouth, semi-circle with more semi circles for the teeth, and then an arc for the mouth. It is just shapes!

I started with the white, painting the white of the eye, and the teeth.

paint white

I roughly mixed two shades of blue together and painted the iris with broad strokes to give it more dimension.

paint duo tone eye

I then painted in the black of the mouth and the pupil. The last step was the lip and eyelids in green. I picked a Mike Wazowski green that was a different shade than the shirt, and painted them on.

paint in green

I added a black line in the top eyelid for the crease, and a white spot on the iris (at my son’s request – because that is what it shows in the photo) and I was all done! It just needed to try for 24 hours before I put my kiddo in the bright, bright sun to take a picture of him in his shirt.

Monsters U t shirt on 30 Minute Crafts

He LOVED the movie, and getting to wear his Mike Wazowski shirt. And I loved hearing him say “Mike Wazowski” every time he talked about his shirt. So cute! We’ll defiantly have to go back and see the movie again!

Oh – and a little bonus for scrolling to the bottom of the post… I actually made a shirt for myself, too. Because mommy-son shirts are awesome. But I didn’t want mine to be too matchy-matchy, and I didn’t want it to be too over the top, so I  grabbed some fabric spray paint…

fabric spray paint

And I painted spots on the sides and back of a shirt that was “Sully Blue”, after prepping it with freezer paper. It took about 5 minutes, and was super easy to do. The hardest part is stopping and walking away…

spray shirt

So, my son and I had an awesome time seeing Monsters U… and we went to the movies dressed as Mike and Sully. Though my son calls it my “kitty shirt.” You’ll have to go back and watch the first movie to understand that reference.

Grab your kids, and go see this movie. It is out RIGHT NOW.

And wear shirts. Even if they aren’t Mike and Sulley Shirts.

Save

Watermelon Week: Day 5

It is the final day of Watermelon Week! Check out these fun projects:

watermelon week day 5

Brenda’s Watermelon Wrapping Paper, Sarah’s Watermelon Outfit, and Summers Watermelon Trio.

Double Feature: Cook and Craft

Last week, Brandie and I shared a fun treat and summer pack idea for you to do with your kids. This week we’re back, and we’re sharing a fun movie double feature! I’m sharing TWO fun crafty printables for you to print out for movie night with the kids, and Brandie is sharing some delicious peanut butter and jelly popcorn! That’s a double feature I can get on board with! YUM!

Summer movie bucket list

You can print out the Summer Movie Bucket List to make a list of must-see videos. Make your own list based on your Netflix cue, what you want to rent from Redbox, or from your own video collection. Consider making a themed list – all animated movies, all sci-fi, or all Tom Hanks (I’m thinking Forrest Gump, Catch Me if You Can, Apollo 13…). Make your list appropriate for the ages of your kids, of course!

After you’ve made your movie choices, make sure to make some delicious PB&J popcorn! Brandie has come up with the perfect movie snack!

summer movie double feature

After the movie, sit down with the kids to draw their favorite quote. If you have young kids, write the quote in for them, and then let them illustrate the scene in this fun movie frame printable.

This summer, let movies be more than just a stand-by for a day that you’re not going to the pool! Make a plan, make some popcorn, and enjoy the movie long after the credits are over!


Watermelon Week: Day 4

watermelon week day four

So many fun Watermelon projects today! Check out Rhonda’s Grilled Watermelon recipe, Colleen’s painted watermelon banner, and Paula’s adorable watermelon headband!