DIY Floral Birdhouse

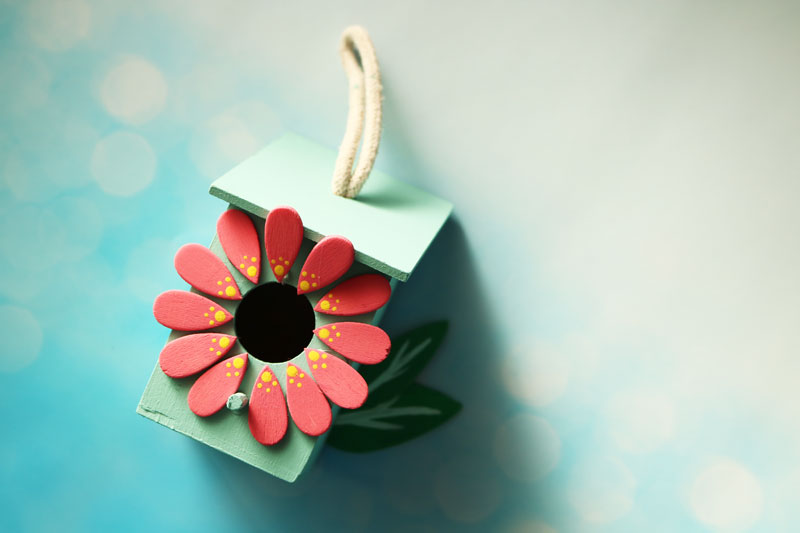
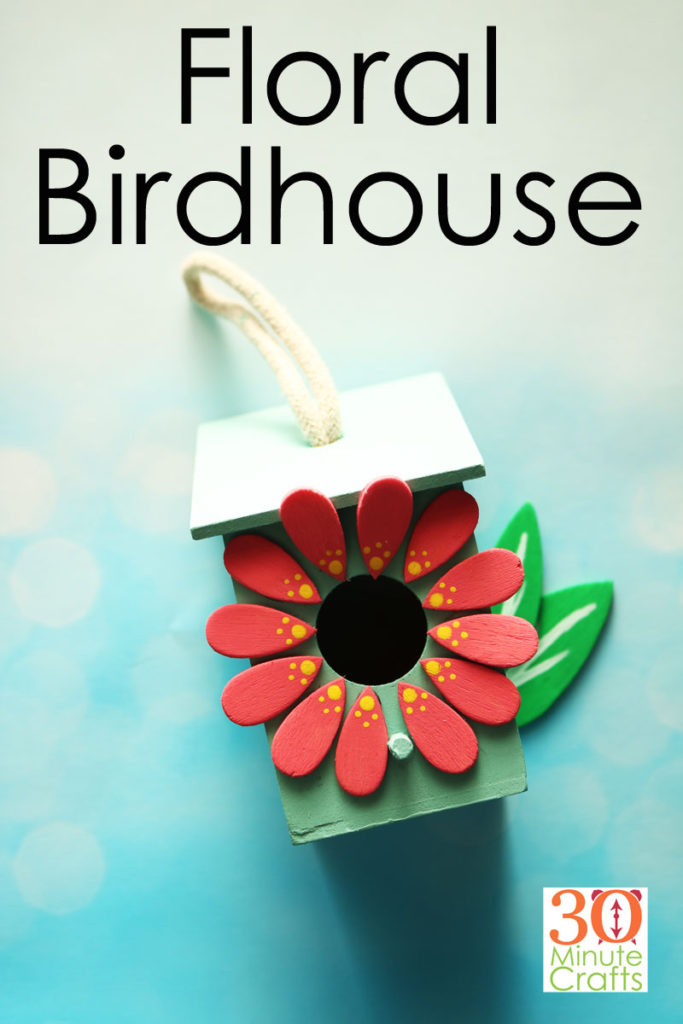
We’re celebrating National Craft Month with this fun DIY Floral Birdhouse! All week long we’re sharing fun crafting ideas, and today we’re sharing fun crafts you can make with paint, like this Floral Birdhouse. And be sure to scroll all the way down to check out other fun crafts you can make using paint!

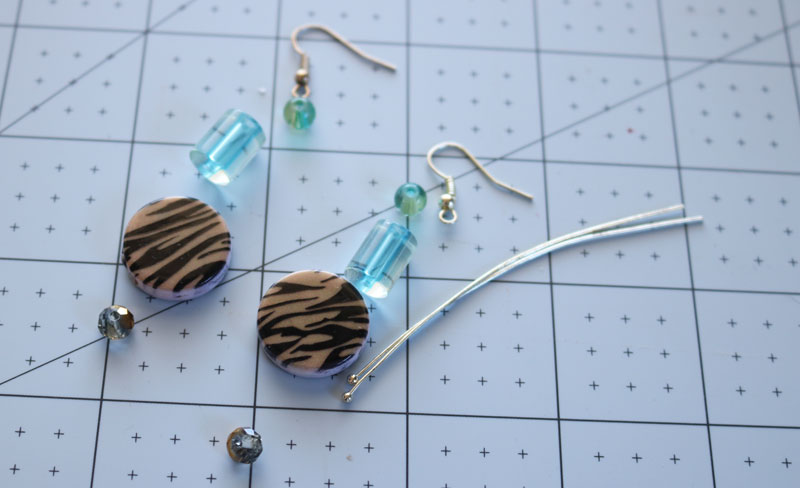
To make this DIY Floral Birdhouse, you’ll need:
Small wooden birdhouse from the craft store
Small wooden petal shapes found in the wood aisle of the craft store
Large and small wooden leaf shapes
Paint
Paintbrush
Hot Glue

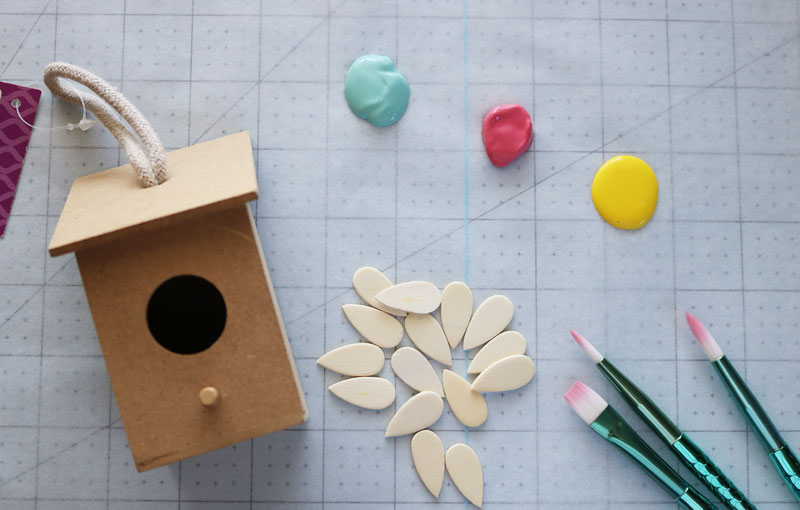
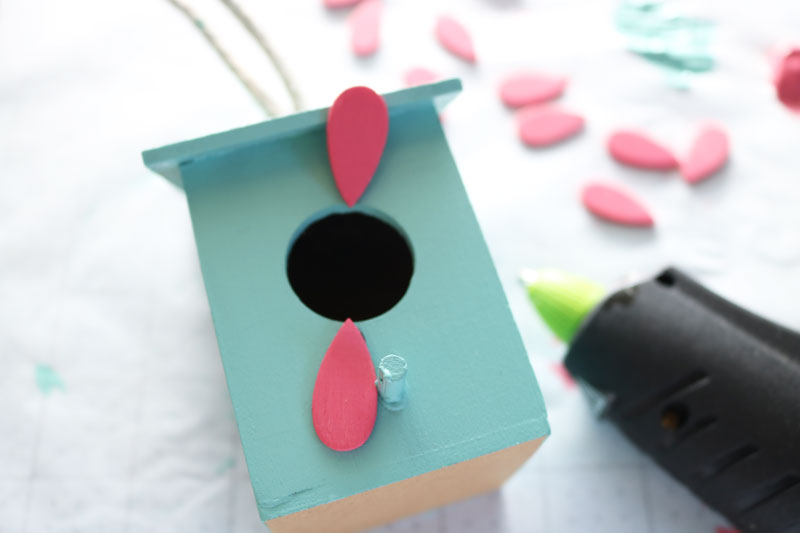
Start by painting the birdhouse and small wooden petals. Allow to dry, this will only take a few minutes.

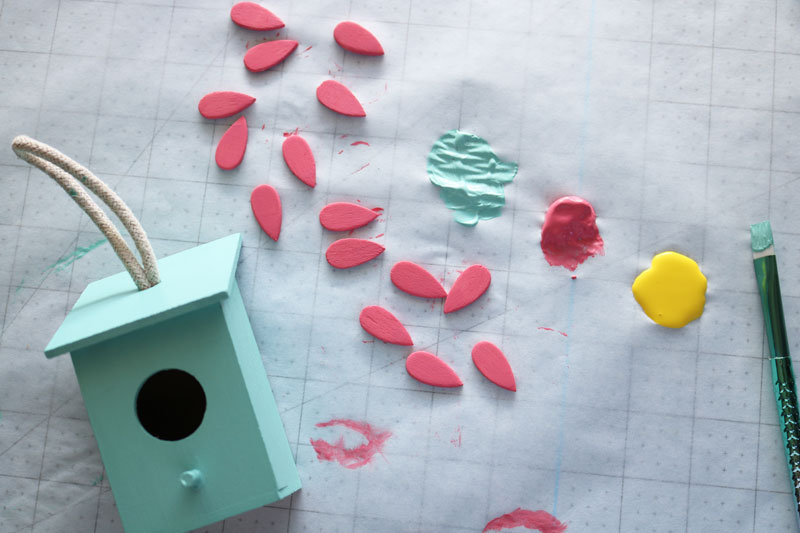
Start by gluing one of the petals on one side of the wooden peg. Glue a second petal exactly across from the peg. The birdhouse roof is in the way, so I just glued the petal at a slant. I thought this might look strange, but it turns out completely fine in the end!

Add petals exactly between the first two, on either side. Then add more petals between those to fill out the flower.

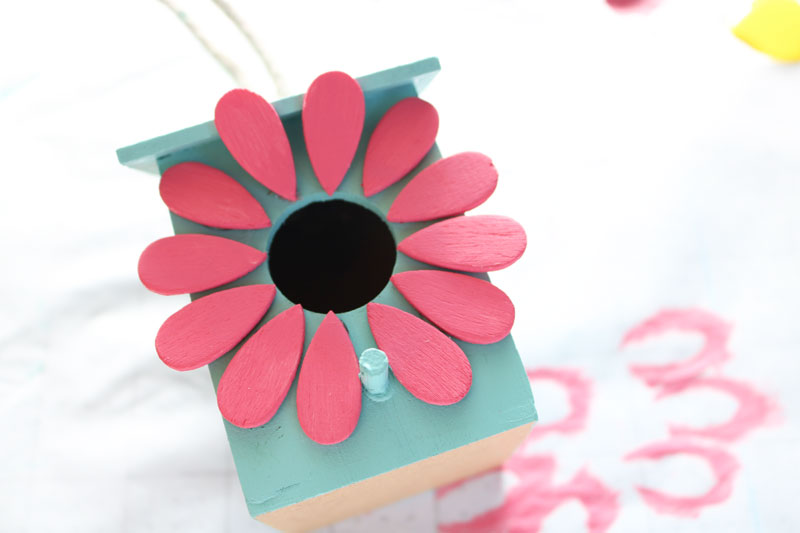
Add yellow dots for interest.

If you want more fun, paint a medium and large leaf shape green. Add a couple paint lines for the veins in the leaves.

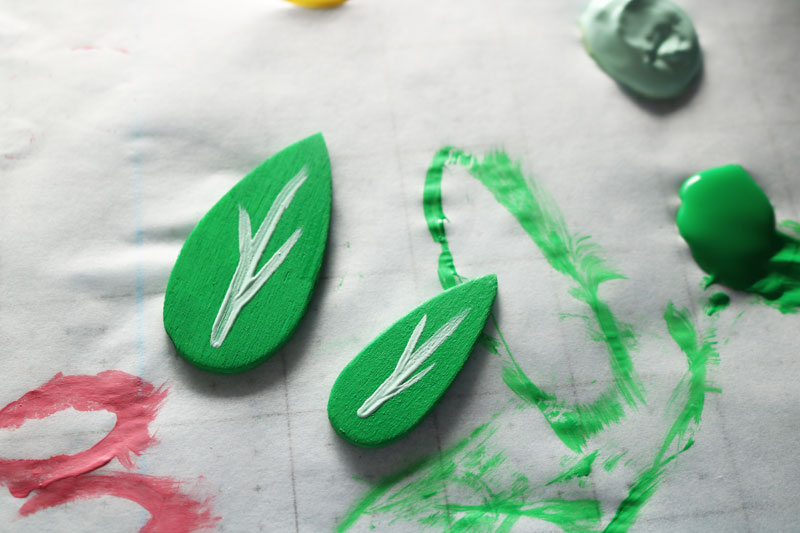
Glue to the back side of the birdhouse.

That’s it! Your simple DIY Floral Birdhouse is complete!

Trendy Earrings

Whenever I’m looking for a simple craft, I always go for earrings. Earrings are simple to make, and I can always use another pair!

These earrings are super simple to make, and you can change up the beads to whatever style you prefer! And if you want to check out some other fun crafts, scroll all the way down to check out some other fun craft ideas!

To make these trendy earrings, you’ll need:
Beads
Head Pins or Ball Pins
Earring Wires
Round Nosed Pliers

String the beads onto the ball pin. Place the round nosed pliers against the top bead, and curve the wire at a 90 degree angle. This will leave room for the twist at the end.

Move the pliers above the bend. Wrap the wire around the pliers.

Add the earring wire. Then wrap the wire around the base of the loop.

Complete the second earring in the same way.

And check out these other great craft ideas!

At Pineapple Paper Co., you’ll find this fun St. Patrick’s Day pot of gold craft!

Looking to elevate your style? Check out these adorable tassels at Shrimp Salad Circus.

I love this great luggage tag that Jen at 100 Directions whipped up.

Get ready for spring with this tulip wreath from The Country Chic Cottage.

You can find the step-by-step for this hedgehog phone holder at Tried and True blog.

These Easter bath bombs from the Glue Sticks Blog have a fun surprise inside!

See Lindsay has a fun take on a memory game for the kids.

These faux chocolate bunny napkin rings from 365 Days of Crafts are sure to be a hit this Easter!

Creatively Beth makes an adorable rainbow craft that is also easy to make.

This embossed card from EJ’s Fun crafting is a fun and simple craft idea as well!

BE sure to swing back by tomorrow for another fun and fast craft and more great crafting ideas! Tomorrow we’ll be playing with paint, and I have a great spring craft you won’t want to miss!

Wild Thing Free SVG

Baseball fan? Or do you just have a wild thing in your life? Use this free Wild Thing SVG in your upcoming craft project … or use any one of these other fabulous baseball themed SVG files that I have linked to down below. All of these baseball themed SVGs are totally free!!

You can easily convert this Wild Thing SVG to a fun tee! You just need to get your tee and your vinyl. You can cut the SVG with your Cricut.

I fused my vinyl in place using my Cricut EasyPress.

Get your free Wild Thing SVG by signing up for our weekly emails!


The file is free!

Sign up below to get your free SVG file!

You’ve successfully signed up! Check your email for details.

And check out all these other totally free (and totally amazing) baseball themed SVG files! Do you have a favorite?

Unicorn Card

Invitations and thank you notes are two great reasons to need a card if you’re planning a party. If you’re going to a party, a card is a great way to add a personal note to a gift, and a great place to tuck a gift card or some cash for the gift recipient. This Unicorn Card is incredibly simple to make, and is made special by using Cricut papers that add the extra detail (so that you don’t have to!)

To make the Unicorn Card, you’ll need your Cricut Maker as well as Cricut Glitter paper and Cricut Foil Paper. I know this black doesn’t look like foil, but it is! You’ll also want the Cricut Double Scoring wheel to make the folds. The double scoring wheel is exclusive to the Cricut Maker. Lastly, you’ll want hot glue to put it all together. For these kinds of materials, I recommend hot glue.

You can use my cut file to make your Unicorn card.

Once you have the pieces cut and folded, use hot glue on the back of the unicorn image to glue it to the glitter front of the card.

Fold together and glue the sides of the envelope. Make sure that you don’t glue down the top flap – you still want your envelope to be able to open!

Your card is all done!

Such a fun card to give as a gift, with a gift, or say thank you for a gift!

And be sure to check out all these other fabulous party crafts that you can make with your Cricut!

You are invited to the Inlinkz link party!

Click here to enter

Unicorn Gift Tags

I’m always charmed by party favors. Giving a gift to someone who comes to your party is just so lovely, don’t you think? So, I love making these favors something special. One way to do that is to wrap them as gifts! And add themed thank-you tags like these simple Unicorn gift tags that were cut on the Cricut.

To make these unicorn gift tags, you’ll need:
Scrapbook paper or Cardstock
Cricut Pen
Cricut Machine

You can use my unicorn gift tag cut file, or you can design your own in Cricut Design Space.

Cut out the design and have Cricut write as well.

Then just tie the tag onto the wrapped gifts (I wrapped mine with sheets of coordinating tissue paper) with some ribbon, and you’re done!

These are favors you’ll love passing out!

Check out these other fabulous party ideas that you can make with your Cricut!

You are invited to the Inlinkz link party!

Click here to enter

Birthday Luminarias

Are you ready for some more awesome birthday party craft ideas? I sure hope your answer is YES, because that’s what is happening today! I’m sharing these super simple to make Birthday Luminarias, that you can absolutely customize for any party theme!

If you’re looking for other awesome party crafts, be sure to scroll all the way down for more fabulous party craft ideas!

To make these Birthday Luminarias, you’ll need:
12×12 scrapbook paper
Vellum
Cricut machine
Hot Glue
Battery-operated tea lights

You can use my 40th birthday unicorn luminaria file as a base for your luminaria. You can cover either image with a square that you can weld in place to remove either the number, the unicorn, or both. And then you can add your own number and or design and slice.

Remember! Slice will only work when you have two layers – and exactly two layers – selected. So make sure that you don’t select the scoring lines. Selecting the scoring lines will prevent slice from working.

If you want to keep your paper from curling when you remove it from the mat, you can curl the mat away from the paper rather than peeling the paper off the mat.

Once you have your file, you can cut it out and fold on the scoring lines.

Cut the vellum into 3 1/2″ x 4″ rectangles. Hot glue in place over the cut-outs. You are gluing the vellum to the inside of the luminaria.

Fold the luminaria together, then glue the side seam.

Fold the bottom of the box. Glue the bottom flap.

To make sure the luminaria does not tip, before the glue cools, sit the luminaria upright and press down with a pen to make sure the bottom is flat.

Turn on your flameless tea lights (DO NOT USE CANDLES THAT HAVE ACTUAL FLAME!), and put them in the luminarias.

If you’re looking for more fabulous party crafts you can make with your Cricut, check out these great ideas:

You are invited to the Inlinkz link party!

Click here to enter

Birthday Girl Tee

Some of us love it when everybody knows it is our birthday. And for those of us who love being the center of attention, this Birthday Girl Tee is perfect. Using just one color of iron on vinyl, it is very quick to make, and can be used year after year!

Speaking of Birthdays and Parties … I have a bunch of friends who are sharing party crafts of their own! Be sure to scroll down to check out all their awesome party craft projects that you can make on your Cricut!

To make this Birthday Girl Tee, you’ll need:

T-shirt that fits the birthday girl
A sheet of iron on vinyl – pick a contrasting color or pattern
Cricut machine
Weeding tools
Iron or Cricut Easy Press

To cut out the design, you can use the Cricut Design Space File I have here. I have it sized for an adult Large tee. You may need to resize it depending on the size shirt you’re using.

Make sure that you mirror the design before cutting – essential when cutting out iron on vinyl.

Once the design has cut, go ahead and weed the design. Then follow the instructions to fuse on the iron on. Different types of iron on have different temperature recommendations and fuse times, so be sure to double-check those before fusing down your iron on.

Once you’ve got it fused in place, you pull back the carrier sheet, and you’re all done! Easy peasy, lemon squeezy!

Ready for all those other fabulous Cricut Party ideas I promised you? Check these out!

You are invited to the Inlinkz link party!

Click here to enter

I love party favors, so this party-cracker style favor from See Linsday is perfect!!

Artsy Fartsy Mama created this favor box that looks like a slice of cake – and how adorable is that face detail in the candle??

How adorable is this Donut Party invitation that Charynn at Pineapple Paper Company whipped up!?

I am in love with this St. Patrick’s Day Party Pack from Michelle’s Party Plan it!!

And these awesome party crafts from my co-hosts for this series…

Jessica at Mad in Crafts made this adorable and easy to make circle garland.

Over at The Country Chic Cottage, Angie whipped up some mason jar lid coasters, perfect for keeping your tables neat at your next party.

Jen from 100 Directions made these adorable party flags, perfect for putting on cupcakes!

Custom Birthday Streamers

I love customizing birthday parties! And one of the easiest ways is by customizing the party decor – including these easy-to-make custom birthday streamers! Yes, the custom birthday streamers are put together with a sewing machine, but sewing on paper is super simple. You don’t need to have any sewing experience to make these streamers!

All week long, I’ll be sharing party projects you can make with your Cricut, and so are a bunch of my crafty friends! Be sure to scroll down to check out their fabulous Cricut Party Craft Ideas!

To make these birthday streamers, you’ll need:

Scrapbook paper – I went with assorted pinks and aquas to go with the Party Decor
Sewing Machine with thread
Cricut Machine and mat
Cardboard tube (such as a paper towel roll or roll from Cricut Vinyl)

In Cricut Design space, pick your design. I went with the numbers 4 and 0 for this fortieth birthday party. To add interest, I looked through Cricut images and found a unicorn head that matches the unicorn theme. Since the unicorn head is a Cricut Access image, and I have Cricut Access, I get to use this image for free!

Duplicate the image until you’ve filled an area 11.5″ x 11.5″. That is the largest area you can cut on a 12″ x 12″ cutting mat (and on 12″ x 12″ paper). Then cut out all your pieces. Since I was using assorted papers, I cut out multiple pages of each before I started putting them together.

The easiest way to put them all together is to stitch them on the sewing machine. This is super simple, and you don’t need any sewing experience.

One trick is to bump up the stitch length as high as it will go. You don’t need the stitches close together on paper.

Give yourself several inches of thread to start. You can use this to tie up the streamers after you’re done making them.

Stitch through the middle of your designs. Between each image, add a couple stitches. This will give you length on your streamers, and also allow them to spin freely.

Once you’ve started adding pieces, tape the thread ends to your cardboard tube, and start rolling the streamer onto the cardboard tube. This will keep the streamer from getting tangled while making it, and transporting it.

Keep adding more and more images to make your streamer. It will take lots and lots to get a good length! Eventually, your cardboard tube will have a big roll on it.

You can hang up these custom party streamers the same way you hang up your crepe paper streamers. In fact, I think it is fun to have both of them up at the party!

You can make your Custom Birthday Streamers with whatever theme you like – use the images you want, and the letters or numbers you want! You can just use letters – HAPPY BIRTHDAY NAME – or just images (I used blue and red trains for a train party I hosted several years ago). There are so many ways to take this basic technique and make it your own!

Be sure to head to Mad in Crafts, 100 Directions, and The Country Chic Cottage to check out other fabulous crafts you can make with your Cricut Machine!

You are invited to the Inlinkz link party!

Click here to enter

Simple DIY Cards

As a creative person, when I want to send a card, I feel like it should be a DIY card. One that I made or embellished in some way. But in the moment where I want to write the card, I don’t also have time to make it. So, it is handy to have a stack of pre-crafted DIY cards that are just ready for a quick sentiment and a signature. That’s where these simple DIY cards come in! Grab some supplies, and you can whip up a stack of fun cards that are ready to go when the occasion arises!

To make your cards, you’ll need:

Plain scrapbook paper
Decorative scrapbook papers
Paper cutter
Envelopes
Ink and rubber stamps
Adhesive (I like a double sided tape rather than a wet adhesive)
Decorative Washi Tape

Start by cutting your paper. You’ll want to make sure that the papers fit in your envelope – that is super important! So, make sure to cut it smaller than the envelope size. Cutting a 6″ x 8″ strip will fold into a 4″ x 6″ card.

Cut small squares while you’re at it. I like 1 1/2″ x 1 1 /2″ for my squares, but go with what works for you.

Fold your papers in half to make the cards.

Now cut your decorative papers. You’ll want to cut these at least 1/4″ smaller than the front of your card. So, for a 4″ x 6″ card, cut 3 3/4″ x 5 3/4″ or smaller.

Then use your adhesive to secure a decorative paper to the front of each card.

Use a coordinating washi tape to add a stripe of color across the front of each card. Mix it up with different colors!

On each of the small squares, use the rubber stamp to add a sentiment.

Secure the sentiments to the fronts of the cards, and your cards are complete!

Store each card with an envelope to have it ready to go! These cards are quick, simple, and offer the perfect handmade touch!

Want more projects like this one? Check out:
Simple DIY Gift Card Holders
DIY Stampable Gift Tag

100 Books for 100 Days of School

The days have flown by – if you’re looking for a fun way to celebrate 100 days of school, this free SVG file for 100 Days of school is perfect! These 100 books are also a great way to celebrate having read 100 books – either on their own or having 100 books read to them. If you’re celebrating 1000 books before Kindergarten, just duplicate one of the zeros, and now you have an SVG for 1000 books before Kindergarten! Such a versatile cut file!! Be sure to scroll all the way down for the details on how to get this file, and check out all the other fun 100 days SVG files – all totally free!

This post contains affiliate links which provide a commission to this site only when a purchase is made.

After you cut the file out of vinyl (make sure that you mirror the image if you’re using iron on), you need to weed it. Then you’re ready to apply it on a surface.

For adhesive vinyl, use transfer tape to apply the vinyl to your surface. For iron on, you can use a hot iron or the Cricut Easypress to apply the iron on.

Follow the instructions for the type of iron on and surface you’re using to know the temperature settings and time you need to heat the design. Once it has set, you can remove the carrier sheet.

It is that simple to make a 100 days shirt! This tee would be great for a teacher to wear on the 100th day, a librarian, or any student in class! You can also print out the PDF of the 100 image to use as a coloring sheet for students. If you have small handwriting, you might even be able to add the names of some books to the spines!

Leave a comment below to let me know how you’re using this 100 days smarter SVG file. And be sure to check out all the other fabulous totally free SVG files that you can find at the links below!


The file is free!

Sign up below to get your free SVG file!

You’ve successfully signed up! Check your email for details.