Google Eye Monster Jewelry

google eye monster jewelry

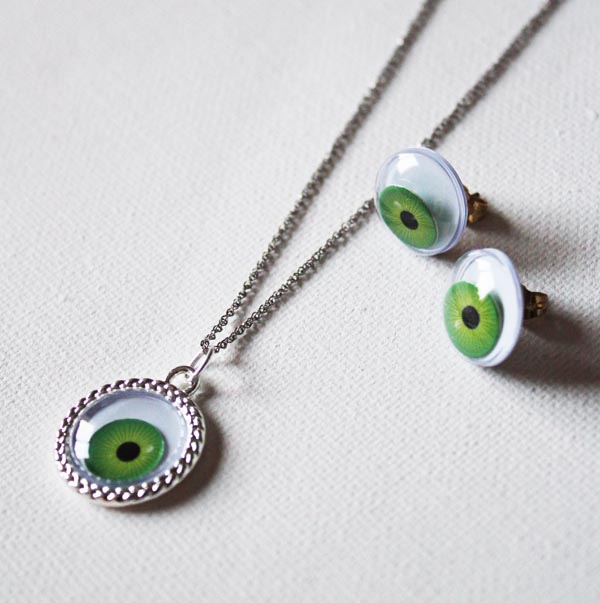
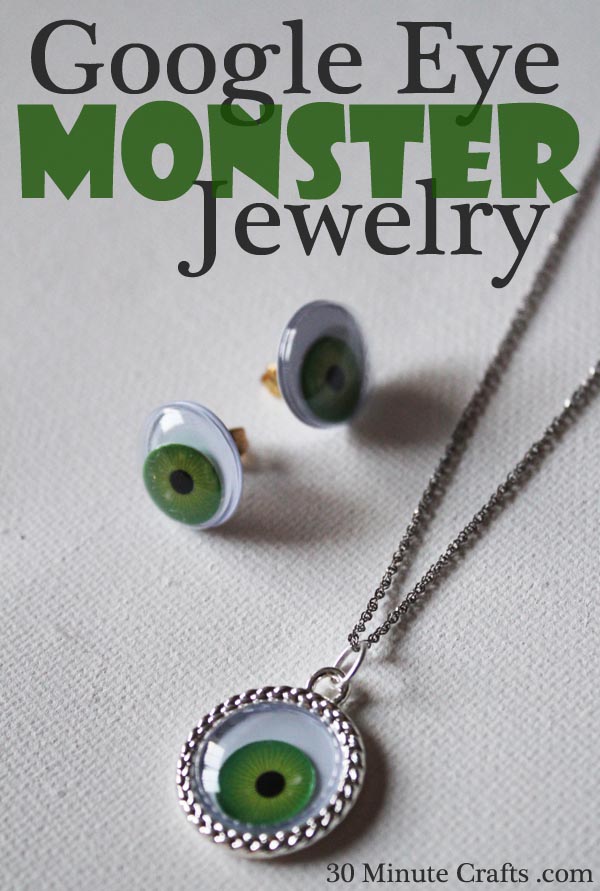
I have a thing for google eyes. Or googly eyes. Whatever you want to call them. I don’t know why, exactly. They are just so much fun. And so simple to craft with. Add two google eyes to a rock, and you’ve got a little rock person. Done. And so simple! And there is such a variety of googly eyes. Big ones, small ones, colored, glow in the dark, with eyelashes… I have a small collection of googly eyes that I use on different projects. And I was super, super excited to make this Google Eye Monster Jewelry. It is insanely simple to make, and is so much fun to wear! Let me show you how…
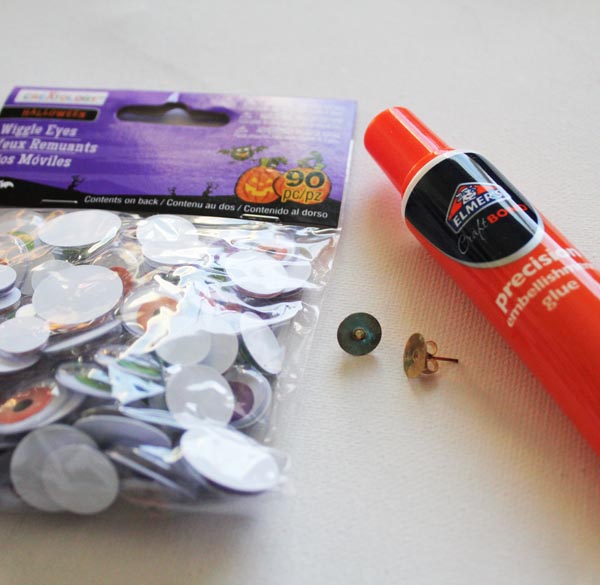
google eye jewelry suppliesStart with:
Earring posts
Jewelry Glue
Google eyes of your choice
Necklace Pendant
Jump Ring
Necklace Chain


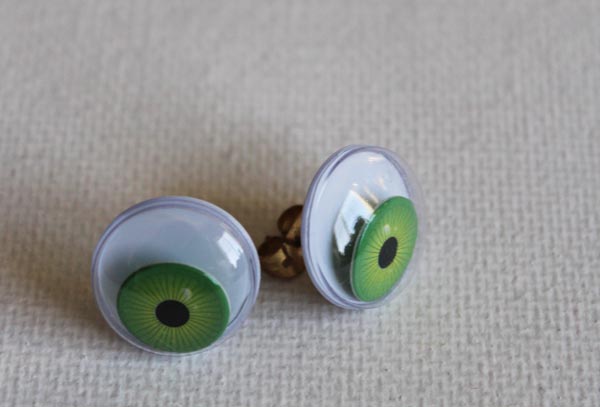
Grab your earring posts and two googly eyes. Put a dab of glue on the earring posts.dab of glue on posts

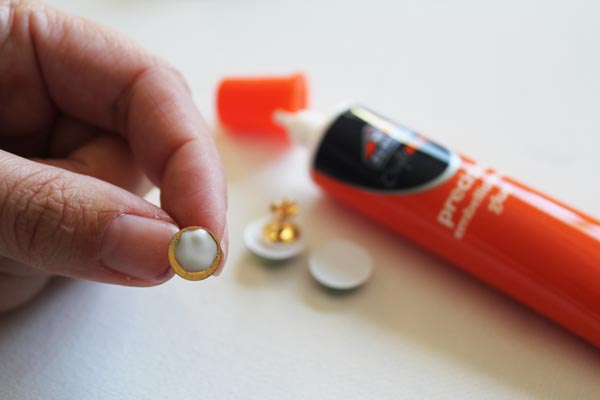
Smoosh your google eyes onto the posts. Don’t center them (you’ll be tempted to). Instead, put the posts towards one side. This side will be the top. Not centering the posts will make them more comfortable to wear, especially on smaller earlobes. glue on posts

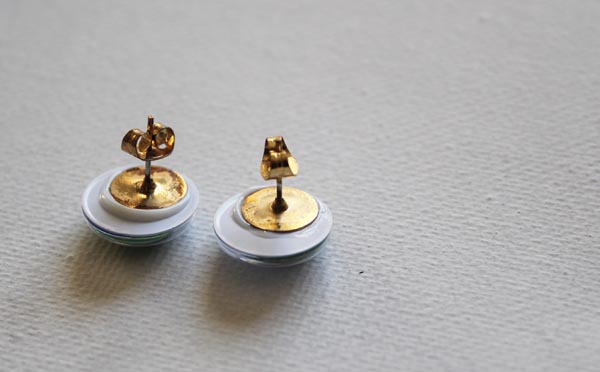
Just let the glue dry, and you’ve got some great googly eye earrings!

google eye earrings

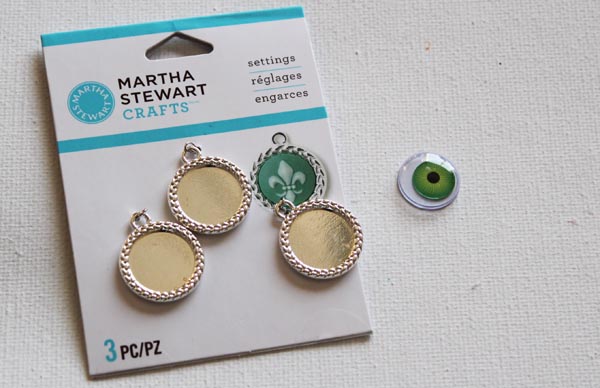
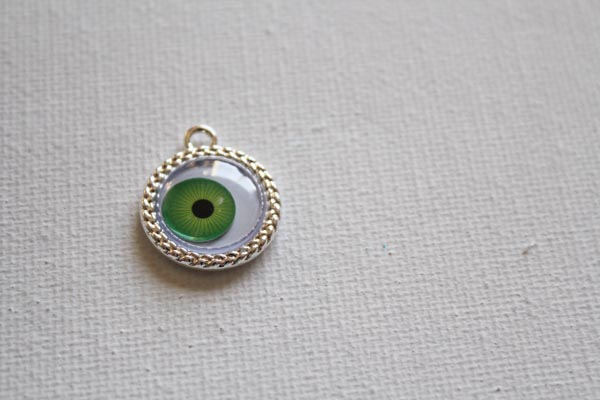
I wanted to make a necklace to go with my earrings. I had these charm bases from Martha Stewart’s Jewelry line, and they fit a google eye PERFECTLY. I love it when that happens!

pendants

Just a very small dab of glue in the middle (enough to secure it, not so much that it gooshes out everywhere) (yes, “gooshes” is a very technical term here).

dab of glue

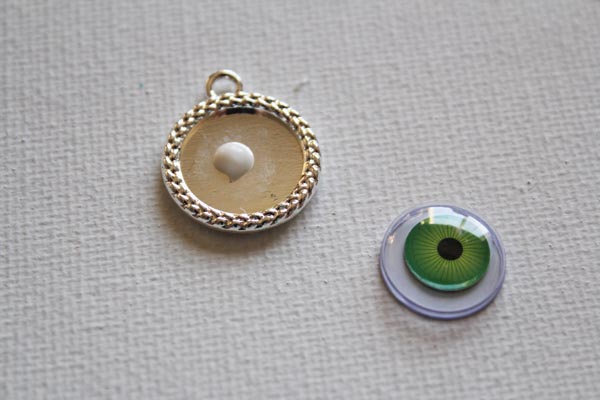
Then I just put my google eye in place, and let it dry. After it dried, I added a jump ring to the top and strung it on a chain for a very spooky looking pendant.

put google eye in pendant

It reminds me a little bit of Mad Eye Moody from Harry Potter… but in Jewelry form!

Mad Eye Moody Harry Potter Jewelry

Fast Thanksgiving Table Decor

Mason Jar Turkey

What? Talking about Thanksgiving already… and it isn’t even Halloween yet? Well, I like to be ahead of the curve over here. Getting you thinking about all the fun Holiday crafting that is coming up, and hopefully inspiring you to do some amazing creating of your own. That doesn’t mean I’ve given up on Halloween yet – I still have lots of fun Halloween goodness to share… it just means I was super excited about hanging out with my friend Angie from The Country Chic Cottage, and working on some Fast Thanksgiving crafts with her.

I made a favor using a mason jar and pipecleaners, and Angie whipped up a napkin ring. These are both great fast Thanksgiving crafts you can use to set your Thanksgiving table… either the kids’ table or the grown-ups’ table!


This video was created as part of our monthly “Crafty Hangouts” series. We get together with a bunch of bloggers to create fun crafting and decor videos. You can check them out at CraftyHangouts.com. If you’re a blogger interested in joining in on a future hangout series, check out our upcoming Hangout Schedule.

fall crafty hangouts

Earbud Hoodie

Earbud hoodie

Making this earbud hoodie is something I’ve had on my mind since last winter. During cooler months, I like to wear a hoodie. The pockets are perfect for all kinds of things, including putting an iPod or other player. I listen to books on Audible while working on projects, but the wires of my earbuds often get in the way. A simple zipper in the lining is a super easy way to solve this problem. Here’s how to make your own Earbud Hoodie:

First, you need a hoodie and a zipper. Any kind of zipper is fine, it just needs to be long enough to extend 3″ further than the top of the pocket to the bottom of the hood.hoodie and zipper

Pin the zipper in place so that the bottom covers the top of the pocket a few inches.pin zipper in place

Trim the top of the zipper, if needed, so that it tucks under the edge of the hood.

trim zipper

Start by stitching down one side of the zipper with a thread color that coordinates with the hoodie. You don’t need a zipper foot – you’ll want your stitches closer to the edge than to the zipper.

stitch down side of zipper

Stitch down the other side.

stitch sides of zipper

Make sure you stitch across the top of the zippers. If you don’t, you can accidentally pull the zipper pull right off the zipper – which is fixable, but a pain!

Unzip the zipper all the way down. Put your hand in hole the pocket from the outside, and find the zipper. Cut a small hole at the base of the open zipper.This is for the cord to feed through.

hole for wire

Thread the plug of your earbuds through the hole, then zip the cord inside the casing made by the zipper, with the earbuds poking out the top.

earbuds out of zipper

Just plug in your player, and you’re all set! If you used a coordinating thread, you will barely be able to notice the stitching on the front of the sweater.

finished ear bud hoodie

IMPORTANT: Make sure to remove the earbuds before you wash your sweater!


Spooky Halloween Table Setting

This is a Sponsored post written by me on behalf of Dollar General for SocialSpark. All opinions are 100% mine.

Spooky Table Setting at 30 Minute Crafts .com

I took a trip to my local Dollar General earlier this week to get some Halloween crafting supplies. I love Halloween, and wanted to put together a table perfect for a Halloween dinner party. Dollar General had everything I needed to set a spooky table.

Dollar General Items for Halloween Table


I bought these awesome Halloween supplies at Dollar General:
Store Brand “Dew”-style soda
Halloween Striped Tights
Plastic Body Parts
Skull Straws
“Undead” Caution Tape
Cobwebs (optional)
Plastic Spiders (optional)
To this I added:
Mini Jars (shown)
Lace Tablecloth
Dark Placemats
White Plates
Silverware
Black Napkins
Everyday Glassware

Creating my table setting was simple. I started by layering my tablecloth, placemats, and china. I set out the silverware, then got to work making everything spooky.

I started with the tights and straws.

Halloween tights and Straws

I cut the tights into sections the height of my glasses. Then slipped the tube over my glass. You can cover about 6 glasses with a single pair of tights.

Halloween Glasses

Add a skeleton straw, and you’ve got some great Halloween glassware!

Next I put the body parts in my small jars.

Body Parts in Jars

The “Mountain Explosion” drink is the perfect color to mimic formaldehyde. I poured it in each jar to cover the fake body part, then closed the lid.

Body Parts in Jars

The carbonation makes it extra spooky – don’t you think?

Finally, I used the “Undead” caution tape.

Undead Caution Tape

I cut off 18″ pieces to tie around the napkins, and put everything together to make the perfect spooky table setting.

Spooky Table Setting


The cobwebs and plastic spiders can be added to the backs of your chairs, or just the general decor.

This is the perfect setting for a Halloween Dinner, Murder-mystery dinner, or Friday the 13th Dinner. Now to figure out what to serve…

Spooky table Setting

As you can see, Dollar General had everything I needed for the perfect spooky table decor! For more great Halloween Crafting ideas, check out Dollar General on Twitter (@DollarGeneral) and like Dollar General on Facebook.

Visit Sponsor's Site

Pink Ribbon Ribbon Wreath

Pink Ribbon Wreath

October is Breast Cancer Awareness Month, which is a big deal to me. I have a history of breast cancer on both sides of my family. Which is scary. Two of my favorite people ever, my mom and my aunt, have fought breast cancer. Lucky for all of us, screenings and treatments have continued to improve, so we’re catching cancer sooner, and treating it better, leading to a lot more survivors.

I wanted to share with you a quick and easy Pink Ribbon Ribbon Wreath. This guy is so easy to make thanks to the roller stamp that my friend Jen Goode sent me. She designed this bad boy, and it is so easy and fun to use! I used it with pink paint to make my ribbon, but you could use it with any color paint or ink to represent any cause – teal for ovarian cancer, orange for Leukemia, whatever color represents your particular cause. Pretty awesome, huh?

wreath suppliesLet’s get started! To make my wreath I used:

Feather wreath (floral section of the craft store)
“Hope” Jumbo stamp wheel designed by Jen Goode for Rollagraph® by Clearsnap
Wide Ribbon
Pink Fabric Paint
Large Flat Lid or Paper Plate
Paintbrush


Start by pouring the paint out onto the lid or paper plate. With the paintbrush, spread out the paint so that you have a thin, even layer. And by thin, I mean THIN. You want it thick enough that you can’t see right through it, but just barely. You can see in the photo below that on my first pass, the paint was too thick. Even so, using the fabric paint kept it from bleeding on the ribbon.

BCA roller stamp

Roll your roller through the paint several times, then roll along the ribbon.

Repeat the process. Having the paint lighter then darker gives it a fun look. Don’t worry too much about matching up the pattern, this design is pretty busy.

printed ribbon

Set the ribbon aside to dry.

Tie the ribbon onto the wreath in a bow, and you’re all done!

Pink ribbon ribbon

I used both a satin and a sheer ribbon for this project, and love the layered look of adding both. You can add additional ribbon for a fuller bow if you like – I kept this pink ribbon project simple.

But, there are so many ways you can use this stamp! Check out these other fun projects made by other bloggers that are part of this series:

BCA-2013-Jen-Goode


30 Minute Doll Quilts

30 minute doll quilts

These little 30 minute doll quilts are great for new quilters, but experienced quilters will also appreciate how quick and easy they are to make. They are made “pillowcase style” with no binding. This is a great way for a beginner to learn the basics of quilting. I also made them without piecing the tops! I used this awesome hummingbird panel from Anna Griffin.

I made these two doll quilts for my two nieces, and they loved them! They are the perfect size for their little dolls. If you want to whip up some quick and easy doll quilts, here is what you need:

Fabric Panel From Anna Griffin with coordinating fabric for backing
Rotary Cutter and Ruler (or scissors if you want to go “old school”)
Pins
Sewing Machine
Batting
Walking foot for your sewing machine (optional but recommended)

supplies for easy doll quilts

Cut your panel, then cut your backing fabric at least 1/2″ bigger. I set a timer to see how quickly I could put these together.

trim backing

Cut your batting the same size as the backing. You can see I’m working on two quilts at once. Layer the pieces like this: Batting on the bottom, then backing (face UP), then the quilt top (face DOWN).

prepare layers of doll quilt

Stitch through all the layers, almost all the way around. Leave a 4″ gap for turning.


stitch through layers

You can see I’ve stitched all the way around, leaving my hole at the top, in the middle of one of the longer sides.

stitched all the way around

Trim the corners. Some people like to trim straight across, but I like to trim a little more. Trimming the corners takes the bulk out of the corners when you turn your quilt right side out. This makes the corners sharper and flatter (they look much nicer).

trim corners

Turn the quilt right side out, taking care with the corners. Fold in the raw edges along the hole, and pin the hole closed.pin opening closed

Stitch all the way around the quilt top, about 1/8″ from the edge. This will close the hole, and give you a pretty, finished-looking edge at the same time.

stitch closed

Now it is time to add some quilting. Attach your walking foot (if you have one), and slowly and carefully outline parts of the panel to make them stand out. Quilting makes your quilt top look pretty, and also keeps the layers together.

quilt the design

stitched mini quilts

Stitch as much as you like to get a pretty, finished doll quilt.

finished doll quilts

Give the doll quilts to your favorite doll-loving kiddo, or use them as decor in your home!

Halloween i-spy Game

This Halloween i-spy game will take you less than 30 minutes to put together – but will entertain the kids for hours! Plus, it gives you an excuse to buy some of that fancy water and see if it is worth the price of the bottle! Sure, the cashier might look at you funny when you explain that it isn’t about the water, it is about the bottle… the kid you gift this to will love it! Though this one is Halloween themed, you can go with any theme that your kiddos will love… as long as the pieces fit into the opening of the bottle!

Halloween i-spy from she's kinda crafty

Have a long car trip in your future? You’ll want to pin this! Make sure you pin from the original source.

Rune Necklace

Rune Necklace on 30 Minute Crafts

Lately, I’ve been into Harry Potter. Which is where I came up with this Rune necklace. Hermione talks about how much more interesting a subject Ancient Runes is than Divination, and in the final book, the Deathly Hallows are mistaken for a rune. I thought it would be fun to incorporate runes into a necklace for a Halloween-worthy look that you can get away wearing to the office. A fun accessory that isn’t too costume-y.

This necklace is also super-easy to make! All you need are:
Sharp Blade
Large Black Beads (with white underneath)
Eye Pins
Chain
Jump Rings
Necklace Clasp

Start by scratching your rune designs into one side of the beads. I made sure that my beads had black over white, so that the bottom layer showed through.

scratch shape into rune

I looked up a list of runes to find the different shapes I wanted. Each has a meaning, so I picked symbols that have meaning to me.

make the runes you want

As you can see, scraping the designs into the beads made the shapes look very raw and rustic – perfect!

I strung the eye pins through the beads, and closed the loop on the other side, using round-nosed pliers.

add eye pins

Then I used jump rings to string them together, and attach them to the necklace chain.

add chain

All that was left was to add the clasp, and my Rune Necklace was complete!

finished rune necklace

This will surely get you in the mood for some more fun Halloween crafts. I’ve teamed up with some of my blogging buddies to share fun Halloween crafts all week long! Check out some of their projects in the linky below:

the creepers are coming button

Craft Lightning Super Spooky Edition – Day 5 Roundup!

Yes, it is the final day of Craft Lightning around here… but not the end of fast crafts! I’ll keep bringing you fun, fast crafts that take 30 Minutes or less, so be sure to come back. Add this blog to your reader, put it in your favorites, or sign up to get a weekly e-mail with all the fast crafting updates.

Today I have NINE awesome fast crafts to share with you, from some of my amazing bloggy friends!

I’ve seen glass blocks done up for Christmas Decor, and have no idea why I never thought of using glass blocks for Halloween crafting… check out this glass block craft by the DIY village and you’ll see that it is such a natural fit!

Glass Block Halloween Craft - DIY Village

Pumpkin crafts are a natural at Halloween, and this Subway Art on a pumpkin by Delicate Construction is such a great fit!

Subway Art Pumpkin - Delicate Construction

There are so many fun ways to craft with bottles, and these fun upcycled bottles by One Artsy Mama are a great Halloween craft! Who doesn’t have bottles lying around that wouldn’t make great spooky decor?

Upcycled Bottles - One Artsy Mama

Decorative Duck Tape has truly changed the face of fast crafting. You can add color and pattern to almost any surface so quickly! Dreamsicle Sisters used it to make this great Houndstooth Pumpkin.

Houndstooth Pumpkin - Dreamsicle Sisters

Dish up some fun treats this Halloween in this fun Candy Corn pouch that Cyn from Creative Cynchronicity whipped up. I have to admit… Candy Corn is one of my favorite Halloween treats!

Candy Corn Pouch - Creative Cyncronicity

Mummies are another Halloween staple. Turning a pumpkin into a mummy is such a fun idea! Read all about how to do it on LisaStuf’s blog!

Mummy Pumpkin - Lisa Stuf Blogspot

Speaking of things that go “bump” in the night… check out this fun skeleton made out of paper plates from Mom Endeavors!

Paper Plate Skeleton - Mom Endeavors

Have you ever heard of double-stenciling? I hadn’t until I read this great Boo Shirt Tutorial from The Country Chic Cottage! Now I can’t wait to go and double-stencil something! painted boo halloween shirt diy - The Country Chic Cottage

And in case you missed my project from earlier today, I added a little trendy to my Halloween decor with this Ikat pumpkin plate!

ikat pumpkin plate

If you missed any of this week, be sure to check out the day one, day two, day three, and day four roundups… and come back soon! I have more fun and fast crafting tutorials here all the time!

15 Minute Ikat Pumpkin Plate

ikat pumpkin plate

When I saw this Ikat plate in the discount section at Michael’s, I fell in love with the packaging. I thought it would make a cute shadowbox. But I couldn’t justify buying it just for the packaging (could I?), so I challenged myself to come up with a project using the plate. This project is super simple, you only need 4 supplies, and 15 minutes!


This Ikat pumpkin plate is the last project in our Craft Lightning series this week. Angie from the Country Chic Cottage and I have been sharing Halloween projects that can be done in 15 minutes or less all week, along with our blogging buddies. Swing back by this evening for the final roundup!

Make an Ikat pumpkin plateTo make this plate, you need:

Small plate with Ikat design
Decoart Glass Paint
Paintbrush
Alcohol

Start by wiping down your plate with alcohol to clean the surface.

wipe down plate with alcohol

I looked up a pumpkin design on my phone, and used that as my “model” as I drew a pumpkin on my plate.

start drawing

After the pumpkin was finished, I saw how un-centered he was, so I added some vines to balance the design.

add vines

Then I started filling in the outside with paint.

add paint

I spread the paint out, and used an up-down motion with the side of my paintbrush to get a textured look.

add texture to paint

I continued this all around the plate… all that was left was to wait for it to dry!

fill outside with texture

Make sure to come back tonight for more great fast-crafting Halloween projects!